Video
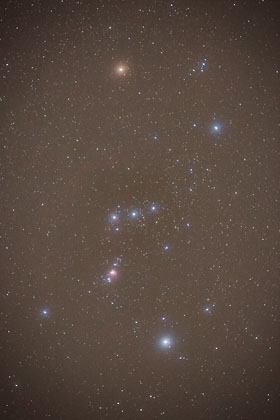
The processing that we will apply to our images is designed to make the astrophotograph look good aesthetically. This type of processing is designed only to produce "pretty pictures" and not scientifically accurate data. The image of Orion seen above has been processed with the basic steps listed above. It was taken with a Canon 20Da DSLR camera. It was a single frame, 30-second exposure shot with a lens of 35mm focal length at f/2.8 at ISO 3200 with a fog filter to diffuse the stars. It was taken at 33F ambient temperature. The original was a JPEG shot in the camera with the white balance set to daylight. Contrast and sharpening were set to normal, and no special color correction was applied in the camera. In-camera noise reduction was turned off.
JPEG vs. Raw These basic image processing steps assume that you have shot a JPEG file in the camera. Raw file processing will be discussed in the next section on advanced image calibration and processing. CMOS and CCD chips in DSLR cameras are linear sensors. Human perception, however, is not linear. The original linear data from the sensor must have a non-linear tonal curve applied to it to make it look like a normal picture. All of this is done in the camera before the file is written to memory if JPEG is selected as the file format. If raw is chosen as the file format, and the data is opened as a linear 16-bit file, such as is recommended for advanced image processing, then we must apply these non-linear curves to the raw data. For this example of Orion, these non-linear curves have already been applied to the JPEG image in the camera. If we had shot a normal daytime image as a JPEG and then opened that JPEG file in Photoshop, it would look like a normal picture. This is where we are starting with this astronomical image. Much of the data processing in terms of tonal curves and white balance have already been done in the camera. There is more that we can do however to make the image look better. Archive the Original, Work on a Copy Before making any adjustments to the original, it should be archived to an optical media such as a CD-R. This original image should not be touched again. When working on an image, always work on a copy. Do not work on the original file, just in case we, somehow, screw it up royally, we can always go back to the pristine, untouched, original and start over. Before any adjustments are made to the image, the original JPEG should be opened and uncompressed and then saved in the TIFF file format. Be careful not to overwrite the original. Choose Save As instead of Save. This now becomes your new original. I usually save it on my hard drive, and write-protect it by right clicking on it, selecting Properties > Attributes > check on Read-only. Then when I open it to work on it, I immediately make a copy to work on. This is the third copy, but since the data is digital, we can make as many perfect copies as we want. Never open up a JPEG and do anything to it and re-save it as a JPEG. These multiple compressions in a lossy-format such as JPEG will lose data every time you re-compress them. If you save them in a lossless format, such as TIFF, you can open them and work on them as many times as you want, and you won't lose data from compression. |
|||||||
|
Back | Up | Next |