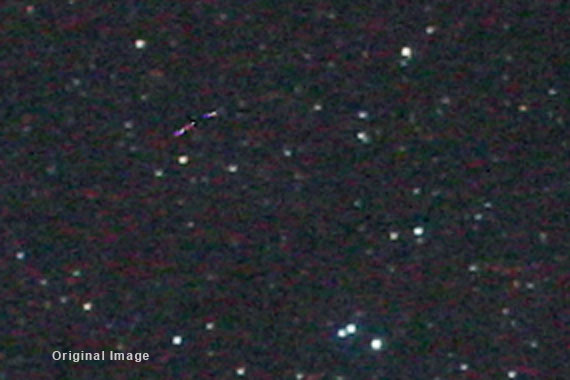
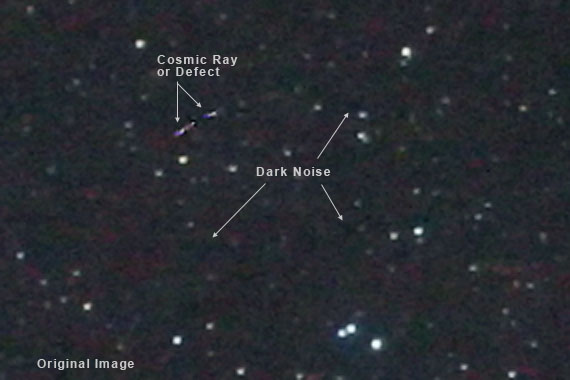
Video It's difficult to see the noise in the image at the reduced image scale necessary to show the full-frame image on these web pages, but the noise has been made worse by the adjustments we have done to the image. We have increased the contrast by adjusting the black and white points, which has also increased the visibility of the noise. When the image is enlarged to 100 percent, the noise is becoming objectionable. Double click on the zoom tool to enlarge the image to 100 percent. Click inside the image again with the zoom tool to enlarge it even more. You will see that the noise in the background is much more noticeable. This is because as we stretched the contrast of the image, the noise was also stretched and made more visible. This noise after stretching can be reduced by starting with a higher signal-to-noise ratio before stretching. This is accomplished primarily by having more signal to start with, which means stacking multiple originals. Calibrating with dark frames will also help tremendously. The noise in this image consists of an uneven background and red splotches. There are no hot pixels because the image was shot at a fairly cold ambient temperature of 33F.
Because we only had one frame to start with here, we are forced to reduce the noise with software. For this example, we'll use Noise Ninja, a commercial plug-in for Photoshop. 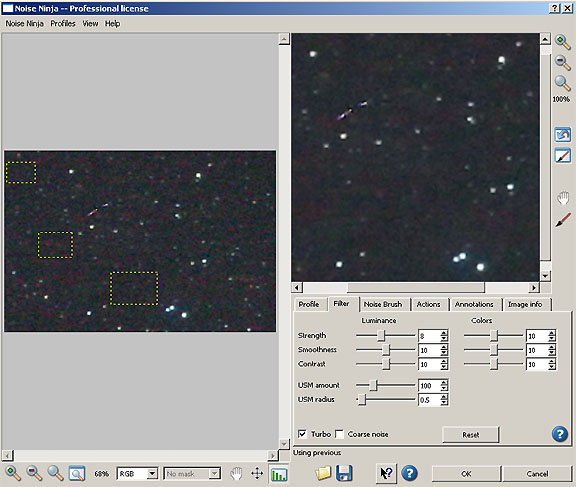
Let Noise Ninja build a custom profile, or make selection areas yourself. Adjust parameters. Note how it has also gotten rid of the large red splotches. Fade the filter. Complete noise reduction makes the image look plastic. Fix Cosmetic Imperfections If there are any cosmetic imperfections in the image, such as shadows from dust on the sensor's cover glass, or hot pixels, we can use Photoshop's standard tools such as the clone tool or healing brush to fix them. In this image, there is what appears to be a cosmic-ray strike. This is not unusual with CCD or CMOS sensors because of their sensitivity. Although this is a record of a real event, it is not very aesthetic because it looks like a defect. If there is any doubt about whether an artifact is a real object or not, compare it to other frames that you have shot. Generally noise and cosmic-ray strikes do not repeat exactly the same from frame to frame. If you think you have discovered a new comet or supernova because you see something in one of your frames that you don't find on the charts, or in other peoples pictures, you must check it against other frames to be sure it is real. The chances are, it isn't. Even some optical defects and reflections can repeat from frame to frame, so be careful not to embarrass yourself by sending off a telegram to the International Astronomical Union's Central Bureau of Astronomical Telegrams, and be sure to read "So You Think You've Discovered A Comet..." first.
In Photoshop CS, we can easily remove it with the Healing Brush, as well as touch up some dark "holes" strewn throughout the image. Just remember not to remove any real stars or create any unreal ones. |
||||||
|
Back | Up | Next |