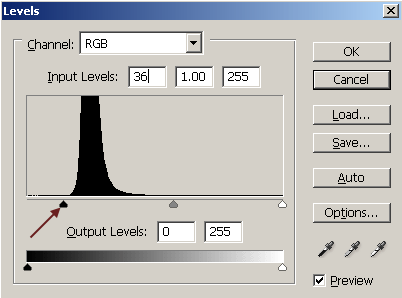
Video Setting the black point is a balancing act. Having a true black at 0,0,0 will maximize the dynamic range and contrast of the image. This is normally a desirable thing in most images. But with the unusual nature of deep-sky astrophotography, setting the black point too dark runs the unacceptable risk of losing faint detail in images. A reasonable compromise is to move the black point slider to just before the start of the mountain of pixels that represent the sky background in the histogram as we saw in the previous section. This will maximize the dynamic range and still leave some room in the shadows. Once the sky background has been neutralized we can set the black point in the image. The black point technically defines which pixels in the image will be mapped to 0,0,0 or pure black with no detail. However, with long-exposure deep-sky images, the sky background should not be made pure black. Even though the sky appears black to our eyes at night, we are exposing long enough so that the sky should not be black in the image. As discussed in the previous section, the sky at night really does have color if exposed long enough. We have neutralized this color from air glow or man-made light pollution to make the sky background close to being a neutral gray. We really do not want to make the sky background black. Much of the faintest detail in many deep-sky objects is very dark, some of it barely above the sky background. If we make the sky black, we will have great difficulty in being able to see this detail. Many people's monitors are not adjusted correctly and this detail will be lost when they view images with a black sky. It is also very difficult to reproduce dark detail like this when the image is printed. The "black" point of an image does not have to be set to pure black. We can actually map the darkest pixels in the image to whatever values we want. It's usually best to set the sky background to somewhere between 20,20,20 and 40,40,40, depending on the image and its contents. For this example, we will use the image that we have previously flat-fielded. Create another levels adjustment layer. Call it "Black Points". In the pull down menus, go to: Layer > New Adjustment Layer > Levels.
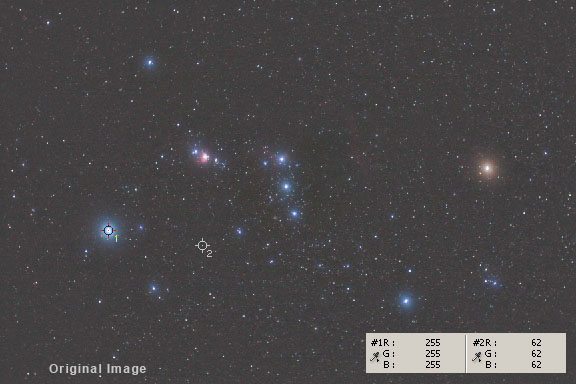
Since we have already neutralized the image, we can just use the black point slider in the combined RGB Channel. Drag it to the right while monitoring the pixel values in the info palette under color sample point 2.
A good rule of thumb to use for deciding how much to move the black point slider to the right is to move it until just before the "mountain" begins in the histogram in the combined RGB channel. At this point, the pixel values for color sample point 2 are about 30,30,31. Hold your mouse cursor over the image to see a comparison between the before and after adjustments to the image as well as the pixel values. It should be noted that while the info palette and color sample tools provide an objective measurement of the colors in the image, it is not a perfect tool because there can be many different colored pixels that make up the sky background. At most magnifications they blend into one overall color. If the image is enlarged to its maximum magnification, we can see that the sky background is not uniform at all. The info palette readout depends on the location of the color sample point. Moving the cursor around in the image it is easy to see pixel values change by as many as 5 to 10 points in areas of sky that look uniform.
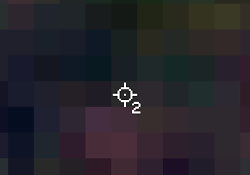
If we enlarge the image so that we can see individual pixels, as in the image at right which is enlarged to 1600 percent, we will see a tremendous variation, even in what appears to be an even-toned area. Simply selecting a different point for measurement will yield different pixel values. This is typical of astronomical images. So, while it is important to read the numbers as a guide, the final judgment should be made on the visual display of the image. This goes to show that an image is not just numbers, but really more than that. An image is the visual sensation perceived by a human observer when it is viewed on a monitor, or print. If you personally feel that the color of the image is off, then adjust it until it is pleasing to you. Remember though that your perception is based on your particular monitor, and everyone's monitors are going to be different, sometimes by large amounts. The exact same image, displaying the exact same pixel values, will look different on different monitors. That is why using the numbers is a good objective guide for a subjective aesthetic decision on the final color. On the other hand, the numbers do not lie. If you display a grayscale step wedge with neutral steps, and any of the steps do not look gray to your eye, you will know that something is wrong with your monitor, or that it is not calibrated correctly.
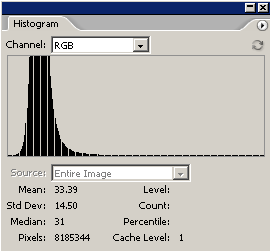
Now look at the histogram of the image. You'll see gaps. This is because we started with 8-bit data and only 256 steps of tone in the original image, and we adjusted it and stretched it quite a bit. We need to be careful here because if the original data is so bad that it requires a lot of adjustments, we may end up posterizing the image and the gaps that are seen in the histogram will be visible in the image as discrete steps of tone instead of a smooth change from one tone to the next. In this particular case, the gaps are not large enough to be visible in the image. If we had shot a raw image to start with, and then preformed these same manipulations, we would have had many more steps of tone to work with, 4096 instead of 256, and we could have performed even more extensive adjustments and not worried about posterization. That's why raw images are so powerful for astrophotography. Because they are shot in a higher bit-depth, they have more steps of tone to work with, and we can perform more adjustments before degradation becomes visible. |
||||||||||
|
Back | Up | Next |