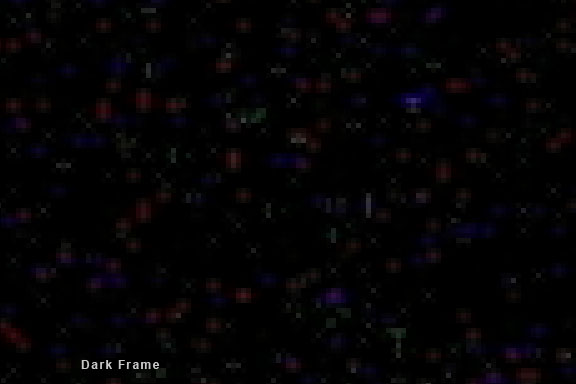
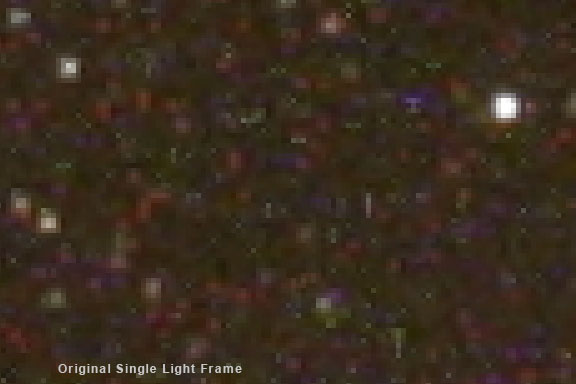
Video In our example image of Orion that we saw in the previous section, we only have a single light frame, and no dark frames. We can get away with this because the image was shot at a low ambient temperature and there isn't much thermal signal present. If we had shot at a higher ambient temperature, the situation would have been very different. There would have been thermal signal present in the form of hot pixels and color blobs that we would have needed to deal with. We will take a little detour here and discuss the great benefits of using dark frames to remove thermal signal, even for JPEG images. Thermal Signal Dark frames record the thermal signal in a DSLR camera. This is signal that is generated by heat in the camera, even when no photons are hitting the sensor. This signal is present in all frames, including light frames shot at long exposures. We can remove this thermal signal from the light frames by subtracting a "dark" frame. Shooting several dark frames and averaging them together to create a master dark frame can yield even better results.
To shoot a dark frame, take your camera off of the telescope and put the body cap on, and cover the viewfinder eyepiece with its cover or a piece of black tape so that no light reaches the sensor. Then shoot an exposure, or series of exposures, equal in length to the light frame exposure, at the same ISO and ambient temperature as the light frames. Even if you only have one light frame, it can benefit from subtracting a dark frame to remove the thermal signal. Subtracting a dark frame, or master dark frame, is optimally done with Raw images. However, even JPEG images can benefit from dark frame subtraction. Both the light and dark frames can be JPEG images. If you shoot more than one dark frame, average them together to create a master dark frame. Then subtract the master dark frame from each individual light frame. Averaging multiple frames can most easily be accomplished in an astronomical image processing program like Images Plus, but it can be done in a regular image processing program like Photoshop.
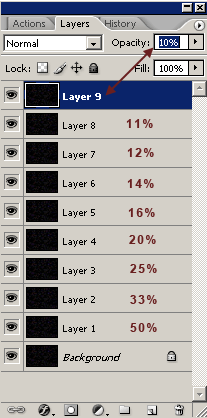
Open the first dark frame that you have shot. This will be your base image. Open the second dark frame. Copy and paste the second image as a layer on top of the first image. Change the blending percentage to 50 percent in the Layer's palette. Close the second image. Open the third dark frame. Copy and paste it into the first image. Change the blending percentage of this third layer to 33 percent. Repeat for each additional dark frame that you have. The following list gives the blending percentage for each layer as they are seen in Photoshop's Layers Palette. The background layer will always be on the bottom, and each additional layer is added on top.
You don't have to have the total number of images and layers listed here, you may have more or less, although more than 10 are probably more easily combined in groups or in a dedicated astronomical image processing program. After you have all of the individual dark frames pasted as layers, and the blending percentages set correctly, then flatten the image. Go to Layer > Flatten Image. Then save the flattened image as an uncompressed TIFF File with the name "MasterDark.TIF".
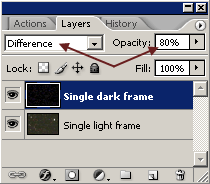
In the mouse-over example image above, a single dark frame has been subtracted from a single light frame, removing much of the thermal signal in the form of hot pixels and red and blue splotches of color, and improving the image. Note however that the background of the image after a dark frame has been subtracted still contains a lot of noise. This can be improved by averaging several light frames together as we will see in the next section. When you use Photoshop to subtract a dark frame, enlarge the image several hundred percent so that you can see individual pixels. You will be able to see the hot pixels and color noise blobs. If the temperature of your dark was higher than the temperature of your light frame, you may be left with dark holes after the subtraction. In this case you can adjust the opacity of the dark-frame layer as described in step 6 below, and make the match a little better. Subtract a Dark Frame from Each Individual Light Frame
In-Camera Noise Reduction vs Dark Frame Subtraction DSLR cameras that offer in-camera noise reduction perform dark-frame subtraction in the camera to accomplish this. After the actual exposure to light is finished, the camera's shutter closes and a dark frame is shot in the camera. The camera is busy during this time and another exposure of the astronomical object can not be shot until the in-camera dark frame is finished. Software in the camera then automatically subtracts this dark frame from the light frame. If you shot with the in-camera noise reduction turned on, you won't need to subtract separate dark frames, nor should you attempt to do both. Either shoot separate dark frames or use the in-camera noise reduction. But the price to pay for using in-camera noise reduction is essentially doubling of the exposure times without doubling of the photons that are gathered. It is better to spend clear dark-sky time collecting photos with light exposures and then shooting the darks later. The Problem of Temperature Matching in a DSLR Camera Because the temperature inside the camera is heating up as multiple exposures are taken, the thermal signal will be different in each frame. Technically, to subtract the thermal signal from a light frame, the temperature of the light frames and dark frames must be exactly the same. This is almost impossible to do with a DSLR camera. If the temperature of the darks does not match the lights, hot pixels or dark holes may result from subtracting a dark frame with a different thermal signal than the thermal signal in the light frame. A single dark frame taken immediately after a light frame will give the closest match because the temperature will be the closest. Unfortunately, this creates the same problem as with in-camera noise reduction - it takes twice as long to shoot a light and a dark, but no photons are gathered for half of the total time. It is usually better to gather more photons because this always increases the signal-to-noise ratio. If single dark frames are going to be used with single light frames, then it is probably better to let the camera perform the dark frame subtraction with the in-camera noise reduction function turned on. If multiple dark frames are shot to create a master dark frame, then in-camera noise reduction should be turned off. Multiple light and dark frames shot at different temperatures from in-camera heating can be calibrated by using an astronomical image processing program like Images Plus that performs automatic dark frame matching where the darks are adjusted to match the lights. It is possible to do some manual matching by adjusting the opacity of the dark-frame layer that is subtracted from the light frame in the Photoshop layer subtraction method that is described above. |
||||||||||
|
Back | Up | Next |