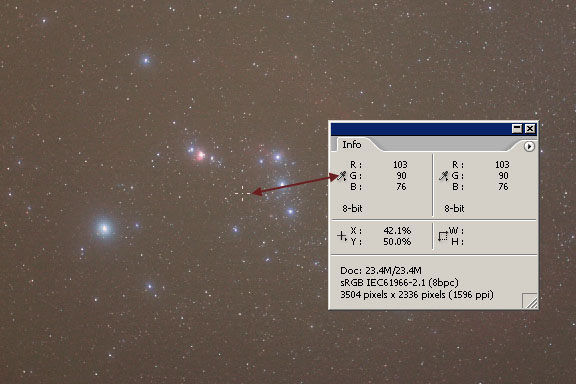
Video Our eyes have evolved to see the light of our Sun as white, neutral light. Advanced CCD astrophotographers go to a lot of trouble to carefully calibrate their images so they are "white balanced". This means that stars in the image that are similar to the Sun's spectral type are recorded as white. In astrophotography with a stock, non-modified, DSLR camera, we can do this much more simply by setting the white balance of the image to daylight. This daylight white balance setting will then be applied to JPEG images in the camera. Raw images do not have a white balance, but a daylight setting can be applied to them when they are opened in an image processing program. Setting the camera's white balance to daylight for JPEG images will ensure that the colors of the stars in the image are recorded correctly. Most long-exposure deep-sky astronomical images will have bright stars in the frame that are completely saturated to white. This means that the pixel values in the red, green and blue channels are maxed out at 4095 for a 12-bit raw image, or at 255 for an 8-bit JPEG image. The stars in the frame that are not saturated will have correct star colors if the white balance is set to daylight for JPEG images. In cases where the brightest stars in a JPEG image that has been shot with daylight white balance are saturated, the white point in the image is set. Any further adjustments to the white point will cause the star diameters to grow, and fainter stars that are not saturated will become saturated. In some cases this may be acceptable if we are willing to trade this loss of detail in stars to increase the contrast in the darker portions of the image. In other cases, such as our wide-field Orion example after flat-fielding, the brightest stars in the image are not saturated. Photoshop's Info Palette Photoshop offers a very powerful objective tool to evaluate images - the Info (information) Palette. Go to Window > Info to display the info palette. The main function of the info palette is to display the red, green and blue pixel values of the particular pixel in the image that is located under the cursor when it is moved around in the image. These values tell us the brightness and color of a particular pixel in the image.
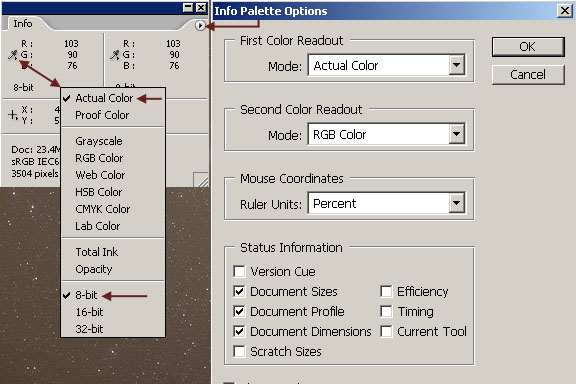
At the top of the info palette the readout displays the actual pixel values for the color model that the image is currently in, which will normally be RGB color. Another readout, to the right of the actual color, can be set to display the pixel values for other color models, such as CMYK. The default is for the left readout to show the actual color and the right readout to show RGB color. Normally these are the same for the images we will be working on, but they can be changed in the info palette options. These pixel values run from 0 for black to 255 for white. These 256 steps are the divisions of the dynamic range that are specified by the bit-depth of the image. In this case, 8 bits of tonal depth means 256 individual steps from black to white. 12-bit raw images out of a DSLR camera specify 4096 steps of tone between black and white. The info palette display can show 8 bit numbers or 16 bit numbers. The 8 or 16-bit readout can be selected in the readout options (the microscopic arrow under the eyedropper icon next to the pixel value display in the info palette) to change the pixel value readout for different bit-depths. Normally I leave it set to 8 bits.
In Photoshop CS2, different information can be displayed about an image, such as the image's size and dimensions, the location of the cursor in the image, and its color space profile. These options and others can be set in the info palette's options (the small right-pointing arrow in the small circle at the upper right corner of the info palette. Photoshop's Eyedropper Tool and Color Sample Tool
Two closely related tools that work with the info palette are the eyedropper tool and the color sample tool. These are located in the tools palette. The eyedropper tool samples colors in the image. The size of the eyedropper can be changed from its default of a point sample of a single pixel to a 3x3 pixel box or a 5x5 pixel box. Because many long-exposure deep-sky images have a lot of noise in them, the sky background will have lots of "rogue" pixels. These are pixels that vary considerably from their neighbors in brightness and color. When we move the cursor or eyedropper tool around in the image to see what the pixel values are, we normally want to find out what the overall color and brightness is of the sky background. If we leave the readout set to the point sample of a single pixel, and we happen to land on a rogue pixel, we might be misled because it is not really representative of most of the other pixels in the image. To avoid this problem of rogue pixels, it is best to set the size of the sample area to either a 3x3 pixel box, or a 5x5 pixel box. I set it to a 5x5 pixel box so that Photoshop averages the pixel values in this 5x5 pixel box and displays the average in the info palette's readout. It is also a good idea to move the cursor around in the image while watching the info palette's readout to get a general feeling for the overall brightness and color of the image. The color sample tool is simply an eyedropper tool that can be established in a fixed location in the image. The color sample tool is accessed from the fly-out menu under the arrow in the eyedropper tool in the tools palette. Up to four different color sample points can be set in an image. They can be moved around by simply clicking the sample point and dragging it with the mouse. The info palette will display the pixel values for each readout.
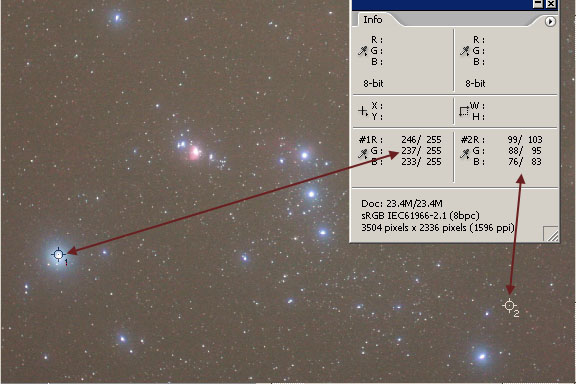
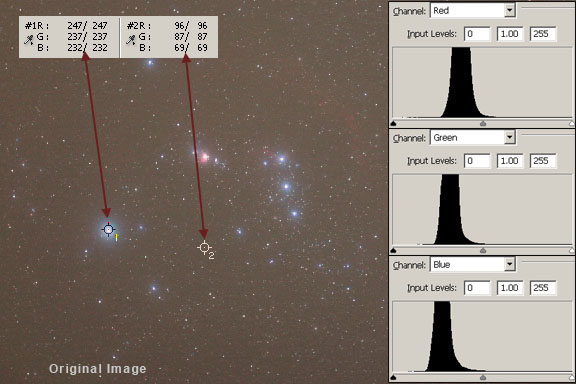
When an image adjustment process is opened, such as a levels adjustment, the info palette displays two sets of pixel values. The one on the left shows the original pixel values, and the one on the right shows the pixel values after the current adjustment. This is very useful information when adjusting the black and white points, contrast and color of an image. Set the White Point in Each Individual Color Channel In the example below we can see that the pixel values for the pixels in the core of the brightest star in the image are 247, 237, 232 for the red, green and blue color channels respectively. This tells us that the brightest star in the image is not white, and it should be. The pixel values for the core of this star should be maxed out at 255,255,255. Because they are not at their maximum values, this means the entire available dynamic range is not being utilized and the contrast is not as great as it should be in the image. We will now set the white point in the image by adjusting the white point in each individual color channel. This will map these pixels in the core of the star to white and help maximize the dynamic range. Establish a color sample point in the core of the brightest star in the image and one in a blank area of sky background. Be sure the color sample point is set to a 5 x 5 pixel grid in the tool's options. When the levels dialog box is opened, two sets of numbers are then displayed for each color sample point - the number of the sample point before the adjustment and the value after the adjustment. When we move the levels adjustment sliders the second set of numbers will change to reflect the new brightness values being assigned to the pixels under the color sample point. Let's create a levels adjustment layer. Call it "White Points". This allows us to experiment with changes without them being applied permanently to the image. In the pull down menus, go to: Layer > New Adjustment Layer > Levels.
In the levels dialog box, select red in the channel pull down menu at top. While watching the pixel values for color sample point number 1, drag the white point slider to the left until the input level reads 247. You can also just type in 247 directly into the box. This will map all of the brightest pixels in the core of the star in the red channel that started at a brightness level of 247 to 255. Do not OK the dialog box yet. Then use the pull-down channels menu to go to the green channel and drag the white point slider so that the input level reads 237. This will map the pixels in the green channel in the core of the star to 255. Finally, go into the blue channel and set the input level to 232 for the white point. This will map the pixels in the blue channel of the core of the star to 255. Hold your mouse cursor over the example image above to see a comparison between the original image and the image with the white points correctly set. The individual color channels in the levels dialog are shown at right. The info palette readouts are at top left of the image. Be careful when you make the white point adjustments in the individual channels because at some point in the adjustment it will read 255 no matter how far you drag the white point slider to the left. You want to drag it until it just reads 255 and no farther. Now OK the dialog box. If you are satisfied with these adjustments, flatten the image (Layer > Flatten Image) and save it as a TIFF file. If you want to preserve the levels adjustment layer, save the image as a .psd Photoshop file. The white point in our flat-fielded image is now set to maximize the contrast. If the core of the brightest star in the image was already at 255,255,255, we would not have had to perform this white point correction. Technically, adjusting the white point like this has thrown off the daylight color balance setting and star colors will be off. In most cases you will never have to worry about this because there will almost always be a star in the field that is totally saturated and you won't have to make this white point adjustment at all. For very advanced astrophotography, the white point should be adjusted to a non-saturated Sun-like G2V solar analog star in the image. |
||||||||||||
|
Back | Up | Next |