Video The next step in our image processing is to neutralize the color of the sky background. This means to adjust the color of the sky background so that it is neutral, or close to it, and does not have a color cast. If we use the color sample tool and read the pixel values in the info palette as we move around in the sky background of the image, the red, green and blue values should all be approximately equal if the sky background is neutral. There will be some variations because of random pixels in the image, but overall, they should be fairly close to each other. If we performed a flat-fielding operation by subtracting a blurred copy of the original as seen in this previous section, the sky background should be neutral and this step does not have to be performed on the image. If we have not performed this flat-fielding operation, then the color of the sky background will be off and we will have to neutralize it. You may be wondering why the color of the sky background is incorrect if we shot daylight white balance in the camera and then set the white points in the image. This is because digital cameras are sensitive enough to accurately record the true color of the sky if the exposures are long enough. The night sky appears black to our eye at a dark-sky site, but is not black. The sky has color from natural sources such as the airglow, as well as man-made sources such as light pollution. At most observing sites, images will usually record the sky with some color, usually an unpleasant red-brown color. If we want to show the deep-sky objects as they look in their natural state, as if we viewed them from space, we have to neutralize the color of the sky background. Neutralizing the sky background can be accomplished in two different ways. The easiest is to use the gray-point eyedropper in the levels palette. The other method is to set the "black point" in the image. Here we will describe how to use the gray-point eyedropper, and in the next section we will tell how to neutralize the sky background by correctly setting the black point. Neutralizing the Color of the Sky Background with the Gray-Point Eyedropper
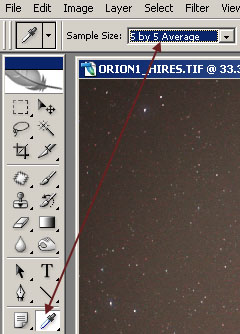
The eyedropper tool is used to measure the pixel values in the image. Whatever pixel is under the tool as it is moved around in the image will have its red, green and blue channel values displayed in the info palette. The sample size of the eyedropper should first be set to a 5x5 pixel grid. If it is left at the default of a point sample, it will only measure the pixel values of the single pixel it is over at the time. Because there are random "rogue" pixels sometimes, it is best to set the sample size to a 5x5 pixel box. Then the readouts will be an average of this 5x5 pixel box, and rogue pixels will be averaged out. Click on the eyedropper tool in the tool's palette, and select a 5x5 pixel average in the tool's options under the pull down menus at the top of the Photoshop window. This is important because the gray-point eyedropper will also use this tool size setting when we use it. We will use the image of Orion with the white point set from the previous section. The image was saved with the color sample points, so they will be there the next time we open the image. These points are saved with the file but will not print if the image is output to a printer.
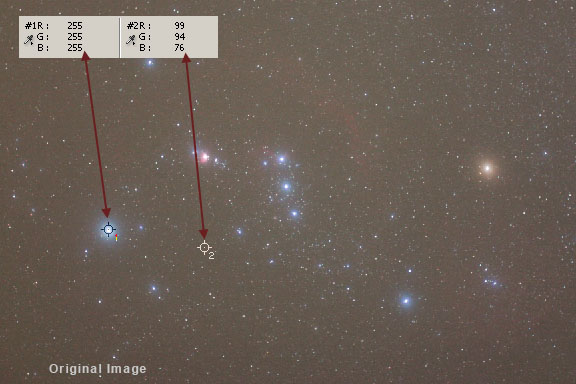
Color sample point 2 has already been established a blank area of sky background without any detail, stars, or nebulosity. This sample point tells us that the sky background pixel values are now about 99,94,76 after the white point has been set. This indicates the image is slightly high in red, but the blue is low by about 20 points. This tells us that the sky background has a slightly red and mostly yellow cast. Low in blue means a yellow cast since blue is the compliment of yellow on the color wheel, just as red is the compliment of cyan, and green is the compliment of magenta. Open a levels adjustment layer. Call it "Neutral Sky". This allows us to experiment with changes without them being applied permanently to the image. In the pull down menus, go to: Layer > New Adjustment Layer > Levels. Click on the gray-point eyedropper in the levels dialog box. This is the middle eyedropper.
Now move the cursor around in the image and click. The pixels under the cursor will now be automatically mapped to neutral. Try clicking in different locations while watching the color of the sky background change and while monitoring the pixel values for color sample point number 2. If the pixel values are equal after clicking the gray point eyedropper, you can tweak the adjustment by moving the mid-tone slider in a particular color channel while the levels dialog is still open. Monitor the pixel values in the info palette while doing these adjustments.
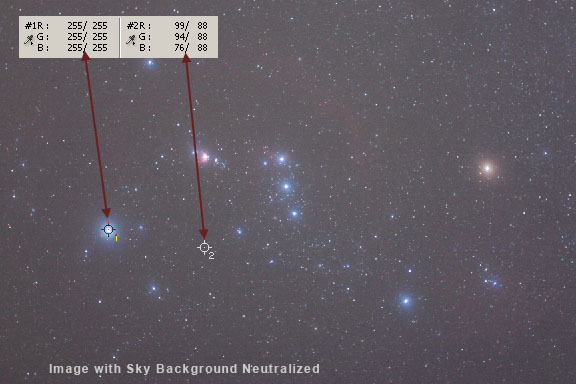
We can see in the mouse-over comparison between the original image and the image with the sky background neutralized that the pixel values now all read 88,88,88 for the sky background under color sample point 2. This simple adjustment has greatly improved the image. Hold down the Alt key and the Cancel button in the levels dialog will turn into a Reset button and you can undo any adjustments without closing the levels dialog. If you ok the dialog and want to undo the changes, you can use Edit > Undo in the pull-down menus, or you can move up a step in the history palette (Window > History). If you are happy with the adjustment, you can flatten the adjustment layer to make the changes permanent, or you can archive the image at this point as a Photoshop .psd file to store the adjustment layer with the image. |
||||||||||
|
Back | Up | Next |