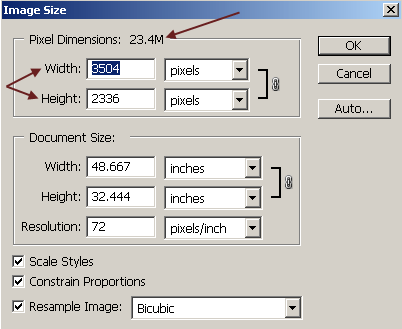
Video In-Camera Sharpening DSLR cameras have a low-pass blurring filter in front of the sensor to deal with the problems of moire and aliasing. Because of this, and because of the blurring effect of the atmosphere during long exposures, the images produced by these cameras must be sharpened. Only specially modified DSLR cameras have this filter removed. Even images produced by modified cameras must be sharpened because of the sharpness lost to seeing effects. JPEG images are usually sharpened in the camera when the image is processed and before the JPEG file is written to the storage card. The amount of in-camera sharpening for a JPEG image can usually be controlled via menu settings. Sometimes it can even be turned off completely which can help with the noise in images shot at extremely high ISO settings such as ISO 3200. If you are shooting JPEG images in the camera, I recommend that you experiment with different in-camera sharpening settings to find the setting that works best for your images. This will usually be a compromise between the amount of sharpening and the amount of noise present based on the temperature and ISO. Sharpening, whether in-camera, or in later processing will make the noise in an image appear worse if not done carefully. A Two-Pass Approach It is generally recommended that a two-pass approach to sharpening be applied to DSLR camera images. The first pass can either be in-camera sharpening of the JPEG image, or if sharpening is turned off in the camera, an unsharp mask can be applied in Photoshop. This initial round of sharpening gets the sharpness back that was lost due to the low-pass anti-aliasing filter built into the camera. The second step of sharpening is not performed until the specific type of output is known. Different output types require different amounts of sharpening. The amount of sharpening will depend on the content of the picture, it's original sharpness from focus, seeing, etc. the amount of cropping and enlargement, and the size it will be printed at. Generally, for images with a lot of noise in them, or JPEGs in the camera, it's not a good idea to apply any sharpening at all to them. The better the signal-to-noise ratio in the image, the more sharpening can be applied. For most deep-sky images, it is better to be a little subtle with the sharpening and apply less than you would for a normal daytime image. Resampling The original image out of a DSLR camera will usually be many millions of pixels in size. This large file size contains the full optical resolution of the sensor in the DSLR camera. The Canon 20D for example, has a 3504 x 2336 pixel image that contains 8,185,344 pixels and creates a 23.4 megabyte file. This full resolution file is the one that we want to correct and enhance because it contains all of the original data from the camera. It is perfect for making large prints. However, it is much too large to display on a web page or to send in an email. For these uses, we must resize, or resample the image. Resizing or resampling an image means to change the number of pixels in the image and its file size. This is usually done with a fairly sophisticated mathematical algorithm in an image processing program like Photoshop, using a method like Bicubic interpolation. This algorithm examines each pixel in the image and its neighbors, and discards groups of them as it creates a new pixel based on the data it has examined. The bicubic resampling algorithm usually works very well for photographic images. To resample an image in Photoshop, go to: Image > Image Size. Note the file size for the original image is given at the top of the dialog box, and the dimensions of the image in pixels is given in the width and height boxes.
Make sure the box is checked next to Resample Image and that "Bicubic" is the method in the menu box. See the illustration below.
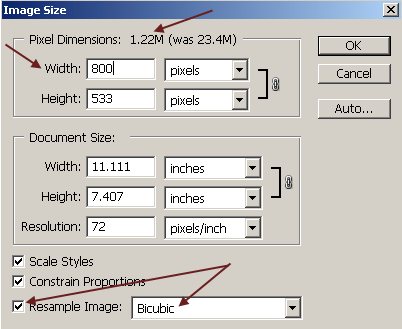
Now change the width or height box and the file size next to Pixel Dimensions will change reflecting the new file size. The original file size will be displayed next to it. If the Constrain Proportions box is checked, changing either the width or height will change the other to keep the proportions of the image exactly constant. For web display or email use, a width of 600 to 800 pixels is usually good for a horizontal image. Once an image is resampled like this to change its size, it usually loses some sharpness however. This sharpness can be regained by use of Photoshop's Unsharp Mask Filter. Photoshop's Unsharp Mask Filter Photoshop offers several different options under the Filter > Sharpen menu. The one that we will use, because it gives the most control, is the unsharp mask. The name sounds contradictory, but it works.
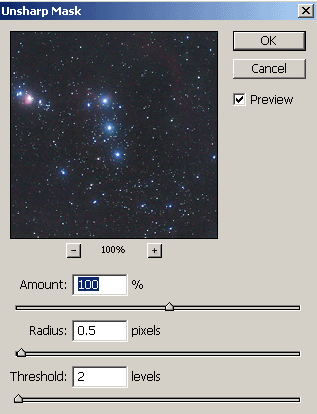
For the initial sharpening, try an amount of 100 to 300 percent, and a radius of 0.3 to 0.5 pixels. The Threshold should be set somewhere between 1 and 4 levels. The unsharp mask filter acts by sharpening edges in an image. The amount slider specifies how much sharpening is applied. The radius determines the number of pixels surrounding the edge pixels that affect the sharpening. The threshold specifies how different the sharpened pixels must be from the surrounding area before they are considered edge pixels and sharpened by the filter.
Some experimentation will be necessary to determine the optimum amount of sharpening needed by Photoshop unsharp mask filter. A balance needs to be struck between the amount of noise present in the final processed image and the amount of sharpening that can be applied because sharpening usually makes the noise appear worse. More sharpening can be applied to low-noise images. Photoshop CS2 also offers a new "Smart Sharpen" filter, which gives more control over the unsharp-mask filter. It allows independent controls over how much sharpening is applied to the shadows and highlights. This is a very useful feature to prevent aggravation of the noise in the shadow areas. Save As JPEG Once the image has been resampled and sharpened, it can now be saved as a JPEG file format image for web display or for emailing to friends. This compressed file format does throw away some data to achieve high compression ratios, but it does a really good job of it. If done correctly, the loss should be hardly noticeable visually.
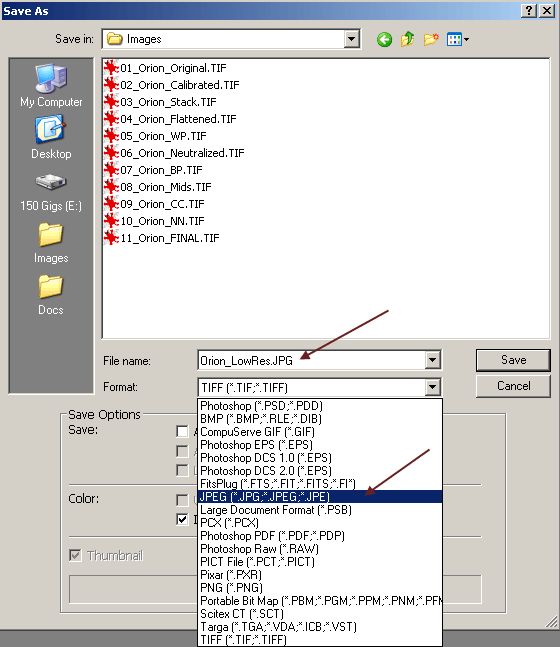
Go to File > Save As. Give the file a descriptive file name. Select JPEG as the file format from the pull down menu.
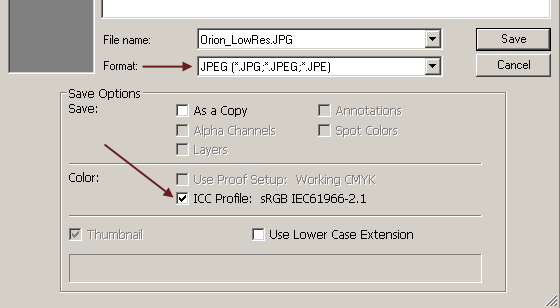
Make sure the box is checked next to ICC Profile so that the correct color space tag is embedded in the file.
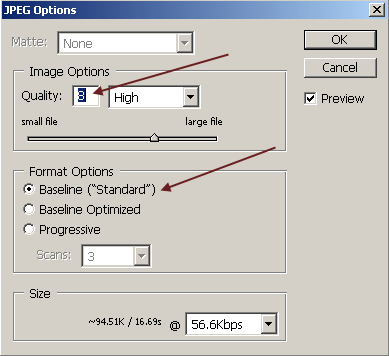
The compression ratio is a compromise between file size and quality. A high compression ratio yields a small file size, but a poor quality image. I usually use a high quality setting around an 8 that gives good quality and a reasonable file size. Make sure that Baseline ("Standard") is checked under format options. |
||||||||||||||||
|
Back | Up | Next |