As any great chef will tell you, it's the combination of the ingredients, the way they are cooked, and the presentation that produce a great meal.
It's the same thing for great astrophotos.
|
|
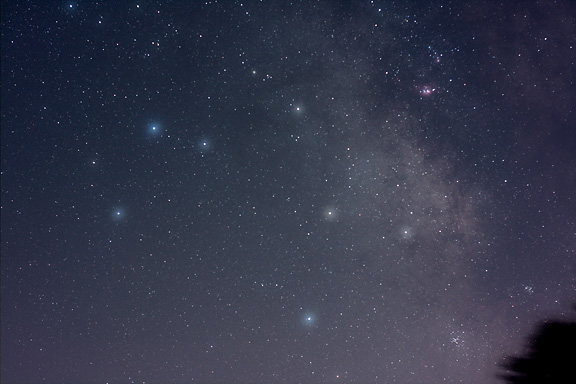
Sagittarius and the Milky Way were shot with a Canon EOS 1000D (Digital Rebel XS) DSLR camera with a 50mm lens and light-pollution filter. The image is a composite of five 90-second exposures at f/2.8 at ISO 1600 taken on a tracking mount. The original five frames were shot as JPEG files with a custom white balance and sharpness turned off, and contrast turned up for the in-camera processing. No other processing was applied to the image except resizing for display here. It was taken from a reasonably dark-sky observing site where the Milky Way was visible, but there was still some light pollution around.
|
- Master the Basics First
- Start Simple - Attempt easy things first at which you will have more of a chance of success. Example: star trails and scenic shots from a fixed tripod.
- Advance Slowly - Don't try to do too much when you're not ready. If you fail, you will just get discouraged and be inclined to give up. After fixed tripod shots, move up to longer exposures with wide-angle lenses on a camera on a mount that tracks the sky. Take some barn-door tracker shots or piggyback shots on an equatorial mount. Finally, move up to longer-exposure shots at longer focal lengths.
- Use Optimum Camera Settings - Get to know your camera. Read the manual. Learn the optimum camera settings for astrophotography, especially if you are shooting single JPEG images in the camera.
- Use ISO 1600.
- Set a custom white balance on the sky background.
- Turn sharpening down and contrast up.
- Adjust the color in the camera.
- Use long-exposure noise reduction at high ambient temperatures if you are only going to take a couple of frames.
Letting the camera do these things to the Raw data before the JPEG file is written will produce much better images.
- Expose Correctly - A big mistake that most beginners make is not exposing long enough. You must expose each image long enough to get the important signal from the deep-sky object up out of the camera's noise. Determine the correct exposure with the histogram. Your longest unguided exposures will be a balance between how long you can go before periodic error trails your images, and the percentage of usable pictures at a given exposure.
- Shoot From a Dark Sky Site - Learn the importance of a dark-sky observing site. To shoot the faint stuff, shoot from a dark-sky site. Almost all of the deep-sky pictures in this book were taken from a moderately dark-sky site where you could see the Milky Way. It's not impossible to shoot the brighter stuff, like M27 and M57 and open clusters and globular clusters, from brighter suburban skies, but you are really going to have a hard time shooting faint nebulas and faint galaxies from bright skies.
- Use Filters - Learn that deep-sky and anti-light-pollution filters will really help your images. Especially if you want to shoot red emission nebulas.
- Increase the Signal-to-Noise Ratio - One of the most important things you can do after you master the basics is to shoot more exposures and stack them to improve the signal-to-noise ratio in your images. More exposure means more signal. More signal means a better signal-to-noise ratio. With digital images, we don't need to shoot one really long exposure. We would be limited by the tracking accuracy of our mount. But we can shoot a lot of shorter exposures and stack them to equal a longer exposure.
- Adjust, Correct and Enhance Your Images - Learn the art of image adjustment and enhancement. Post processing your images after you have shot them can really polish that diamond in the rough you have mined.
- Practice - Don't be afraid to fail. Learn from your mistakes because you will make a lot of them. I know I have made just about every mistake you can make, and I'm still inventing new ones. Accept that there is a learning curve and that it will take time. Don't jump in and think you are going to do the hardest stuff first, like shooting prime focus long-exposure deep-sky astrophotos of emission nebulas with a stock camera with a 12-inch altazimuth Go To Schmidt-Cassegrain from downtown in a city when you don't even know the constellations or where Polaris is.
|
10 Tips for Great Pictures - The Bottom Line
Master the basics. Start simple and advance slowly.
Make sure you expose long enough. Use the histogram to determine the correct exposure.
Set a custom white balance in the camera and optimize the contrast and color settings for in-camera processing.
Shoot from a dark-sky observing site if at all possible. Use filters if you must shoot from a light-polluted observing site.
Use a filter to improve recording of red emission nebulas.
For more advanced imaging, shoot a lot of images, calibrate them with dark frames, and stack them to improve the signal-to-noise ratio.
Learn how to properly adjust, correct and enhance your images, and practice, practice, practice!
|
|