Different sources of light can produce different colors of illumination. For example, a tungsten light bulb produces a very warm, red-colored light. A clear blue sky in the shade produces a very cool, blue-colored light. Our eyes are very good at adapting to different colors of light so we don't usually notice this. They will adapt so that the brightest object in the scene is seen as white and the rest of the scene will appear normally colored. Digital cameras, however, will record the color of the light accurately, but it may not seem accurate to us when we view the image from the digital file. DSLR cameras have a way to correct for this by adjusting the white balance in the camera to compensate for the color of the light. Most DSLR cameras have different pre-set white balances, such as for sunlight, tungsten, and open shade. Most also offer an automatic white balance setting where the camera tries to balance the color for the light source automatically. Unfortunately, this automatic setting doesn't work very well for astrophotography. Thankfully, most cameras also offer the ability to set a custom white balance which is very useful. We can use this to our advantage for astrophotography. The Color of the Night Sky At light-polluted observing sites, the lower atmosphere of the Earth is illuminated by man-made light. It will usually be correctly recorded as an ugly red-brown when the camera is set to daylight white balance. Even under the darkest skies, the atmosphere has some faint color from airglow. It is also usually a dark red or brown. Airglow is caused by oxygen atoms glowing in the upper atmosphere which are excited by solar ultraviolet radiation. This ugly red-brown color from either artificial light pollution or natural airglow is an accurate recording of the true color of the near-Earth sky. However, it is not what the night sky would look like from space, and it is not very aesthetically appealing, and it can contaminate the color of the sky background as well as the color of deep-sky objects. Luckily it can be removed by setting a custom white balance on the sky background itself.
If you are more advanced and are shooting Raw files, you can more accurately correct for this red-brown sky background color later in image processing. If you are just beginning and want to shoot JPEGs in the camera, you will want to shoot a custom white balance so the camera adjusts the data before the JPEG file is written. If you try to do too much processing to your JPEG image later, such as correcting the white balance, and increasing the contrast, you may end up compromising the image and posterization may become visible. Posterization can be seen as visible steps in an area that is supposed to be even-toned or smoothly varying, such as a gradient of brightness in a blank sky that fades from light to dark. This banding can be caused by over-manipulation of the data in the image file. For JPEG images shot in the camera, it is best to let the camera do most of the processing internally before the JPEG file is written. In addition to white balance adjustments, it is also possible to adjust the contrast, color and sharpness in the camera. We'll cover this in detail below. Setting a Custom White Balance You'll have to read your camera manual to find out exactly how to set a custom white balance for your particular camera, but it is usually a setting that uses a test exposure of a gray or white card to correct the white balance. For deep-sky astrophotography, we will just use a section of the sky for the test exposure instead of a gray or white card.
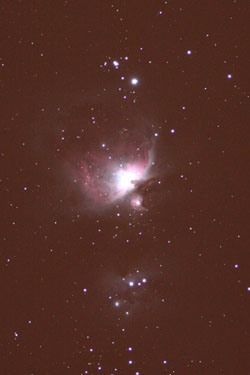
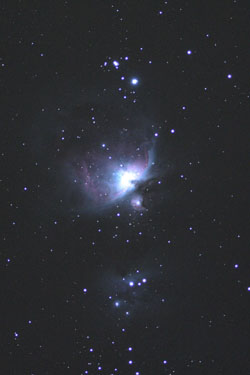
The first frame shows a blank area of sky near the ultimate target, M42, the Orion Nebula. Since it is fairly large and I was using a telescope where it would occupy a significant portion of the frame, I didn't want to set a custom white balance on the nebula itself. Since it has a lot of red nebulosity, it might throw the custom white balance off. So I moved the scope to an area of sky that only had stars. Then I took a test frame. I had to expose longer than normal for the correct exposure determined in the previous section. This is because the camera needs a mid-tone gray (which will be the sky background) to determine the correct white balance. Your test frame should be exposed so that the mountain peaks at about half way across the histogram. The sky background in this image came out with an ugly red-brown color because of the light pollution. This is what we will remove by setting a custom white balance on the sky background itself. Then I went into the camera's menu and selected "Custom White Balance". I selected the frame of the blank sky that I had just shot for the camera to use to set a custom white balance. It doesn't matter which white balance this test frame is set to, the camera will use it to correctly set the custom white balance. Finally I pressed the white balance button on the back of the camera, and selected the custom setting to use the custom white balance from the frame that we just selected. This last step is critical. Even if you tell the camera to use a particular frame to set a custom white balance, if you leave the camera set on auto or daylight, it will use those and not the custom white balance. Next, I shot another test frame of the same area to be sure the custom white balance was working. As you can see from the last frame in the animation, it was. The custom white balance made the sky background a nice neutral gray and removed the red-brown light pollution. Then I did some more test exposures to determine the correct exposure on M42 so that the histogram was well separated from the left wall of the histogram box, as discussed in the previous section. The final result is the image of M42 at the top of the page on the right. The custom white balance will be automatically applied to all JPEG images in the camera, and the custom white balance settings will be stored in the Raw file so it can be applied when you open the Raw image in an image processing program. If you shoot Raw, you can change the white balance after you have shot the images. It is a good idea to practice shooting a custom white balance indoors so you are familiar with the procedure before you try to use it under a clear dark sky.
Nikon and Canon both offer methods to adjust the processing of an image in the camera before it is written as a permanent JPEG file to the memory card. There are three basic concepts involved:
Canon Picture Styles and Nikon Picture Controls Canon Picture Styles and Nikon Picture Controls allow you to pick a particular "look" for your images, much as different films, such as Kodachrome, and Velvia, had a very different look. Velvia images, for example, were very contrasty with deep color saturation.
With Nikon you can access these adjustments under the Optimize Images menu under the Custom sub-menu on older cameras, and under Picture Controls on newer cameras. For astrophotos, I recommend experimenting with Standard or Neutral for both Canon and Nikon. Shoot some test exposures and see which one you like.
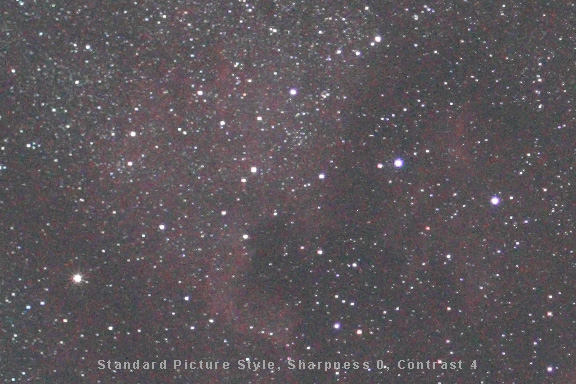
Contrast, Sharpness, and Saturation Adjustments In addition to the picture styles described above, we can also adjust the contrast, sharpness, and color (to a certain extent) in the camera. These adjustments are applied to JPEG data in the camera by the digital processor. I recommend setting the sharpness to its lowest level because with astronomical images you will sharpen the noise and make it more visible. You can also increase the contrast setting as this will help with most deep-sky images. If you are just shooting stars in a cluster, you may want to leave the contrast set to normal.
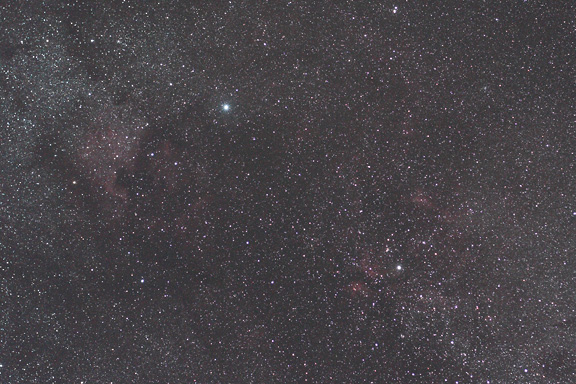
All of the images in the comparisons above are JPEGs straight out of the camera shot with standard picture style with no additional post-processing applied. They were shot with a 50mm lens at f/2.8 with a Hutech IDAS LPS filter and a 3 minute exposure at ISO 1600. The first image is with the in-camera sharpening set to 0 and the contrast set to the default of 4. The second image is with the in-camera sharpening set to 0 and the contrast set to 7. The third image is with the in-camera sharpening set to the default of 3 and the contrast set to 7. We can see how the first image, while not bad, is improved by increasing the in-camera contrast while setting the in-camera sharpening to 0. Setting the contrast to 7 and turning the sharpness back up to its normal default setting greatly exaggerates the noise and ruins the image. The saturation setting will also depend on the image. Increased saturation can help bring out color in an image, but it can also increase noise. Color tone applies mostly to skin tones, so you don't have to change this setting. Custom White Balance Fine Tuning Canon and Nikon also provide a method for manual white balance correction or fine-tuning. After you have set a custom white balance, the sky may be gray, but this may not be as aesthetically pleasing as having it a little bit blue. You can adjust your custom white balance with this setting. You can access this adjustment under the WB SHIFT/BKT menu setting for Canon, and under the Fine Tune White Balance under the White Balance menu for Nikon.
Experiment with adding some blue to the image after you have set a custom white balance on the sky. This setting is applied in the camera to the JPEG images, and the information stored in a Raw image where it can be applied later in processing.
Not all of these settings can be accessed in the beginner zones and exposure modes. That is why you should use the Manual setting for astrophotography. If you are shooting single JPEG frames, it is much better to let the camera make as many adjustments as possible to the original data before the JPEG file is written to the memory card. This will produce better JPEG images.
|
|||||||||||||||||||||||||
|
Back | Up | Next |
|||||||||||||||||||||||||