Focusing your DSLR camera on the stars can seem to be one of the most difficult things in astrophotography. It's not. But it is very critical for good images. Just looking through the viewfinder and expecting to get good focus with your eyes won't work very well. Eyes adapt too well to different views, and camera viewfinders are too dim to see well enough to achieve critical focus. There are more than a dozen different ways to focus your camera. Some are easy, some are hard. Some work well, some not so well. We'll only go over a couple of easy and proven methods here. Live View Focus In section 408, we have already discussed, in detail, Focusing Camera Lenses using Live View, so here we will concentrate on focusing a DSLR camera when it is attached to a telescope. Most all new DSLR cameras now come with Live View where you can preview the image on an LCD monitor on the back of the camera. You see what the sensor sees through the lens or telescope in real time, just like a video camera. You access the Live View settings under a custom menu. You turn on Live View on the Canon 1000D (Digital Rebel XS) by pressing the "Set" button on the back of the camera.
Unquestionably, the easiest way to focus is with Live View. It's also one of the best ways because it takes the actual image off the sensor and you can view it at high magnification. You simply turn Live View on, center a bright star in the box displayed on the screen, press the plus button on the back of the camera to magnify the image to 5x and then press it again to magnify to 10x. Then watch the image, and rack the focuser in and out slowly, just like as if you were focusing an eyepiece.
The video shows the star starting out of focus when it is first magnified. Focus is then racked in, going through the point of best focus until the star is out of focus on the other side of focus. It is best to go back and forth through the point of best focus several times, in smaller increments, so that you get familiar with what the point of best focus looks like. Then finally stop at that point. If you are shooting a faint deep-sky object, you won't be able to see it on the Live View display. It will only work with bright stars, planets, or the Moon. You can set Live View so that it will attempt to display the image with exposure adjustments for shutter speed and ISO. So if you have the shutter speed at 1/1000th of a second and the ISO set to 100, you are not going to be able to see a star. Set the shutter speed to bulb. Set the ISO to 1600. Use the brightest star you can find that is conveniently placed for viewing on the LCD on the back of the camera. Live View is very sensitive to focus. If you are way off to start with, you won't see the star at all. Simply find a star and get it in the field of view of the camera, and then visually focus it through the viewfinder to get it as close to focus as possible. Then use Live View to magnify the star and focus it on the LCD on the back of the camera. If you pick a really bright star or planet, you may find that you can achieve better focus if you use a shorter shutter speed. If you have the "simulate exposure" function turned on, the brightness of the object will change as you change the ISO and shutter speed. For a really bright object, use a shorter shutter speed. For faint stars, use ISO 1600 and the bulb setting. If a star is too faint, you may not be able to see it at all. The brightness of the star you will need will depend on the aperture of your scope or lens. You will need brighter stars with smaller apertures. If you try to focus on a star, and you have the scope reasonably close to focus to start with, and you can't see it at all at with the camera set to ISO 1600 and bulb, you will have to find a brighter star. If you are shooting with a refractor, there may be times when the object you are shooting is overhead, and the LCD on the back of the camera is pointing down to the ground. It may be at a very uncomfortable position to view. In this case, you have several possible solutions:
Live View will heat up the inside of the camera, which will increase the thermal noise, so turn it off as soon as you are done focusing. When the star is focused, lock the focuser down so it can't move. If you have a DSLR camera with Live View focus, you probably don't need anything else to help you focus your camera. Some folks think a Bahtinov mask helps with focusing. If you don't have Live View, and have to use trial-and-error, then a Bahtinov mask will certainly help. Bahtinov Mask
A Bahtinov mask is a simple focusing aid for astrophotography. It is made from an opaque disk with a particular pattern of holes cut in it that is placed in front of your lens or telescope. It was devised by Pavel Bahtinov, an amateur astrophotographer. A Bahtinov mask causes an "x"-like diffraction pattern with a line across the "x" that moves as the focus is changed. When your camera lens or telescope is at correct focus, the line will split the "x" exactly in half. If you have Live View, you can use a Bahtinov mask to help you with focus if you have trouble judging when the stars are in focus. If you don't have Live View, you can simply take some test exposures, and then display the image on the LCD on the back of the camera and enlarge it to judge the location of the central line. Take more test exposures and vary the focus each time until the line splits the x. Then you are at focus. Don't forget to remove the Bahtinov mask after you have achieved focus and before you take the actual images. Astrojargon has a web page generator to make your own Bahtinov mask and Spike-A sells a commercial version. Autofocus If you are using a camera lens, you may be able to use autofocus if the lens is fast enough, and the star is bright enough, and you can get the star exactly on one of the little focus detectors on the viewfinder, which is not as easy as it seems. This usually works better with longer focal length lenses that have fast focal ratios. and doesn't work that well with wide-angle lenses. You may need to illuminate the viewfinder to position the star exactly on one of the autofocus spots. These are usually indicated in the viewfinder. You will not be able to use the camera's autofocus to focus a telescope.
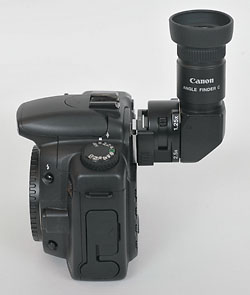
Right Angle Finders
But while these finders work ok in the daytime, they are difficult to use to achieve accurate focus through a telescope or camera lens at night. They are also expensive. The real problem is that the view through them is incredibly dim. Also, you have to center your eye exactly in the sweet spot of the optics to be able to see a really sharp image. Because this is so hard to do at night, you can easily be fooled into thinking that you have achieved an accurate focus when you really haven't. Note that you will not be able to see any deep-sky objects through such a finder and usually only the brightest stars. I do not recommend trying to use a right-angle finder to achieve accurate focus.
|
|||||||||||||||||
|
Back | Up | Next |
|||||||||||||||||