Mouse-Over
|
|
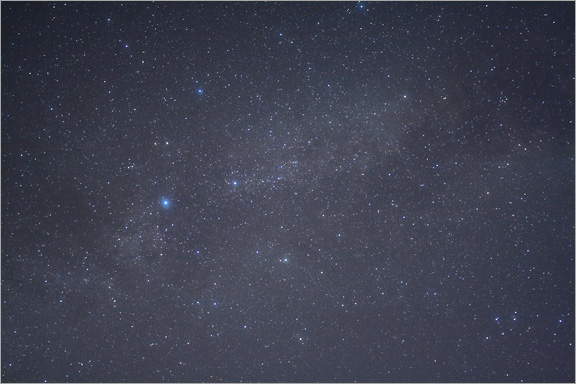
The Milky Way in Cygnus stretches across this image, bisected by the great rift of dark nebula and obscuring material that blocks the stars behind it. Deneb, seen here left of center, is the brightest star in Cygnus. This is a 2.5-minute exposure made with the camera on a hand-driven barn-door tracker. Hold your mouse cursor over the image to see an outline of the constellation figure.
|
Section 207, Constructing a Barn-Door Tracker, describes how a simple barn-door tracker is made. It is an incredibly easy and inexpensive way to get started in long-exposure tracked astrophotography with short focal length lenses.
Tracking the stars compensates for the Earth's rotation, and allows longer exposures that will record fainter stuff in the sky.
In the example above, we have recorded the rich star clouds and dark lanes in the Milky Way in Cygnus. It was shot with my Canon 1000D (Digital Rebel XS) DSLR camera with the 18-55mm f/3.5 - 5.6 zoom lens and a 2.5-minute exposure at ISO 1600 on the barn-door tracker that I made.
Barn-Door Tracker Procedure
|
|
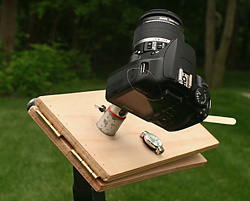
This simple homemade barn-door tracker and camera and lens were used to take the image seen at the top of this page.
|
- Attach your camera with lens on the barn-door tracker with a ball head.
- Attach the barn-door tracker to the tripod.
- Place the hinge on the left as you face north, and the drive bolt on the right. For the southern hemisphere, place the hinge on the right as you face south.
- Aim along the hinge and point the hinge's axis at the north celestial pole near Polaris to polar align the tracker for the northern hemisphere. For the southern hemisphere, aim the axis of the hinge at the south celestial pole near Sigma Octantis.
- Focus the camera lens on a bright star.
- Unlock the ball head and aim the camera to frame the constellation or area of sky you want to shoot.
- Basic Camera Settings
- Set the lens to its widest, fastest aperture.
- Set the ISO to 1600 if you are at a dark-sky site or ISO 200 or 400 if you are at a light-polluted site.
- Turn on in-camera long-exposure noise reduction.
- Set the camera's custom function to lock the mirror up.
- Set the camera's white balance to daylight.
- Set the exposure to 30 seconds at a light polluted site. Set the exposure to the "bulb" setting at a dark-sky site.
- Your first exposure is a test exposure to determine the correct exposure and checking your framing. The correct exposure is when the histogram's mountain is separated from the left side wall of the histogram box.
- Set a custom white balance in the camera using the test frame that you just took.
- Adjust the color and contrast in the camera.
- Turn in-camera sharpening down.
- Use the self timer, or a remote release to open the shutter.
- Start turning the handle on the barn-door tracker at the same rate as the sweep-second hand on a watch. Turn it clockwise one rotation every minute.
- At the end of the exposure, close the shutter if you are using a remote release.
- After the in-camera noise reduction has done it's work, examine the image on the LCD on the back of the camera to see how you did. See if the exposure is correct and how the color balance looks. Magnify it to check the focus and tracking. Remember that the camera will be busy doing the in-camera noise reduction for the same amount of time as your exposure, and you won't be able to do anything with the camera until it is finished.
- Make adjustments and corrections as necessary and take another image.
- Feel the warm glow of excitement and accomplishment from of your first successfully tracked long-exposure astrophoto!
This may seem complicated. But it's easy once you become familiar with your camera and how to change the settings, and you get some experience with focusing on a star.
The procedure described above is fairly basic and standard for every type of long-exposure astrophotography that you will do.
Starting with a wide-angle lens will minimize potential problems and lead to a greater probability of success.
|
Using a Barn-Door Tracker - The Bottom Line
The camera settings and exposure basics are the same for using a barn-door tracker as for fixed-tripod astrophotography.
The difference is that you will be able to use longer exposures without trailing as you turn the handle on your barn-door tracker to compensate for the Earth's rotation.
|