Mouse-Over
 Original Raw Image
|
Corrected and Adjusted Image
|
Enhanced Image
Original Raw Image
|
Corrected and Adjusted Image
|
Enhanced Image
|
|
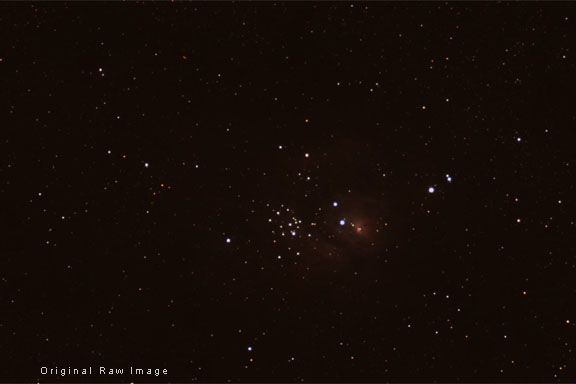
Hold your mouse cursor over the descriptions below the image to see the comparisons between the original Raw image, the corrected and adjusted image, and the final enhanced image. All of the information is there in the Raw file, it just must be corrected, adjusted and enhanced to make it visible.
|
This section will only briefly give you a taste of some of the correction and enhancement techniques that can be applied to astronomical photographs.
We won't actually describe these methods in step-by-step detail because the book is basically an introduction to DSLR astrophotography for beginners and not a book on image processing. I could write a whole book on how to perform these techniques step-by-step. Heck, I did! It's called Photoshop for Astrophotographers. But I did want to show some examples of how simple image correction and advanced enhancement techniques can make your images better.
Photography's incredible power and usefulness in art and science comes from its ability to accurately and realistically record nature. Long-exposure astrophotos allow us to record things that are really out there in nature, but are just too faint to be seen with the unaided eye, and even with a telescope.
For advanced astrophotography, most of the time we will be working with Raw image files. Raw files record the data from the sensor in a linear form. Humans however, do not perceive things in a linear manner. Our perception is closer to logarithmic. This means that we must correct the Raw data to put it into a form that we expect to see.
If you look at the image in a Raw linear file, you will see that it is very dark and low in contrast. All of the information is there in the data, it just has to be stretched so that we can see it. See the first example image at the top of this page to see what a true Raw image looks like.
Astronomical objects by their nature are also very faint, low in contrast, and very subtly colored. If you went by what they look like visually in a telescope, the overwhelming majority of them would have no color at all. But the color really is there in nature, it is just too faint to see.
The ability of digital cameras to record this detail is what gives astrophotography its power and magic. But this Raw data must be corrected for practical reasons, and enhanced for aesthetic ones.
Basic Image Adjustment
- Set the white balance - Our eyes evolved to see the light from our Sun as white. A star in the image similar to the Sun should be white. If it is not, all of the other colors in the image will be wrong. This is especially important for modified cameras. For unmodified cameras, we can simply shoot with daylight white balance.
- Apply a non-linear stretch - The Raw data is linear. Human perception is similar to a logarithmic curve. The linear data must be adjusted for the image to look normal to us.
- Neutralize the sky background - This removes any ugly color casts from light pollution or airglow.
- Adjust the black and white points - This maximizes the dynamic range and contrast in the image. If done correctly, no information in the dark or bright areas of the image will be lost.
Basic Image Correction
- Remove vignetting and gradients - If your image has vignetting and it's not too severe, and you haven't shot any flat-field calibration frames, you can remove vignetting in software. You can also remove any gradients in the sky from sources like light pollution.
- Fix cosmetic imperfections - You can also fix problems like left-over hot pixels, dust-shadows, and cosmic ray hits in software.
- Reduce Noise - If your image has too much noise you can reduce it with software such as Noiseware or Noise Ninja.
Mouse-Over
 Long Exposure
|
Mask
|
Short Exposure
|
HDR Composite
Long Exposure
|
Mask
|
Short Exposure
|
HDR Composite
|
|
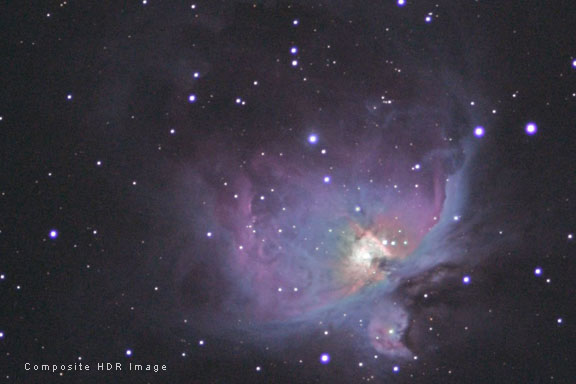
Hold your mouse cursor over the descriptions below the image to see the contribution of each layer to the final high dynamic range image. Some objects, such as the Orion nebula, have a brightness range that is just too great to be captured in a single exposure with a digital camera. With this technique, different exposures are combined through a mask to preserve detail in the brightest and faintest parts of the nebula.
|
Image Enhancement
- Increase the contrast - Since the faint detail in most astronomical subjects is low contrast, increasing the contrast will help make it more visible.
- Increase the color saturation - The color in most astronomical images is faint and subtle also. The color saturation is usually increased even for normal daytime images when a Raw file is processed, so it should be increased for an astronomical image also to make it look natural.
- Enhance faint detail - Special techniques can be used to enhance faint detail without sacrificing highlight detail.
- High-Pass Filter - High-pass filtering can enhance spatial detail on different scales.
- High Dynamic Range Composites - Combining different exposures with layer masks can create high-dynamic-range images.
- Sharpen - Most images need some sharpening. The low-pass filter in DSLR cameras intentionally blurs the image to prevent moire in normal daytime images, but this also blurs the stars a bit in astronomical images. Seeing also causes a natural blurring effect. Sharpening can restore the sharpness lost to these causes. Too much sharpening can make the noise in an image worse. Sharpening should always be done last, and based on the images output use.
I also cover all of these correction, adjustment, and enhancement methods in detail with step-by-step instructions and video tutorials in my advanced book A Guide to Astrophotography with Digital SLR Cameras.
Through my astrophotograhy I try to share with others the wonders and beauty of the universe that are sometimes invisible to the human eye. All of these techniques just optimize the data in the original file. They do not add anything that was not there in the first place.
|
Image Correction and Enhancement- The Bottom Line
Image correction, adjustment and enhancement can greatly improve and optimize the technical quality, visual appearance and aesthetics of our astrophotos if they are done with knowledge and subtlety.
|