|
Camera Settings for Astrophotography
|
Back |
Up |
Next
|
Modern DSLR cameras are sophisticated and highly complex pieces of technology. They offer an almost bewildering array of settings and functions. Most are accessed either directly through buttons on the top or back of the camera, or through a series of software menus.
|
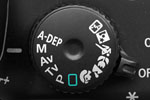
Manual Setting
Exposure Mode Dial
|
To simplify things for novice photographers, camera manufacturers offer a series of automatic modes that pretty much control everything on the camera. Various different shooting scenarios, such as special settings for sports photography, can be set on the main exposure mode dial on the top of the camera.
Unfortunately, there is no special setting for astrophotography!
Instead, we will almost exclusively use the Manual exposure setting. This is set on the Mode Dial on the top of the camera.

|
|
Camera controls and functions in the Canon 1000D (Digital Rebel XS) are accessed via a variety of buttons on the top and back of the camera, as well as a series of software menus that are viewed on the LCD on the back of the camera.
|
This will give us complete control over all of the camera's settings and functions. Most will only have to be set once. Some, such as the custom white balance setting will have to be set each time we go out to shoot long-exposure deep-sky astrophotos.
It is a good idea to spend some time with the camera and camera manual in the daytime familiarizing yourself with various different settings and menu items.
The primary camera settings such as shutter speed, aperture and ISO are normally displayed on the LCD on the top of the camera on more expensive models, or on the LCD on the back of the camera on inexpensive models such as the Canon 1000D (Digital Rebel XS). On the 1000D these settings are normally displayed all the time as well as the images after each frame is shot. This constant display can heat the camera up causing more noise, so for astrophotography it is a good idea to turn this continuous display off. This can be done with a menu setting. You can then turn the display back on by pressing the Display button.
Menus are accessed by pressing the Menu button. Each menu item's settings and sub-menus are displayed on the LCD screen on the back of the camera.
Another series of settings are accessed in sub-menus under the Custom Functions Menu.
Not all cameras have all of the settings discussed below. Once you have set most of these settings, you don't need to fool with them again except for maybe a couple like custom white balance, ISO, shutter speed and aperture.
Camera Settings

|
|
Canon's 1000D (XS) Menu Animation
|
- Program Mode - Set to Manual.
- Autofocus - Turn off, or set to Manual.
- ISO - Set to 1600 for faint objects under dark skies. Set to a lower ISO for bright objects with a large dynamic range, or if shooting under a lot of light pollution.
- Aperture - The aperture is fixed if you are shooting through a telescope so you can't change this. If you are using a camera lens, set to the widest aperture for a slow lens, or stop down 2 stops for a fast lens.
- Shutter Speed - Set to the correct exposure as determined by examining the histogram, which we will discuss in the next section. Up to 30 second exposures can be dialed in directly. For longer than 30 seconds, set to Bulb. On some cameras, Bulb may be a separate exposure mode setting, or it may be accessed on the shutter speed dial one click past the 30-second setting.
- White Balance - Set a custom white balance on the sky background. See Section 509.
- Drive Mode - Set to single shooting.
- Autofocus - Turn off.
- Picture Style - Set to Standard.
- Color Space - use sRGB.
- Auto Lighting Optimizer - Turn off by setting to disable.
- Quality - Set to Raw. If shooting JPEG only, set to high-quality Large. If you can, set the camera to shoot Raw + Large JPEG concurrently.
- File Format: Raw vs. JPEG - Most DSLR cameras come with the file format that images are stored in set to JPEG as the default. Todays DSLR cameras also allow images to be saved in a proprietary "Raw" file format that offers the potential for higher quality images. Many cameras also allow JPEG and Raw file formats to be used at the same time, with the camera writing two files to the memory card after an image is taken.
Beginner's can shoot in JPEG file format. More advanced astrophotographers will want to use Raw file format. I use both at the same time. See Section 306.
- JPEG Compression Settings - DSLR Cameras also offer different JPEG compression settings, sometimes also called "quality" settings. Higher quality means less compression which results in a larger file size. To fit more images on a card, for normal daytime snapshot photography, some people shoot with a lower quality setting that compresses the JPEG files more. Of course, you lose more information when you use higher-compression JPEG settings.
If you don't want to go to the trouble of shooting with Raw files, set the JPEG compression to the highest quality setting (largest file size). See Section 306.
- Raw Compression - Some cameras offer an in-camera compression for their Raw file formats that is different than the compression used with JPEG files. It may be lossy or lossless. This Raw compression will be proprietary and you may only be able to access the file with the manufacturer's software. In general, I would advise against using Raw compression. Memory storage is inexpensive enough to not have to use it. See Section 306.
- Native Optical Resolution - Many cameras offer different resolution settings. The camera's native optical resolution outputs the same number of pixels that the image is taken with. This is the setting you want to use. For example, the Canon 1000D offers a native optical resolution of 3888 x 2592 pixels, but also offers lower, interpolated resolutions of 2816 x 1880 pixels and 1936 x 1288 pixels. See Section 306.
You can always resize down to a smaller file size later in software, but if you do it in the camera to the original file, you throw away valuable data and you can never get it back.
- Shutter Release Without Card - Set to Disable. This will prevent the camera from shooting without a memory card present.
- Image Review - The camera will display the image after the shutter closes. Turn this off. You can turn view an image to examine it by simply pressing the display button on the back of the camera. Having the image displayed after every shot will heat the camera up causing more thermal noise. It can also be very distracting to other people at a star party. After you have done your test exposures and focused and framed, you don't need to review every image if you are shooting a series of images for stacking.
- Peripheral Illumination Correction - Set to Off. You can correct later during image processing.
- Red-Eye Reduction - Set to disable. We won't use this for astrophotography.
- Exposure Compensation / Auto Exposure Bracketing - Set to Zero. We won't use this for normal astrophotography because we are not using autoexposure.
- Metering Mode - Set to Evaluative. This doesn't really matter as we won't use this for deep-sky. For lunar or solar work (with the proper safe solar filter), you can set it to spot metering.
- White Balance Shift / Bracketing - Try adding some blue if you have set a custom white balance on the sky background. See Section 509.
- Dust Delete Data - We won't use this for astrophotography.
- ISO Auto - We won't use this for astrophotography.
- Canon Picture Styles and Nikon Picture Controls - Set to Standard or Neutral for Canon, and Standard or Vivid for Nikon.
- Contrast - Increase for faint deep-sky objects. Turn down for star clusters.
- Sharpening - For JPEGs it's usually best to turn the sharpening down.
- Saturation - Adjust to taste by shooting a test image.
- Auto Power Off - Set to 1 minute.
- Auto Rotate - Set to off.
- Format - It is a good idea to format your memory card once in a while after you have copied your images to your computer. Warning! Formatting your memory card erases all images on it.
- File Numbering - Set to Continuous.
- LCD Auto Off - Set to disable.
- Live View Function Settings - Enable Live View Shooting.
- Custom Functions
- Exposure Level Increments - Set to 1/3 stop.
- ISO Expansion - Set to off.
- Long Exposure Noise Reduction - If you are going to shoot just a couple of long-exposure frames, turn on in-camera long-exposure noise reduction. If you are going to shoot multiple frames for stacking and are shooting separate dark frames, then turn it off.
- High ISO Speed Noise Reduction - Like long-exposure noise reduction, if you are going to shoot just a couple of long-exposure frames at a high ISO, turn on High ISO Speed Noise Reduction. If you are going to shoot multiple frames for stacking and are shooting separate dark frames, then turn it off.
- Highlight Tone Priority - Set to disable.
- Autofocus Assist Beam Firing - Set to disable.
- Mirror Lock-Up - For long exposures with a very solid mounting, it probably is not necessary to lock the mirror up before an exposure. For short exposures for high-resolution planetary or double-star work, it is a good idea to lock the mirror up before the exposure to reduce camera movement and vibration caused by mirror slap. Some cameras access this setting with a control on top of the camera and some through a custom setting in a menu. Some cameras like the Canon 1000D (Digital Rebel XS) require the shutter to be pressed once to lock the mirror up, and then be pressed again to actually open the shutter. Take care to learn exactly how your camera works for this feature, because you could press the shutter thinking you have opened it for a long exposure and go off to do something else, and then come back only to find that all you had done was lock the mirror up and that no exposure had been taken. Some cameras do not offer a mirror lockup at all, but they may move the mirror up out of the way as the first thing when using the self timer. Read the camera manual to learn how your particular model works.
- Shutter / AE Lock Button - Set to #1: AE Lock / AF. This transfers autofocus activation from the shutter release to the autoexposure lock button on the back of the camera.
- LCD Display when Power On - Set to #1: Previous display status.
- Add Image Verification Data - Set to disable.
- Self Timer - If you don't have a remote release, you can use the camera's self-timer to trip the shutter so you don't have to touch the camera, which will help reduce vibrations and possible star trailing. Self-timer is usually set with the drive mode button on the back of the camera.
- Built-in Flash - Turn off, because it won't reach to infinity. It won't even reach to the Moon.
|
Camera Settings for Astrophotography - The Bottom Line
- Program Mode - Set to Manual Exposure.
- Auto-focus - Turn off.
- White Balancee - Set a Custom White balance on the sky background.
- Color Space - Set to sRGB.
- Drive - Set to Single Shot.
- ISO - Set to 1,600.
- Canon Picture Style - Set to Standard.
- Nikon Picture Control - Set to Standard.
- Canon Auto Lighting Optimizer - Turn off.
- Nikon Active-D Lighting - Turn off.
- Highlight Tone Priority - Turn off.
- Contrast - Increase for faint deep-sky objects. Turn down for star clusters.
- Sharpening - Set to low for long-exposure JPEG images.
- Saturation - Adjust to taste by shooting a test image.
- Custom White Balance Fine Tuning - Try adding a little bit of blue.
- Image Review - Turn off.
- Metering - Doesn't really matter.
- Exposure Compensation - Set to zero.
- Shutter Speed - Set to bulb for exposures longer than 30 seconds.
- Self Timer - Use if you don't have a remote release.
- Mirror Lock Up - Turn on for high resolution work.
- File Format - JPEG for Beginner's, and Raw (or Raw + JPEG) for more advanced users.
- JPEG Compression - Use the highest quality setting.
- Raw Compression - Turn off.
- Optical Resolution - Use the highest native optical resolution.
- Flash - Turn off.
- Red-Eye Reduction - Turn off.
- Long Exposure Noise Reduction - Turn on for single JPEGs. Turn off if you are shooting multiple darks.
- High-ISO Noise Reduction - Turn on for single JPEGs. Turn off if you are shooting multiple darks.
|
|