It is easy to determine the correct exposure by simply examining a test exposure's histogram on the LCD on the back of the camera. The correct exposure will depend on several different factors:
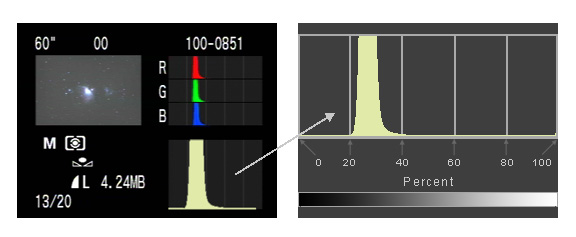
You can view the histogram on the LCD on the back of the camera. On most Canon cameras, you can access it by pressing the INFO button on the back of the camera a couple of times. Read your camera manual to find out exactly how. Other information is also displayed on the LCD as can be seen in the image above at left. From left to right, and from top to bottom, the information is:
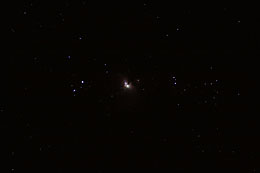
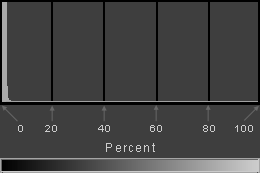
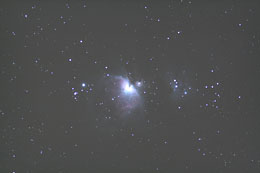
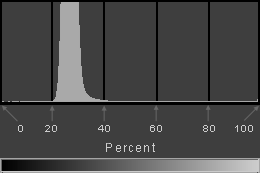
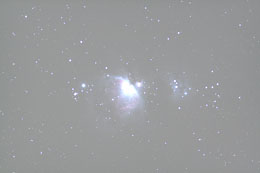
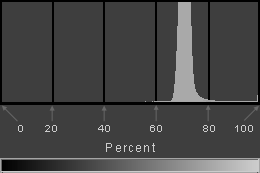
The histogram is simply a bar graph that shows the number of pixels at each brightness level in an image. A histogram runs from pure black on the left to pure white on the right hand side of the graph. The "mountain" of the histogram usually represents the brightness of the pixels in the sky background. You want to expose your image long enough so that this mountain is well separated from the left wall of the histogram. This will raise your important faint image detail up out of the noise of the camera. An underexposed image would have the mountain bunched up against the left hand side. An overexposed image would have the mountain over on the right side. You simply want to expose your image so that the peak of the mountain is about 1/4 to 1/3 of the way from the left hand side of the histogram. Noise and Faint Detail Noise is the enemy of good astrophotos. Camera readout noise lives down in the darkest tones of an image, called the shadows. This noise is located at the extreme left of the histogram. You want to move your faint image data away from the left hand side of the histogram. If most of your image detail is underexposed and dark, it will be lost down in the noise. Histograms and Exposures These images of M42 were shot at a fairly dark observing site where the Milky Way was visible, but when Orion was setting in the west with a lot of light pollution. They were shot at ISO 1600 at f/6 with a custom white balance.
Deep-sky astrophotos are just like daytime photos. Underexposed images are too dark. Overexposed pictures are too light. For a daytime image, ideally we would expose so that all of different parts of the scene have detail in them. This kind of correctly exposed image would have the histogram completely inside the walls and no data cut off on either the left (shadow detail) or right (highlight detail) sides. If you are going to make a mistake in the amount of exposure you give a deep-sky image, it is better to overexpose than to underexpose. A good image can be easily salvaged from what seems like an overexposed astrophoto, but it is very hard to save one that is underexposed because it is so hard to separate the faint detail from the noise. Test Exposures After you have focused and framed your target, take a test exposure. Examine the histogram of this exposure on the back of the camera. For the latest generation of low-noise DSLR cameras, your exposure will be long enough when the "mountain" is completely separated from the left hand side of the histogram wall. I generally try to put the peak of the main "mountain" of the histogram somewhere between 20 percent and 40 percent because this helps really separate the very faintest object detail from the noise in the camera. Canon puts lines in the histogram at the 20, 40, 60 and 80 percent. Nikon puts the division at 25 percent intervals. If you are only going to be shooting one single frame, it's better to expose longer and push the histogram farther to the right to 40 percent and really separate it from the left wall. The more exposure you have, the better signal-to-noise ratio you will have in the final image. The problem with longer exposures is that you will run into tracking limitations with the mount. If your mount can't track accurately for a long exposure, you'll need to use the shortest exposure possible that still separates the histogram from the left side. And you will need to shoot multiple exposures and stack them. If you are going to shoot multiple frames for stacking, you don't have to expose until the histogram peak is at 40 percent. The more frames you are going to stack, the further you can push the histogram to the left, provided that you keep it completely separated from the left wall. Note that for some rare objects, like the core of M42, exposing the histogram for the sky background is going to overexpose the core. In this case, look at the image on the LCD at high magnification and adjust the exposure as necessary to correctly expose the part of the object in which you are interested. Exposure Starting Points At an urban or suburban site with a bright sky from light pollution, start with an exposure of about 30 seconds at f/4 at ISO 400. Shoot another test exposure at 15 seconds, and another at 60 seconds. At a reasonably dark-sky site, where there might be some light pollution present on the horizons, but you can still see the Milky Way, try an initial test exposure of 1 minute at ISO 1600 at f/4. At a very dark-sky site, with no light pollution at all, try an initial test exposure of 4 minutes at f/4 at ISO 1600. Remember, these exposures are just a starting point. Examine the histogram and adjust your exposure accordingly.
|
|||||||||||||||||
|
Back | Up | Next |