The most difficult thing in using a camera lens for astrophotography is focusing it. There are several different ways to achieve good focus, which we will discuss in depth in a later section, but here we will talk about the peculiarities of trying to focus a camera lens for astronomical objects. Infinity Focus When we focus for normal daytime photography, the camera lens moves the optical elements inside of it to focus on the object we have the camera pointed at. For close objects, the lens must move out away from the camera's sensor a little bit. This is done internally in most lenses.
The Sun, Moon, stars and planets are so far away, they are effectively at an infinite distance as far as a camera lens or telescope is concerned. In the old days of manual focus lenses, most lenses were made to mechanically stop their inward focus position at the infinity focus, so it was easy to focus them for the stars - all you had to do was turn the focus all the way to the infinity mark on the focus scale on the lens. These days however, most autofocus lenses are intentionally made to focus past the infinity mark. This is done to protect the autofocus mechanism when the lens is seeking focus, and, with longer telephoto lenses, to compensate for changes in focus due to temperature changes. Unfortunately, this can make focusing an autofocus camera lens a little bit tricky.
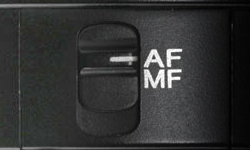
You can try to use autofocus with your lens. It might work if you have a very bright object like the Moon. You can also try it on the very brightest stars or planets. The trick here is to get the star exactly on one of the tiny focusing squares in the viewfinder. Make sure you activate only that square for autofocus. Read your camera manual to learn how to do this. Once you have achieved autofocus, turn autofocus off with the switch on the lens or on the camera body. You don't want the lens seeking focus the next time you press the shutter button. Many inexpensive camera lenses are made primarily to be autofocused. Frequently on these lenses the manual focusing ring is very small. It may also be at the very front of the lens, and the filter and lens hood may attach directly to it. In this case, it is very easy to accidentally move the ring after you have focused it. You can try taping it down, but these focusing rings are usually so incredibly touchy that if you even touch it you will throw the focus off. If you can tape the focus down without moving the focus, as you can on many other lenses, then you should do this. There are other ways around these problems that we will discuss below. Another problem you may run into with taping down the focus ring is that many zoom lenses are not parfocal. Parfocal means the focus stays the same throughout the zoom range. Most zoom lenses need to be re-focused for each different zoom setting. So taping the focus down while the lens is at, say, a wide setting, won't work if you zoom out later. You will need to remove the tape and focus again. The Autofocus Button Most DSLR cameras as set up by default to autofocus the lens when you press the shutter button half-way down. This is great for normal daytime photography, but not so great for astrophotography. If you manage to successfully autofocus on something bright like the Moon, and then you move the camera to shoot a faint deep-sky object, the next time you press the shutter button to take the picture, the camera will try to autofocus again. It won't find anything to focus on, and it may seek a new focus, and move the focus off of your previously successful infinity focus. And, if the camera is set to autofocus and it can't detect that something is in focus, it won't fire at all.
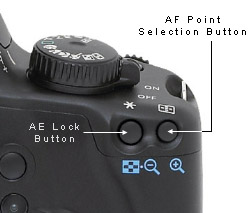
We can use these two settings in a combination of ways. For example, if we have an object that is bright enough to autofocus on, such as the Moon, we can press the AE lock button and use autofocus. Once focus is achieved, don't touch the AE lock button again. If we don't have an object that bright enough to use autofocus, we can turn autofocus off on the lens and manually focus with Live View. Then when we have achieved focus, we can turn autofocus button back on, and the focus position will be locked on the lens, and as long as we don't press the AE lock button, the focus won't change.
There are a several important things you need to know to use Live View for focusing. First of all, realize that Live View is not that sensitive. It's really made for bright scenes encountered in normal daytime photography. You're not ever going to be able to see a nebula or galaxy on Live view, but it definitely can be used for astrophotography by focusing on stars. How faint of a star that you will be able to focus on will depend on the aperture and focal ratio of the lens, and the camera settings. Second, note that most modern lenses focus past infinity. You can not just rack them all the way to the infinity mark and expect critical focus.
The faintness of a star that you will be able to see on Live view is a function of the ISO setting, the shutter speed, the aperture and f/stop. You will be able to focus on fainter stars with a larger aperture. But it is with wide-angle lenses where aperture really comes into play. When you get down into wide-angle lens' focal lengths, the true aperture gets tiny. Even if an 18mm lens seems to have a 2 or 3 inch hunk of glass in the front, that is not really the size of the aperture. An 18mm lens' true aperture at f/3.5 is only about 5mm. That is not very much. That size aperture is just not going to collect a lot of light. The big lens on the front is to get you a wide angle of view, but it is not the true aperture of the lens like on a telescope. You can easily calculate the true aperture by simply using the formula aperture = focal length / focal ratio. So with our example of a lens with 18mm of focal length and a focal ratio of f/3.5, aperture = 18mm / 3.5. Therefore the true aperture = 5.1428mm. The moral of this story is use the brightest object in the sky to focus wide-angle lenses with Live View. Don't expect to be able to see virtually anything through the viewfinder visually with an 18mm lens. They are not easy to aim exactly, but you can adopt a red dot finder to the hot shoe and aim it at the center of the field you want to shot, and then take test shots to see if you are framed correctly. If you have a large aperture scope and use a very bright object to focus on, you may get more accurate results by dialing down the shutter speed to reduce the brightness of the object on Live View.
Long fast telephoto lenses, like a 300mm f/2.8, and telescopes are sensitive to focus changes due to temperature. As the temperature falls, metal in the lenses contracts and the focus shifts. The faster the optical system, the shallower the depth of focus, and the more critical the focus. If the temperature is falling during the night, it is a good idea to re-focus. This is usually not as critical with wide-angle lenses. Bahtinov Mask A Bahtinov mask is a simple disk with a particular pattern of holes in it. It was invented by Pavel Bahtinov, an amateur astrophotographer. This disc is placed in front of the camera lens. When the lens is pointed at a star, it causes a diffraction pattern that makes it easy to judge when focus is achieved. It is simple to cut-out the pattern in a piece of construction paper or cardboard. You'll need to make a custom Bahtinov mask for the particular size of your lens, but this is easy to do. See: http://astrojargon.net/MaskGen.aspx for an online mask generator. If you have Live View, you can then just view the image of a bright star with the mask on. The Bahtinov mask makes a diffraction pattern in the form of an "x" with a line through it. The line moves as focus is changed. When the lens is focused accurately at infinity on a star, the line will exactly bisect the center of the "x". Trial and Error If you have a camera that doesn't have Live View, and the Moon is not up to autofocus on, you can just take a test exposure and vary the focus a little bit and try to find correct focus by a process of trail and error. A Bahtinov mask will make this process easy. Simply focus as best you can by eye. Then take a test exposure and examine the image on the LCD on the back of the camera at high magnification. It will be easy to tell when the image is in focus when the line bisects the "x" caused by the pattern of the Bahtinov mask. Daytime Focus for Night You can focus the lens on something far away during the daytime, and then turn off autofocus. If you don't touch the focusing mechanism, you can then use the lens at night on the stars without having to worry about re-focusing. The distance of the object you focus on in the daytime will depend on the focal length of the lens. For longer focal length lenses, the object has to be farther away.
|
||||||||||||
|
Back | Up | Next |