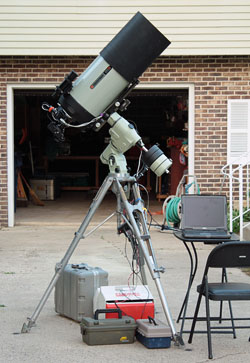
The first thing we need to decide when we shoot planetary images is what size field of view we need. This can also apply to wide-angle scenic shots as well as high-resolution magnified shots. For wide-angle scenics, it's pretty easy to just look through the camera and adjust the focal length of a wide-angle zoom lens to get what we want. If we want to shoot the full disk of the Sun (with a proper safe solar filter) or the Moon, we are going to need around 1,500 mm of focal length to fill the frame on the short side of a normal APS-sized 1.6x crop DSLR like most of the Canon consumer DSLR cameras. Once we get into really high-resolution planetary photography, our prime concern is properly sampling the image as we discussed in Chapter 1 Section 7 - Sampling. We will usually need to use a Barlow, or eyepiece projection to achieve the magnification needed to critically sample the image based on the seeing. Our second main concern is that the object we want to shoot will fit into the field of view that we have for the size of our sensor after we magnify the image to achieve proper sampling. This is usually not a problem with the planets as they are usually small, but it might be a consideration with a large sunspot group or a large lunar feature. Once we hook our camera up to our scope with whatever magnification method we use, it will be easy to see how the object fits in the field of view of the sensor. We can simply look at it on Live View or in Movie Crop Mode, or shoot a test shot, or take a short video. If the object doesn't fit, we will need to adjust the magnification down to a lower power. Prime Focus Prime focus describes a camera attached directly to a telescope without any other eyepieces or camera lenses in the optical path. The telescope then acts as the camera lens. The focal length and focal ratio of the telescope is the equivalent to that of a camera lens. For high-resolution planetary photography, prime focus is usually not enough magnification for critical sampling of small details. The image usually needs to be magnified if the seeing is good enough to reveal these details. Barlow
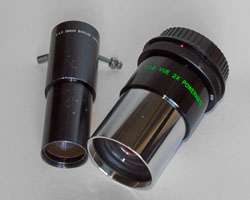
A Barlow lens, named after English engineer and physicist Peter Barlow, is a lens or group of lenses with a negative focal length. When used in the optical path of a telescope just before the focal plane, it increases the effective focal length and magnifies the image. Barlows are used to give about 1.4x to 5x magnification. Good Barlows are usually made of two or more elements that have high-quality anti-reflection coatings. Teleconverters for camera lenses are examples of a Barlow lens. The amount of magnification that a Barlow will give you is usually marked on the Barlow, but for most normal Barlows, the magnification is dependant on the distance from the Barlow lens assembly to the camera sensor. As this distance is increased, the amount of magnification increases. We need to pay attention to this because most Barlows are made for visual use with an eyepiece. An eyepiece's focal plane normally sits inside the Barlow since the eyepiece slides into the tube of the Barlow. The amount of magnification marked on a Barlow is calculated for an eyepiece. When we use a Barlow with a camera, the amount of magnification usually increases because the camera sensor is back in the camera body. When the camera is attached to the Barlow with an adapter, the sensor can be several inches further back than the normal location of the focal plane of an eyepiece. For example, I have a Dakin Barlow which is marked as being 2.4x magnification. But when I use it with my Canon DSLR camera, the actual magnification is closer to 2.9x to 3x. Some Barlow lenses, such as the 2x, 2.5x, and 4x Powermate Barlows by TeleVue, are made so that the magnification stays relatively constant even if the camera distance is changed. This can be important if you need to work at a specific magnification and focal ratio. It can also be useful to be able to change the magnification by moving the camera back with a spacer if we need more power. I usually use two different Barlows. One gives me 2x magnification with my f/10 SCT so that it works at f/20. The other gives me about 3x magnification so that the SCT works at about f/30. These are the focal lengths I need for critical sampling based on my pixel size when the seeing is average (f/20) and when the seeing is good (f/30). Using a Barlow is an excellent way to increase the magnification within the range of about 1.4x to 6x. Barlows are specifically designed for this function. They will have the least amount of optical elements so light loss will be minimized. Eyepiece Projection
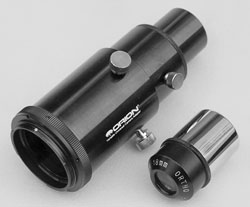
Eyepiece projection uses a special adapter that allows us to use an eyepiece to project a magnified image onto the camera's sensor. No camera lens is used on the camera, only the telescope's eyepiece is used in the adapter, which is inserted into the focuser of the scope with the camera attached to the adapter. Eyepiece projection is used when you need more magnification (usually 6x or more) than you can achieve with a Barlow. This optical arrangement is a step up in complexity as most modern eyepieces have many elements which can absorb and scatter light. As with a Barlow, the magnification factor can be changed by changing the distance between the eyepiece and sensor in the camera. Afocal
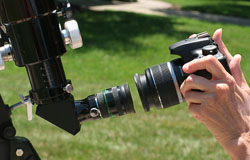
Afocal photography uses a telescope with an eyepiece in it, and a camera with a camera lens on it. You first need to focus both the telescope and camera lens on infinity. Then you simply hold the camera and its lens up to the eyepiece and shoot through it. This can sometimes be a bit tricky as you don't want to touch the scope while shooting because that can cause the image to be blurred. And the camera also needs to be held square to the eyepiece. Vignetting can also be a problem with some camera lenses when used afocally. You can purchase an adapter that will hold your camera and lens in the correct location for afocal photography, however using a Barlow or eyepiece projection is usually a much better choice for high-resolution planetary photography with a DSLR camera. Afocal photography is usually needed for point-and-shoot digital cameras where you can't remove the lens. The equivalent focal length of the system is the telescope's magnification multiplied by the focal length of the camera lens. You can determine the scope's magnification by dividing the scope's focal length by the focal length of the eyepiece. For example, if your scope has 1,000 mm of focal length, and you are using a 25 mm eyepiece, the magnification is 1000 / 25 = 40x. Then if you are using a 50mm lens on your camera, the equivalent focal length of the afocal system is 40 x 50mm = 2,000 mm. The equivalent focal ratio is determined by dividing the equivalent focal length of your afocal system by the diameter of your scope's objective. If you are working at an equivalent focal length of 2,000 mm, and you have 100 mm of aperture, then you have an effective focal ratio of 2,000/100 = f/20. Determining Magnification Depending on the method you use to magnify the image, you can use a formula to determine the amount of magnification. Where M = Magnification, FL = Focal Length You can also measure the size of a known object in an image to determine the focal length that was used. You don't have to perform these calculations by hand. The calculators in the appendix will do it for you, all you have to do in input the numbers of the equipment you are working with. Equipment Preparation Contrast is important in high-resolution planetary photography. Check to see if your mirror or objective needs cleaning as dirt and dust can cut down on contrast. Usually it is good to clean your objective as little as possible when you use it for visual observing. But if you have not cleaned it for a long time, or you observe in a particularly dusty environment, it may need to be cleaned more often. Make sure you clean it properly so that delicate coatings are not damaged. Also keep an eye on dust and dirt that may get on your camera sensor. This will inevitably happen with a DSLR after it has been used for a while. At long focal ratios, dust spots on the cover glass over the sensor will show up as shadows in the image. They will look like dark spots in even-toned areas. Be careful that you don't mistake a dust shadow for something like a sunspot, shadow of a moon transiting across the face of Jupiter, or a comet or an asteroid crashing into Jupiter. You can shoot a test shot to see if you have this problem. Simply aim your telescope at a clear section of sky with Barlow or eyepiece projection working at a high focal ratio. You can even use a camera lens stopped down to its smallest aperture. Sensor Cleaning If you have dust that is causing problems, first try using your DSLR camera's self-cleaning function. Read the manual to learn how to do this. Most cameras try to clean themselves when they are turned on and off, but will also let you initiate the cleaning function manually. Try holding the camera so that the sensor is facing down when you run the cleaning function. If this does not clean the dust spot off, and sometimes it won't, you may have to send it back to the manufacturer to have it cleaned. If you are feeling adventurous, you can try more aggressive cleaning methods yourself, but note that you can void your warranty and damage your camera by trying these methods, so you have to accept personal responsibility for bad things that might happen if you try these methods. Having said that, I can tell you that I have cleaned dust off the cover glass of the sensors of my cameras without damaging them. Maybe I am lucky. Maybe you are not. To clean a sensor cover glass, you have to be careful and do it the right way. Cleaning Digital Sensors is a web site and excellent source of information and more details on how to clean your sensor. Filters Planetary photographers who shoot with monochrome video cameras typically use individual red, green and blue filters to create a color image. One set of video frames is shot with each filter. Three sets of exposures are needed to create a color image. A DSLR, on the other hand, while still using a monochrome sensor, can shoot color images in a single exposure or single video. DSLR sensors have a Bayer array of red, green and blue filters over the individual pixels in the sensor. Each pixel has only one color filter over it. A four-pixel group will have two green, and one red and one blue filtered pixel. By examining neighboring pixels, the color can be determined for each individual pixel, and the resulting image has color data for every pixel. This is also called "one-shot color", because a full-color image can be created with a single exposure, whereas a monochrome camera requires three separate exposures. This means that with a DSLR, you do not need a filter wheel with red, green and blue filters to shoot color with your camera. Those filters are built in. Other filters, however, such as an ultra-violet (UV), infra-red (IR) and color filters can be used to enhance certain kinds of planetary details in certain situations. For example, a UV filter may be helpful to record cloud details on Venus. IR filters can sometimes record more planetary detail because the seeing is usually better at longer wavelengths. However, a specially modified DSLR camera is required to record these wavelengths. A stock DSLR camera normally comes with a filter over the sensor placed there by the manufacturer to filter out UV and infrared (IR) wavelengths. The sensor is capable of recording these wavelengths, but this filter blocks them from reaching it. Vendors such as Gary Honis, Hap Griffin, Hutech and MaxMax can replace that filter in a DSLR to allow it to record in the UV and IR. Note that even with a modified camera and these special filters, the image will only be recorded in pixels with the corresponding color filter. For example, IR-filtered images will only be recorded with the red-filtered pixels in the camera. This drastically cuts down on the resolution because there are only 1/4 of the total pixels with red filters over them, and they are only placed every other pixel, so the spatial resolution is cut in half. Special safe solar filters are a requirement for normal white-light photography of the Sun. You do not need a specially modified camera to shoot the Sun, but you do need a special filter.
Baader makes an excellent mylar filter material for solar photography that is safe and of high optical quality. Other special solar filters will be covered in Chapter 4 Solar System Objects, Section 2 - The Sun. Other Accessories An atmospheric dispersion corrector corrects for the prismatic color dispersion caused by the atmosphere when objects are viewed at a low elevation. Atmospheric prismatic dispersion is commonly seen on bright stars and planets low in the sky as a blue fringe on the top edge of the object and a red fringe on the bottom. It is caused by different color wavelengths bending a different amount as they are refracted in the Earth's atmosphere. This effect can especially cause problems on planets like Venus and Mercury which never get really high in the sky at night. It can also cause problems on any planet if it is observed at a low altitude.
|
||||||||||||
|
Back | Up | Next |