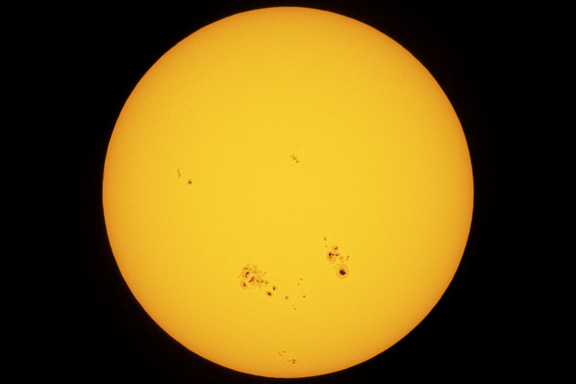
The Sun is our nearest star and the brightest object in the sky shining at magnitude The Sun is a gigantic sphere of plasma, a special state of matter similar to a gas, which is ionized with charged particles. It is made up of mostly hydrogen and helium gas that gives off a prodigious amount of light and energy because of nuclear fusion in its core. The Sun is classified as a G2V yellow dwarf spectral class star although our eyes see its light as white because we have evolved under it. It has a diameter of 1,392,000 km (864,948.7 miles) or about 109 times the diameter of the Earth. It contains 99.8 percent of the total mass of the entire solar system. The energy given off by the Sun is produced by nuclear fusion during the conversion of hydrogen into helium. The Sun has used up about half of its hydrogen since its birth 4.5 billion years ago. It is expected to take another 5 billion years before it runs out of hydrogen. Then it will swell in size and turn into a red giant, and then shrink down to a white dwarf, and finally a black dwarf. The Sun does not have enough mass to explode in a supernova or turn into a black hole. The Earth orbits around the Sun at an average distance of 149.6 million kilometers (about 93 million miles). By definition, this is one astronomical unit (AU). At this distance, it takes light 8 minutes and 19 seconds to reach the Earth. Because the Sun is not a solid body, different parts of it rotate at different rates. The equator takes about 25.6 days to make one revolution. At the poles it take more than 33 days. However, because the Earth is moving around the Sun in the same direction the Sun is rotating, it appears to take about 28 days for the Sun to rotate at its equator. This is called a synodic period. The visible surface of the Sun that emits light is called the photosphere. It has a temperature of about 5,800 K. It is comprised of convection cells called granules, each about 1,000 km in diameter. Hot gas rises in the center of a granule, with cooler gas falling at the edges, which define the spaces between them. Granules have a lifespan of about 8 minutes, accounting for the seeming boiling appearance of the photosphere seen in time-lapse videos. Individual granules can group together into larger clusters which can last about 24 hours. Under good seeing conditions, these granules can be resolved in photos.
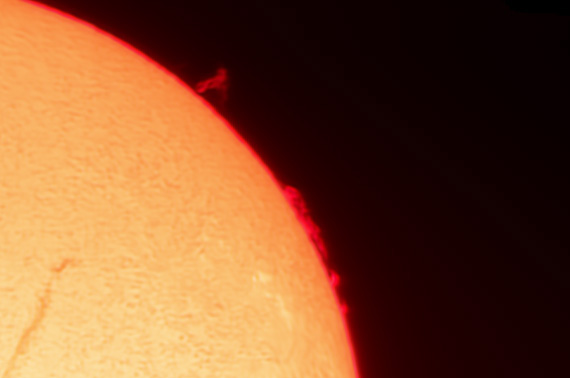
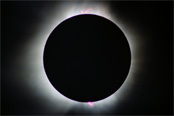
The Sun's atmosphere extends above the photosphere into the chromosphere, corona and heliosphere. The density of the solar atmosphere starts to drop rapidly in the chromosphere. Normally invisible, the chromosphere can only be seen during a total eclipse or with special filtration, where it is seen mostly with a pinkish red color. In the image above, the chromosphere can be see as a thin red line between the yellow photosphere of the Sun and the red edge prominences. The corona is the Sun's outer atmosphere. It has a temperature of about 3 million K, although it is very tenuous. The corona eventually turns into the heliosphere which extends far out into the solar system past Pluto. The corona can usually only be seen at totality during a total solar eclipse, or with a highly specialized coronagraph. The solar wind is a stream of particles (electrons, neutrons and protons) originating in the upper atmosphere of the Sun. Solar flares can release tremendous amount of energy sometimes followed by Coronal Mass Ejections (CMEs) which send charged particles out through space. These charged particles can interact with the Earth's magnetic fields causing geomagnetic storms and aurora on Earth. You can find out what's going on with the Sun at SpaceWeather.com and at the NOAA Space Weather Prediction Center. Solar Features
The Solar Cycle The Solar Cycle lasts about 11 years. During this period, solar activity waxes and wanes. At solar maximum the Sun is most active with the most sunspots, solar flares, and coronal mass ejections. At solar minimum, the Sun is at its most quite. The Sun underwent its last solar minimum, a deep, long-lasting one, in 2008 - 2009. The next maximum is expected to occur in 2013. Between the years 1645 and 1715, solar activity was very low, a period called the Maunder Minimum. This 70 year period should have experienced at least 6 solar cycles with alternating maximum and minimum sunspot numbers, but few sunspots appeared during these years. The Maunder Minimum also coincided with some of the coldest periods of the Little Ice Age, a period when North America and Europe experienced bitterly cold winters, especially in the winter of 1708-1709, although it is uncertain how much solar activity had to do with it. The Dalton Minimum from 1790 to 1830, and the Spörer Minimum from 1460 until 1550 were 40-year and 90-year periods respectively of greatly diminished solar activity like the Maunder Minimum. At the start of a solar cycle, sunspots appear at high solar latitudes in both the northern and southern hemispheres of the Sun. At solar maximum, they move towards the solar equator to a latitude of 15 degrees, and gradually move to 7 degrees as the cycle progresses. As the previous cycle ends, its spots start to fade and new spots start appearing at high latitudes. Solar Safety - Important! The most important thing you need to know about solar visual observing and solar photography is that they can be very dangerous. The Sun puts out an extreme amount of energy, much of it invisible to normal human vision. Severe damage can occur without you even knowing it. You must use a safe, proper solar filter made specifically for viewing or photographing the Sun! According to B. Ralph Chou, MSc, OD, Associate Professor; School of Optometry University of Waterloo in Ontario, Canada, "observing the sun with inadequate or no eye protection results in "eclipse blindness" or retinal burns." Chou says that "Longer wavelengths of visible light and near-IR radiation are absorbed by the dark pigment epithelium below the retina, and converted into heat which can literally cook the exposed tissue," and that "Photocoagulation destroys the rods and cones, leaving a permanently blind area in the retina." Chou goes on to say "The danger to vision of inadequately protected viewing of the sun is significant because light-induced retinal injuries occur without any feeling of pain (there are no pain receptors in the retina), and the visual effects do not occur for at least several hours after the damage is done." It is possible to visually observe and photograph the Sun safely with solar filters specifically designed for observing the Sun.
Safe White-Light Solar Filters White-light solar filters can be used for solar photography. A Baader white-light visual solar filter with an optical density of 5 will transmit only 0.001 percent of the Sun's light. This makes it safe for visual solar observing. Baader also makes a photographic solar filter with less density, so more light is transmitted, and shorter exposures can be used, something that is helpful for high-magnification work at slow focal ratios. The Baader photographic filter has an optical density of 3.8, which transmits 0.0158 percent of the light. A Baader photographic filter is not safe for visual observing. Safe white-light solar filters can be purchased from the following vendors: Special Solar Filters
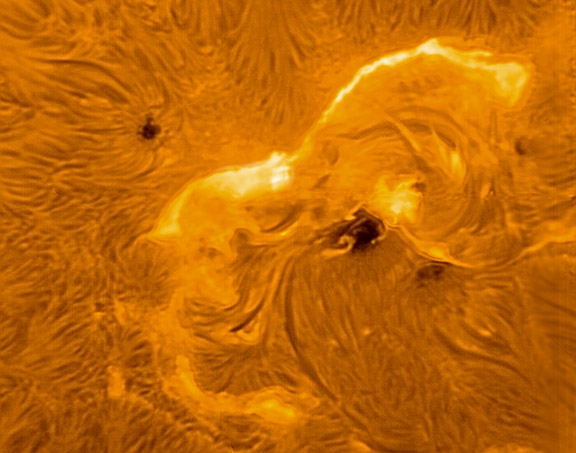
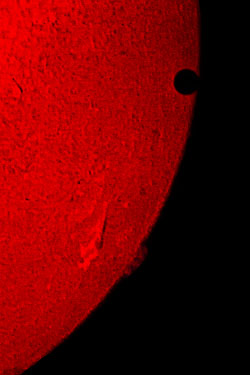
Other specialized filters and dedicated telescopes such as those made by Lunt, Coronado, and DayStar are also available for solar work such as narrowband Hydrogen-Alpha (Ha) that passes Ha light at 656.3 nm and Calcium-K (CaK) at 393.4 nm. These filters pass only a very narrow range of wavelengths that reveal different details on the Sun. Note that Ha solar filters must be used with special pre-filters that filter out most of the Sun's light, and should not be used alone. Also note that the Baader Ca-K filter is not for visual use. It is for photographic imaging only. It is not safe for visual observing. The human eye is not that sensitive, and has poor resolving power, at the Ca-K wavelength of 393.4 nm. Older observers whose eye lenses have yellowed with age will see virtually nothing through a Ca-K filter or dedicated Ca-K telescope. Don't mistake a narrowband Ha filter made for deep-sky astrophotography of emission nebulae for one that can be used on the Sun. These are different filters. Solar narrowband Ha filters pass wavelengths less than 0.1 nanometer wide around the Ha wavelength of 656.3 nm, whereas an Ha deep-sky filter will have a bandpass of 6 to 15 nm. They are not the same thing, and you need to use the right one for solar work, so be sure you know what you are doing before you try something like this. The narrower the bandpass of the solar hydrogen-alpha filter, the more contrast and finer details you will have in the image.
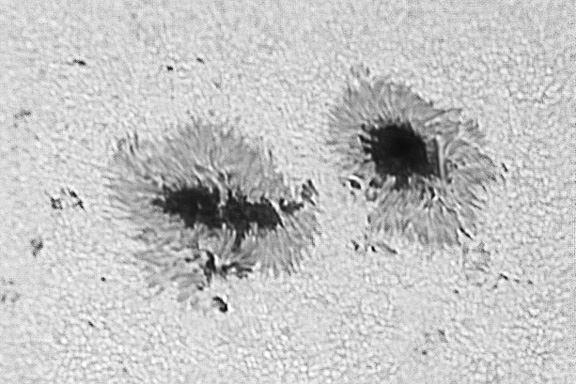
As mentioned in Chapter 3 Taking Pictures, Section 4 - Equipment Setup: Filters, to photograph near UV such as the Ca-K line at 393.4 nm and the Ha line at 656.28 nm, you need a specially modified DSLR camera. Even with a modified camera and these special filters, the image will only be recorded in pixels with the corresponding color filter. For example, Ha-filtered images will only be recorded with the red-filtered pixels, and the blue-filtered pixels will only record the light at 393.4 nm. This drastically cuts down on the resolution because there are only 1/4 of the total pixels with red or blue filters over them, and they are only placed every other pixel, so the spatial resolution is cut in half. Baader also makes a solar continuum filter that offers increased contrast of the Sun's surface in white light, reduces chromatic aberration in non-apochromatic refractors, and reduces seeing effects at shorter wavelengths. This filter must be used with a safe white-light solar filter like Baader's Astro Solar Filter Foil. Narrowband Hydrogen-Alpha Photography The Herschel Wedge A Herschel wedge can also be used for white-light solar photography. It uses a first surface uncoated prism that reflects about 5 percent of the light gathered by the full aperture of your telescope, and an ND3 neutral density filter that reduces the amount of light further by a factor of 1000. It does not use a filter in front of the objective. Ninety-five percent of the light passes through the back of the Herschel wedge prism. You have to be extremely careful with a Herschel wedge because a tremendous amount of light and energy can be gathered by the aperture of even a small telescope, and the ninety-five percent that is sent out the back of the Herschel wedge can cause burns. I know one famous solar observer who lit his Cuban cigars with the light coming out the rear end of a Herschel wedge. A Herschel wedge is only for use with refractors. They usually come with a polarizing filter or neutral density filter to fine tune the brightness of the image. Some suppliers of Herschel wedges are: Solar Photography Tips Sunspots Sunspots are caused by intense magnetic fields which block the upwelling of hot plasma from the interior of the Sun. This causes sunspots to appear to be darker because they are cooler than the surrounding areas of the Sun's brilliant surface. Sunspots have a temperature of about 3,000 - 4,500 K while the rest of the surface is about 5,800K. The core of the Sun, by contrast, is 15.5 million degrees K.
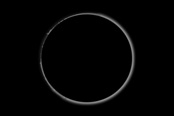
Sunspots can last weeks or months with the largest sunspots growing to some 50,000 km, (30,000 miles) in diameter. These are big enough to be seen with the unaided eye, provided proper filtration is used to prevent damage to eyesight. Viewed from above the plane of the Solar system as defined by the Earth's orbit, the Sun rotates counterclockwise. From our perspective on Earth, the Sun sunspots will appear to move from sky east to sky west across the face of the Sun. Before Galileo, the Sun was thought to be perfect. Galileo shattered this world view when he observed the Sun with one of the first telescopes and found it had spots. He published drawings of them in 1613 in Istoria e Dimostrazioni Intorno Alle Macchie Solari e Loro Accidenti Rome (History and Demonstrations Concerning Sunspots and Their Properties). By observing Sunspots over a period time and noting their movement, Galileo also discovered that the Sun was rotating. To photograph sunspots, you must use a safe solar filter. You generally don't need much more than 2,000 to 3,000 mm of focal length or a focal ratio higher than about f/20. This is because seeing in the daytime rarely allows resolution better than about 5 arcseconds, and this can be recorded with a 5-inch scope working at about f/16 with a camera with the 4.3 micron pixels found in an 18 megapixel DSLR camera like a Canon T3i (600D) T2i (550D), 60D, or 7D. Under good seeing conditions, details such as white-light surface granulation may be seen and recorded down to about 2 arcseconds. If you have a larger scope like a reflector or SCT, you can make a smaller aperture off-axis mask. Solar Eclipse Photography When the Moon happens to align with the Sun in the sky from our vantage point on the Earth, the Moon can block the light from the Sun, resulting in a solar Eclipse. By chance the Moon is almost the exact same apparent size in the sky as the Sun. The Moon is actually has a diameter of 3,474 km, and the Sun's diameter is 1,392,000 km. The Sun is about 400 times larger than the Moon, but by coincidence, is also about 400 times farther away. Because the Moon's orbit around the Earth is not perfectly circular, sometimes the Moon appears to be larger than the Sun, and sometimes it appears to be smaller than the Sun. When the Moon appears larger than the Sun and happens to pass in front of it, we get one of the most spectacular sights in all of nature - a total solar eclipse. When the Moon appears smaller than the Sun and happens to pass in front of it, we get an annular eclipse.
There are four types of solar eclipse: Photographing a Total Solar Eclipse Solar eclipses occur fairly regularly, about every six months, with a mixture of partial, annular and total. The next total solar eclipse that will be visible from the United States occurs on August 21, 2017.
Take your safe solar filter off just before the start of totality. Start your photography of the total phase of the eclipse at 1/2000th of a second exposure at f/8 at ISO 100 (or the equivalent for whatever f/stop you are shooting at) for the Diamond Ring and Bailey's Beads just before second contact. Then methodically increase your exposure by one stop increments until you reach your longest exposures at mid-totality. Then start shortening your exposures, again by one stop increments, until you reach 1/2000th of a second at f/8 for ISO 100 for the Bailey's Beads and Diamond Ring at third contact at the end of totality. This exposure series can then be digitally composited together to reveal the full majesty of the corona during totality. You can go longer at mid-totality to record maximum corona if you have a wide enough field of view, and possibly even record some Earthshine on the face of the moon if you are extremely lucky. For other ISO's simply multiply the exposures, for example, if you need 1/500th second at f/8 at ISO 100 for prominences, but you want to shoot at ISO 200, just use 1/1000th second at f/8. Remember that with DSLR Cameras, the dynamic range goes down as ISO goes up, so shoot at ISO 100 or 200 if possible. Shoot Raw file format. Make sure you have a memory card with a large enough amount of memory to hold all of the frames that you will shoot during totality. You do not want to be changing cards during totality. Consider automating the entire image capture sequence with a program like Images Plus or Backyard EOS during totality so that you can observe the eclipse visually. If you shoot with a safe solar filter during the partial phases, be sure to remember to remove it just before totality, and to BE SURE to replace it just after the end of totality. Don't forget to focus on the Moon's limb just before the start of totality. Do this through your safe solar filter. Since the filter is in front of the main objective, the focus should not change when it is removed for totality.
|
|||||||||||||||||||||||||||||||||||||||||||||||||||||||||||||||
|
Back | Up | Next |
|||||||||||||||||||||||||||||||||||||||||||||||||||||||||||||||