Collimation is the precise aligning of the optical elements in a telescope so that it performs as well as it can. Collimation is incredibly important for high-resolution planetary imaging, much more so than most people realize. Newtonians, Schmidt-Cassegrains, and other mirror-based scopes should be critically collimated before each object is shot. Collimating Tips Collimating a Refractor Refractors don't generally need to be collimated, but they should be checked. Collimation in a refractor generally refers to adjusting the tilt of the lens cell so that the optical axis goes down the center of the telescope tube, focuser and drawtube. The lens elements must also be radially centered and aligned, but radial alignment is usually not something the user can adjust. If the radial alignment is off, the scope usually needs to go back to the manufacturer. The orthogonality, or squaring, of the focuser to the tube should also be checked. This can be done by making a mask that covers the aperture with a tiny hole exactly in the center. A laser can then be placed in the focuser's drawtube. The beam from the laser should hit the tiny hole in the mask over the aperture. Refractors usually have two sets of screws on the front of the lens assembly or cell. The lens is held in a cell that is attached to the tube by three of these screws. The other three screws adjust the tilt of the lens cell by pushing against the tube and are used to adjust the collimation. After the scope is collimated, the first set of screws is locked down. To collimate a refractor, use a Cheshire eyepiece. Cover the lens with the lens cap. Illuminate the 45 degree reflective surface of the Cheshire. Adjust the three tip tilt screws in the cell of the lens assembly until the reflections of the dark eyepiece hole in the Cheshire is centered in the reflections. Collimating a Newtonian It is important to collimate a Newtonian telescope each time you use it. For critical high-resolution planetary work, it should be collimated for each object to be shot, preferably on the same side of the meridian on which the object will be shot. The following items should be done when the telescope is constructed or when the scope is first purchased. They should be checked before the telescope is used for the first time. In a well-constructed telescope these things should not change, but it's a good idea to check them once a year. Each time you use the telescope: Once you have collimated your telescope's diagonal and primary mirror, you can star test it if it is cooled down and if the seeing is good enough. Examine the image of a star at high power, 25x to 50x per inch of aperture. The star at focus should show the Airy disk surrounded by symmetrical and concentric diffraction rings. Adjusting a Newtonian is easy and for critical high-resolution planetary work should be done immediately before imaging each object. Collimating a Schmidt-Cassegrain It is also important to collimate a Schmidt-Cassegrain telescope each time you use it. For critical high-resolution planetary work, it should be collimated for each object to be shot, preferably on the same side of the meridian on which the object will be shot. Most SCT users do not realize that SCTs have to be critically collimated. Most think their SCT "holds collimation pretty well!" But most SCTs focus by moving the primary mirror. You will usually see a lot of image movement when reversing direction when focusing. This is because the primary mirror can not fit perfectly on the baffle tube inside the scope without any play in it. When the primary mirror shifts like this during focusing, critical collimation is lost. It is advisable to use an auxiliary Crayford focuser on the back of the SCT and to lock the primary mirror down so that it can not move. This will help in focusing as well as collimation. Most SCT users also don't realize that just looking at the grossly out of focus doughnut, or at the out-of-focus Fresnel rings in an SCT is not enough to achieve accurate collimation. They should critically examine the Airy disk and diffraction rings on an in-focus star. The problem is that the Airy disk and diffraction rings in a large telescope are most often not visible, unless the seeing is excellent, and it rarely is. This is where a program like Metaguide can be very helpful. You can use it to average a number of frames to help tame the seeing to a certain degree. The primary mirror in an SCT is usually not adjustable as it is in a Newtonian. Only the secondary mirror can be adjusted in an SCT. Collimating an SCT is critical for its high-resolution performance because of the secondary mirror's magnification factor. It's usually about 5x, so any tiny error in collimation is going to be multiplied. Check your scope's owner's manual, or contact the manufacturer to determine exactly how to adjust the secondary. Some secondary assemblies use springs, some do not. Some use screws in a push-pull arrangement where when one screw is loosened, the other two have to be tightened. It is important to learn exactly how your secondary assembly works or you might have the secondary fall out of the assembly and crash into the primary mirror. The star will move in the field after adjusting the collimation. Re-center the star each time before continuing to adjust the collimation. There are three levels of accuracy in collimating an SCT:
The final adjustments in collimation can be very small, sometimes just a fraction of a turn of the aligning bolt.
Collimation Tools These inexpensive tools are very helpful in collimating a telescope. Some manufacturers combine the Cheshire and cross hair sight tube. Laser Collimators You can use a laser to help in collimating your Newtonian. Lasers for collimation are specially made to fit in a 1.25 inch or 2 inch focuser drawtube. When you first get the laser, you need to check to make sure that the beam is collimated parallel to the axis of the body of the Laser. You can check this with a set of "V" blocks, or by putting it in your focuser drawtube. In both cases, aim the laser at a spot on the wall and rotate it to see of the spot stays in the same location. If it does not, contact the laser manufacturer to see how to collimate it.
For the critical final step of adjusting the tilt of the primary mirror of a Newtonian, you really need to use a Barlowed laser. See Neils Olof Carlin's article on Collimation with a Barlowed Laser in the January 2003 issue of Sky & Telescope magazine. You can't use a normal laser for collimating an SCT. You can try something like a Hotech Advanced Laser CT Collimator, but it costs $455 and does not seem that easy to use. Plus, you will probably not be using it to collimate your scope close to the position you will be shooting in, which can cause problems. Software for Collimation There are several pieces of software that are designed to help with collimation. They can be especially helpful if you are collimating by yourself because you can look at the display as you make adjustments.
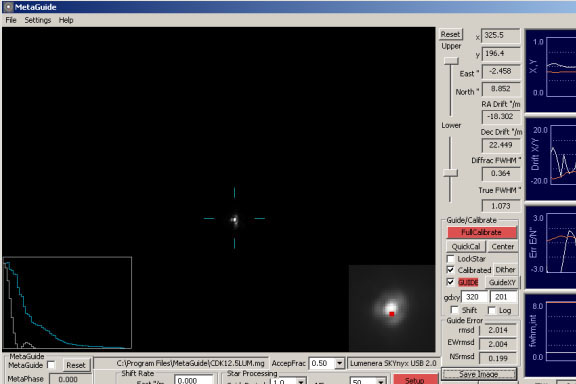
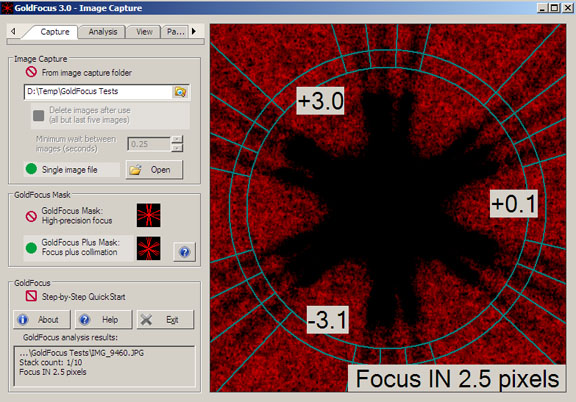
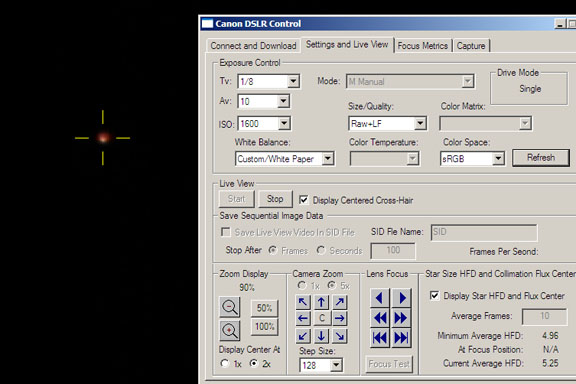
Software that uses your DSLR camera to collimate can be a tremendous advantage for high-resolution planetary photography. The camera is already in place and it is focused. After you achieve collimation, you don't need to change or move anything, you just swing over to your planetary target and start shooting. Artificial Stars An artificial star uses a light source, such as a flashlight, with a tiny pinhole in a cover over the light. If placed far enough away from the scope, it can substitute for a real star. Artificial stars are supposed to help by allowing collimation on cloudy days, or indoors. It provides better seeing because it is closer to the scope and you don't have to look through a lot of potentially bad seeing in the atmosphere. But there are problems with using an artificial star for critical collimation for high-resolution planetary work. First, the artificial star has to be at quite a distance from the telescope, which virtually rules out using it indoors. You can also run into ground level seeing effects outdoors if you are looking over concrete or asphalt. A second problem is that you have to move the mirror out a lot in an SCT to reach close focus, so you will lose critical collimation when you move it back to infinity focus. A third problem is that you would generally use an artificial star with the tube parallel to the ground, but this is not how you will use the scope when you shoot an object in the sky. The mirror can shift when you aim it overhead, and unless the mirror is locked down (and in many cases even if it is locked down) this will throw off critical collimation. And, you can't really lock the mirror anyway because you need to close focus. You might be able to use a very long extension tube to reach focus, but you still have the potential problem of the mirror moving when you aim the scope higher in the sky from its original horizontal collimation position. Artificial stars can be useful in obtaining an initial collimation for a scope that starts out badly out of collimation. Critical collimation should be performed on a star near the object you plan to shoot just before imaging it. Problems in Collimating The biggest problem in critically collimating a large telescope is that you generally can't see the Airy disk and diffraction rings because of seeing. I have used a ToUcam web cam and Metaguide and a Barlow to collimate, as well as a GoldFocus mask and software. The attractive thing about GoldFocus is that you can use your DSLR to take the images that GoldFocus software uses to analyze the collimation, and you can also use it to focus. Your camera and scope focus stays in exactly the same place and all you need to do is move the scope to the planet you want to shoot. Multiple frames can also be averaged in GoldFocus to deal with less-than-great seeing conditions. Metaguide also averages many frames to give you a better star image in less-than-great seeing. Even with these programs, the seeing has to be decent. If it's not, it's probably not worth shooting high-resolution planetary images anyway. Prismatic atmospheric dispersion can elongate the star. Using a red filter can help with this. If you are working by yourself, you might not be able to reach the collimation screws while looking at the star image in the eyepiece. Get someone to help you adjust the collimation screws while you examine the star image. Since you should collimate at the focal ratio you plan to shoot at, this generally means a lot of magnification at a long focal length. This produces a small field of view, so it can be hard to find and center a star for use in collimation. You will have the exact same problem in centering the planet you plan on shooting, so you have to come up with a solution. You can use an accurately aligned finder, or auxiliary guidescope, or Go To. If you use a web cam and Metaguide to help with collimation, the web cam will probably focus at a different location than your eyepiece. If the star is grossly out of focus, you might not be able to see it with the web cam. Turn up the gain and exposure for the web cam to their maximum to find the star initially. You can turn them down after you have focused. Once you have focused a star in the web cam, use a parfocalizing ring on a medium power eyepiece. This will get you very close the next time you need to collimate with the web cam. If you use a web cam and Metaguide, the web cam will probably focus at a different location than your DSLR camera. The ToUcam that I have used ends up focusing fairly close, so I only have to move the Crayford focuser a little bit to reach focus with the DSLR after I have collimated. But if you use a web cam that focuses far from the point where your DSLR focuses, you may need to move the primary mirror to reach focus if your Crayford has limited travel. My Crayford only has about 1/2 inch of focus travel. Moving the primary to focus is a big problem as this will throw off the collimation. In this case you may need to change the focus of the web cam to match the DSLR by using a parfocalizing ring on the web cam or by cutting down the body of the web cam if it needs to focus closer. Collimating at high power gives you a very small field of view. If you are not correctly polar aligned, the star may drift out of the field, or you may have to constantly re-center it to keep it in the field. Take the time to accurately polar align before trying to collimate as keeping the planet in the field will also be a problem if you are not correctly polar aligned. Problems in Holding Collimation Moving the primary mirror in an SCT to focus will throw off critical collimation. For critical high-resolution planetary work, lock the mirror down and use a Crayford focuser on the back of the tube. Even locked-down, the mirror can move when the scope crosses the meridian, and it can move if the mount's Go To does a meridian flip to shoot an object on the other side of the meridian. So shoot on the same side of the meridian that you collimate on. If just crossing the meridian can move the mirror and throw off critical collimation, you have to know that transporting a scope in a car, no matter how well packed it is, will also throw off critical collimation. Just moving a scope from inside to outside can throw off critical collimation. Collimation Resources Entire books have been written on collimation. For more in-depth information refer to:
|
||||||||||||
|
Back | Up | Next |