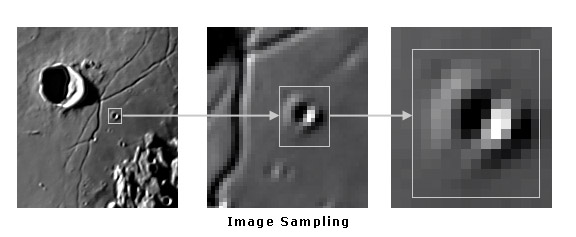
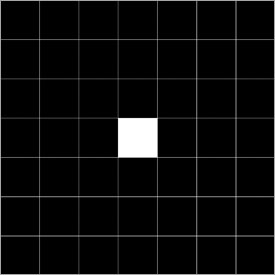
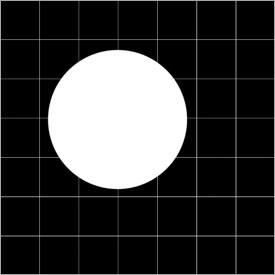
When we take an image with a DSLR camera, the sensor is comprised of a grid of pixels. Each of these pixels takes a snapshot of the brightness of the light that falls on it during an exposure. Each pixel takes a sample of a small part of the whole image. The sample is the size of the diagonal of a pixel. For a square pixel, the diagonal is 1.414x the size of a side. An individual pixel is the smallest amount of detail that we can have in an image. Unfortunately, a single pixel doesn't convey much information about detail in an image except brightness, and it is just a square block. We need to have several pixels to record detail. If the finest detail that our scopes can produce on a given night, based on the seeing, is one arcsecond, and the image scale of our telescope is one arcsecond per pixel, then we won't actually resolve any detail at the one arc-second size. All we will have is a single, square, illuminated pixel. We need to use pixels with a diagonal size smaller than the finest detail we hope to record. The problem is we can't really change the size of the pixels in our DSLR cameras. We can, however, magnify the image to enlarge the detail so it can be correctly sampled by the size of pixels we have. How much magnification we need depends on the size of the pixels in the sensor in the camera that we use to record this detail. We need to match magnification to the pixel size in our cameras and the detail present in the image as allowed by the seeing. Sufficient Sampling Recording the detail is called sampling. When we have enough pixels to record the finest detail, we have sufficient sampling. If we do not have enough pixels to record the smallest detail, we are undersampled. If we have more pixels than we really need to record the finest detail, we are oversampled. For high-resolution planetary photography, we will miss fine detail if we are undersampled, and we will be inefficient if we are oversampled. Oversampling leads to a poorer signal-to-noise ratio in each pixel because the available light from an object is spread out over more pixels, but no more detail is resolved because that is limited by diffraction and seeing. High-resolution detail on the Sun, Moon and planets is very small. It is at the limit of resolution of the seeing and our telescope's optics. To photograph this fine detail, we need to magnify the image based on the size of the pixels in our camera. How much we need to magnify the detail for high-resolution work is the question. Information theorists Harry Nyquist and Claude Shannon formulated a theory, called the Nyquist-Shanon sampling theorem, for telecommunications and signal processing. It basically says that you need to sample at 2x finer than the detail to digitize it so that all of the information is preserved. This is, of course, a vast oversimplification, but it gives us a starting point. Nyquist really applies to two-dimensional waveforms. For planetary detail, we will need to sample more than 2x finer than the spot size of the Airy Disk that we hope to record as we will see. Fitting a Round Peg into a Square Hole The first problem we encounter is that we are going to be sampling a round spot with a square grid. Let's look at some examples of what a spot would look like at various magnifications compared to a fixed pixel size. In the first example, let's imagine we have a scope that produces a spot that is the same size as the pixels in the camera.
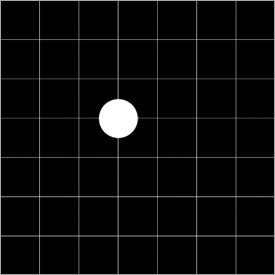
In this case, the round spot ends up being a single square pixel in the image with a brightness the same as the brightness of the spot. Spots in any optical system that has a faster focal ratio and produces smaller spot sizes would still be recorded as a single square pixel. While this would record the spot and definitely be a detection of it, it is not a very good representation of the spot as a spot is round, and this pixel is square. Another consideration is what happens if the spot's light doesn't fall exactly centered on a single pixel. We can see the results below.
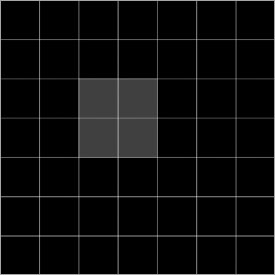
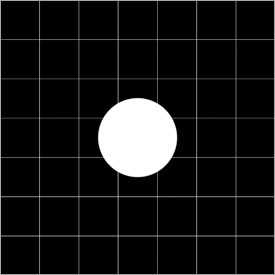
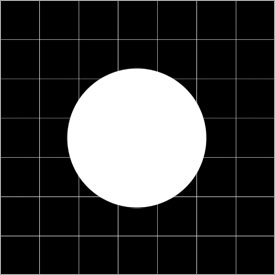
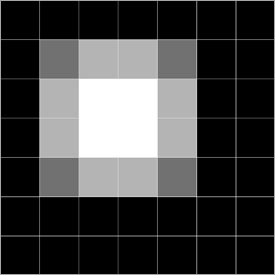
Here, the spot falls on the intersection of 4 pixels. In this case, the resulting image of the round spot on the pixel grid is again square and not round. Only now the spot is four pixels square. Each pixel only receives 1/4 of the total light, so the brightness of each pixel is reduced. Any offset of the star would still produce a four pixel grid, only with pixels of varying brightness. We need smaller pixels to sufficiently sample the spot to make it look round in our final image. But we can't change the pixel size, so we need to magnify the image. Let's magnify the spot to make it twice as big as a single pixel and see what happens. To do this, we would need to double the focal length of the telescope by using a 2x Barlow.
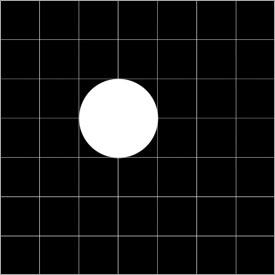
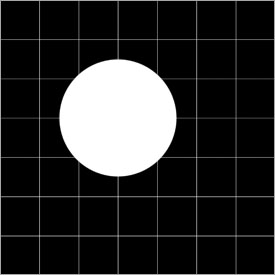
In this example seen above, the spot happens to fall so its center coincides with the center of a pixel. Here, the spot is beginning to look like it is sampled correctly in the pixel grid on the right. The central pixel receives the full illumination of the brightness of the spot, and surrounding pixels receive less so they are proportionally less bright. At this scale, you're going to say that these square pixels still don't look anything like a round spot. But at this scale, these pixels are gigantic compared to what they would be in a normal image. To convince yourself that these square pixels can look like a round spot, look at the screen from across the room and squint. Now lets see what happens if the 2x spot falls at the intersection of four pixels.
Here, we are back to the case of the image of the spot as represented by the pixels on which its light fell being square. Again, not a very good representation of a round spot. So we need to go more than 2x in our sampling because the spots in an image are very rarely going to fall exactly centered on a pixel. Let's increase the focal length again with a 3x Barlow so that the spot is 3 times bigger than a pixel.
The above example shows what a spot will look like on the pixel grid in the image when the spot is 3x the size of the pixels and it falls exactly centered on a pixel.
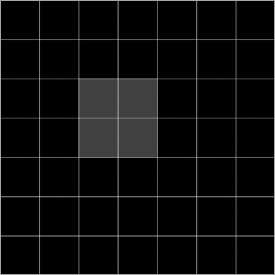
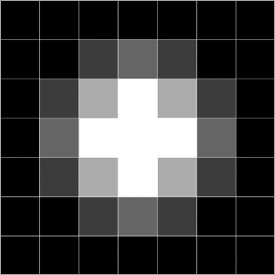
The above example shows what a spot will look like on the pixel grid in the image when the spot is 3x the size of the pixels and it falls centered on the intersection of four pixels. Finally, we'll see what a spot looks like when it is sampled at 3.5x.
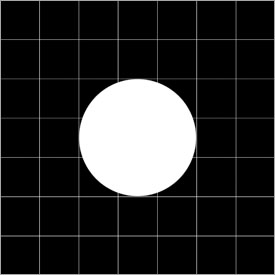
The above example shows what a spot will look like on the pixel grid in the image when the spot is 3.5x the size of the pixels and it falls on centered on the intersection of four pixels. It looks good.
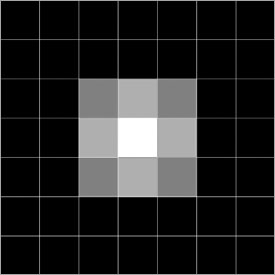
Again, the spot looks good when sampled at 3.5x. In the above simple examples, we can see that for a round spot, representing the smallest spot size of the Airy disk of a star or point of detail in an image, sufficient sampling begins at when the pixels are about 3x smaller than the spot size of the Airy disk that is to be recorded. Sampling for Planetary Photography In planetary photography however, we are not just shooting stars. We are attempting to record extended details where the image is comprised of overlapping Airy disks of different sizes and brightness. Although the Airy disk and rings are the smallest unit that a telescope can form, not all of the Airy disk is always recorded. For example, the rings are rarely recorded. Sometimes only the brightest center of the Airy Disk is recorded. Sometimes the size of the center is smaller for fainter stars and fainter parts of extended images. The situation in planetary imaging is much more complex than simply resolving a star. We have discussed the problems of sampling a round spot with a square grid and seen that we need a minimum sampling rate of about 3x to overcome the difficulties associated with these problems. For other more complicated technical reasons that are beyond the scope of this book, we actually need to go a bit more than 3x. And it never hurts to build in a little bit extra, so let's say we need a minimum sampling rate of about 3.5x to 5x. This means our pixels must be 3.5x to 5x smaller than the smallest spot that can form in an image. The question now becomes what is the size of the smallest spot that we can form? As we have seen, the Airy disk that is actually recorded can be smaller than the theoretical formulas indicate. In the previous chapter we saw that Sidgwick said the Airy disk can be one-half the size of predicted by Dawes traditional formula. The Full Width Half Maximum (FWHM) of the star's Airy disk spot size is even less than that. In practice, the recorded spot size can be even smaller than the FWHM spot size. The theoretically smallest spot size that a scope can produce is related to its focal ratio. Faster focal ratios produce smaller spot sizes. But these spot sizes are affected by the seeing, making them larger. On nights of great seeing, the actual spot sizes are going to most closely approach the smallest the scope can theoretically produce. On nights of average and poor seeing, the spot size is going to be larger. So in relation to your pixels, we don't need to magnify them as much as on a night of great seeing. The bottom line is, we don't actually know how small the spot can be that contains the detail that we hope to capture because the seeing can vary. On one hand, we need to assume it is a fairly small spot so that we can capture small details if the seeing allows. On the other hand, there are practical limitations on how far we can push the focal ratio. Exposures will get very long at really high focal ratios, and at some point, the planet won't fit in the frame anymore. Simple Rule of Thumb for Focal Ratio A very simple rule of thumb to determine the focal ratio, and therefore the magnification, you should shoot at is to multiply your pixel size by 5x for nights of average seeing, and 7x for nights of really good seeing. Good seeing reveals smaller details, so we need to magnify the image more with a longer focal length to correctly sample them with the fixed size of the pixels in our camera. For example, Canon's T3i (600D), T2i (550D), 60D, and 7D all have the same size pixels, which are 4.3 microns square. For a night of average seeing, we would multiply 4.3 by 5x and get 21.5, so we would want to shoot at around f/21. If you have an SCT with a focal ratio of f/10, you could use a 2x Barlow to get to f/20. That would be close enough as these are only rules of thumb and not precise rigorous requirements. If you had a Nikon D7000 with 4.8 micron pixels, and a night of average seeing, we would have 4.8 * 5 = 24. So we would want to shoot at f/24. On a night of really good seeing, for a Canon with 4.3 micron pixels, we would have 4.3 * 7 = f/30. For the Nikon with 4.8 micron pixels, we would have 4.8 * 7 = f/33.6, or about f/34. Note that this rule of thumb is based on the size of the side of the pixel for ease of use so you don't have to calculate the size of the diagonal of the pixel. The size of the diagonal is included in the multiplication factor. We normally would use a Barlow or eyepiece projection to increase the focal ratio, and therefore the focal length and magnification. Calculating Your Pixel Size You can easily calculate the size of your pixels by dividing the size of the sensor by the total number of pixels on a side of the array. For example, the Canon 60D has a sensor that is 22.3 millimeters by 14.9 millimeters. It has a pixel array that has 5184 pixels by 3456 pixels. Take the long side of the frame, 22.3 mm, and divide it by the number of pixels on that long side, 5,184. 22.3 / 5,184 = 0.0043 millimeters. Multiply by 1,000 to get microns. 0.0043 x 1,000 = 4.3. So an individual pixel in a Canon 60D is 4.3 microns in size. You can find the size of your sensor and number of pixels on the technical specifications pages for your particular camera manufacturer, as well as web sites such as Digital Photography Review and Imaging Resource. You can also find the pixel sizes and other specifications for most Nikon and Canon DSLR cameras on my web page Nikon and Canon DSLR Cameras Compared. Fitting the Object in the Frame All of this discussion about magnification and sampling rates is very nice, but there is another very important consideration that we have not discussed so far. That is, we have to be sure that the celestial object we are shooting actually fits in the frame when we increase the magnification to achieve our desired sampling rate. This is not trivial! If we are shooting Saturn and we have the magnification so high that the rings are cut off, it's not going to be a very good picture. If the image scale is too large, it will be very obvious when we actually go to take the picture and look at it on Live View or in a specialized Movie Crop Mode. At this point it may be necessary to back off on the magnification to fit the object in the frame, and that will be the bottom line on the focal ratio and magnification we will end up using. The best sampling rate will really vary depending mostly on the seeing, but also on the size and quality of your scope, and the size of the object you need to fit in the field of view. Angular and Linear Resolution The relationship between angular resolution in terms of arcseconds and the linear spot size of the Airy disk at the focal plane can be a bit confusing. Angular resolution is determined solely by aperture. The Airy disk size is determined solely by focal ratio. The two are related though because focal ratio incorporates aperture in its formula. Note that increasing the magnification does not increase the resolution of your telescope. The resolution in terms of angular size is fixed and represented by a particular spot size at a given magnification. To increase the spot size so our pixels can sufficiently sample it, we need to increase the focal length of the scope. Since the aperture is fixed, increasing the focal length with a Barlow or eyepiece projection also increases the focal ratio. More magnification and a larger focal ratio creates a larger spot size, even though the angular resolution is the same. Longer focal ratios also require more exposure. This is the price we pay for more magnification. Increasing the magnification does not increase the resolution of a telescope. It only magnifies details so we can see them better, or sufficiently sample them based on the size of the pixels in our camera. Summary
|
|||||||||||||||||||||||||||||||||||||
|
Back | Up | Next |