Video White balancing means adjusting the color balance in an image to compensate for the color temperature of the illumination source. This can be done automatically in the camera, or manually in subsequent image processing. Human Visual Perception and Color Balance Human visual perception is very good at working over a tremendous brightness range. It is also excellent at adapting to the color of the illumination in a scene so that colors appear natural to us. Millions of years of evolution have produced human vision that is based on the light from the Sun being perceived as white. But the color of sunlight changes throughout the day. It can be very red when the Sun is close to the horizon. It can be very blue when sunlight is scattered in our atmosphere, and the sky is the only source of illumination when the sun is behind a cloud or when we are in open shade. Our eyes can adapt to this and other changes in the color of illumination from the dominant light source so that we see the brightest tones in a scene as white. This means that we will see the same piece of typewriter paper as white under direct sun, or open shade, whose illumination is very blue from the blue sky. Our eyes will also see this piece of typewriter paper as white under indoor tungsten illumination, which is very red. The color of illumination is usually described as "color temperature". This is an explanation based on the actual physical temperature of a "black body" which, when heated, gives off light. At low temperatures, the light is very red. At about 5,000 - 7,000 degrees K, the light is seen as white. As the color temperature goes higher, the light gets more blue. Here are the color temperatures of a variety of light sources:
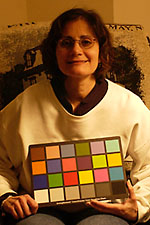
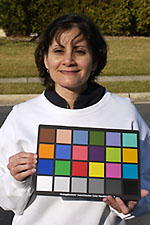
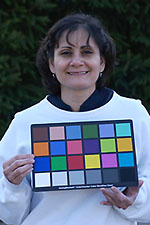
Digital Cameras and Color Balance Camera manufacturers go to great effort to make sure that cameras record colors accurately. However, to a camera set for daylight white balance, a scene illuminated by tungsten light at 3,200K will accurately record as very red. Likewise, a scene illuminated by the sky in open shade will accurately record as being very blue when the camera is set to daylight white balance. Although the camera records these scenes "accurately", this is not how we perceive them. We don't perceive them as being very red or very blue, we perceive them as being normal, with neutral colors. To overcome this problem, digital cameras come with the ability to automatically white balance a scene, or to manually select the correct color temperature for a scene so that the camera's representation of the scene is close to the way we perceive it. In the examples below, all images were shot with the camera set to daylight white balance. The color temperatures were read with a Minolta color temperature meter.
Digital SLR cameras usually come with an auto white balance setting that tries to correct for whatever type of illumination is present in the scene. This usually works pretty well with daytime subjects, and less well with warm, tungsten illuminated subjects. These cameras usually also offer several standard white balance settings depending on the type of illumination, such as tungsten, daylight, open shade, and cloudy. Some DSLR cameras offer the ability to pick a specific color temperature in degrees Kelvin for white balance. Some even offer the ability to set a custom white balance on a gray card to specifically match the dominant source of illumination in the scene. These cameras can do this because the data is digital. Numbers that represent colors in a scene can be adjusted so that white and gray tones are neutral from a wide variety of different light sources. Digital cameras usually produce fairly accurate colors with these standard light sources. Deep-sky astronomical images are different than normal daytime photographic images however. Daytime images usually have a normal scene with objects in it that reflect and absorb light from the dominant source of illumination such as the Sun, a tungsten light, the open sky, or even a flash. Deep-sky images usually include stars that are self luminous, emission nebulae which are also self luminous, and reflection nebulae which shine by reflected starlight. Color Balance in Astronomical Images So what color balance setting should we use for astronomical images? If we want to record accurate color, we should use daylight color balance. This is what our eyes evolved to see as a standard. If we use daylight white balance for our night astronomical photos, any stars that are similar in color to our own Sun will record correctly as white, and other star's colors will also be accurate. There are, however, several problems that we can encounter in trying to do this. First, to shoot good pictures of red emission nebulae, we need a modified camera whose original long-wavelength filter has been replaced or modified. Once we do this, the daylight white balance setting is no longer accurate. The other main problem is that some astronomical image processing programs do not support standard or custom white balances, even if that data tag is embedded in the image file when it is recorded in the camera. Some astronomical image processing programs, like Images Plus, do support these white balance settings. Depending on which program you prefer, you may have to use a different method to achieve correct white balance in an astronomical image. White Balancing a Modified DSLR Camera In a stock DSLR camera, the sensor, Bayer filters, and processing algorithms have all been finely tuned by the manufacturer's engineers and color scientists to produce accurate color with the original long-wavelength filter in place. Modifying the filter by removing it, or substituting another filter with different passband characteristics changes this situation. The automatic color balancing algorithms, and the built-in preset color balances like daylight, won't work correctly with a modified camera. For astrophotography, white balancing a DSLR camera that has had the manufacturer's low-pass long-wavelength filter removed or modified can be accomplished in one of three ways:
Note that we should use only one of these methods at a time. 1. Setting the White Balance on a G2V Star Because our eyes define the light from our Sun as white light, we will define the light from other stars with the same spectral characteristics as our Sun as white. These stars are called G2V in the spectral classification of stars. Unfortunately, this is probably the most difficult method to use to correctly white balance an astronomical image. In this method, we either need to identify a G2V star in the star field we are shooting, or specifically shoot a field with such a star in it, calibrate on it, and apply that calibration to our object of interest. The most accurate way to white balance a deep-sky image is to calibrate the data by setting the white point to a non-saturated G2V star to neutral so that the pixel values in the red, green and blue channels are equal. In practice, most of us shooting non-modified DSLR cameras are not going to need this kind of accuracy. If we simply shoot with the camera set to daylight white balance we will get close enough with simple levels adjustments in Photoshop. At the long exposures we use, most of the bright stars in the image will be saturated to white anyway, and it can be difficult to find a G2V star in a particular star field. For modified cameras,a list of G2V stars from the Hipparcos catalog can be used to find a G2V star on which to calibrate. Properly and accurately calibrating on G2V data is probably best left to dedicated CCD astrophotographers as described here by Al Kelly in this article on Color CCD Imaging with RGB and CMY Filters. An article on True-Color CCD Imaging by Kelly, Richard Berry, Ed Grafton and Chuck Shaw also appeared on this subject in the December, 1998 issue of Sky and Telescope magazine. Color changes based on elevation above the horizon and atmospheric extinction are also taken into account with this method. Note that if you white balance on a G2V star, that star should not be saturated in the original image or in the stack. When adjusting the white points in levels, only two channels should be adjusted to make their pixel values the same as the highest channel (usually the red channel). You do not want to map a non-saturated G2V star to white, you only want to map it to neutral, where all three channels read the same with equal pixel values in each of the red, green and blue channels. If you map it to white, you will lose color in all of the other stars that are the same brightness or brighter, because they will all be clipped. In this special case, white balancing does not mean making the G2V star pure white, but rather making the pixel values equal (technically a shade of gray), but somewhat less than pure white. First the star must be identified, then a color sample point is established. The white points of each individual color channel are then adjusted until all three channels read the same value as the highest channel. Note that this should not be values of 255,255,255 in 8 bits as this star should not be saturated in the original exposure. If it is saturated, the exposure is too long and the star cannot be used to set the white balance. Usually, in a modified camera, the pixel values in the red channel will be the highest, so only the green and blue channels need to be adjusted so that they equal the red channel. If it is not already saturated, the brightest star in the image can be adjusted so that its pixel values equal 255,255,255 to maximize the dynamic range of the image after the image has undergone the non-linear stretch in the next section. 2. Custom White Balance in the Camera Raw linear data does not have a white balance adjustment applied to it in the camera like JPEG images. However, there are notations, called tags, that are included in the raw files, that describe what white balance the camera was set to when the image was taken.
When a raw image is opened in the camera manufacturer's dedicated image processing program, such as Canon's Digital Photo Professional, or Nikon View, the embedded tag is usually applied as the default white balance setting. This setting can easily be changed for the raw file in this software or if the raw file is opened in Photoshop. Standard white balances, such as daylight, can be applied. With a stock, non-modified camera, all we need to do is simply select daylight as the white balance for the deep-sky image. This method will not work however for modified cameras because their settings are configured with the manufacturer's long-wavelength filter in place in front of the sensor. With a modified camera, we can shoot a custom white balance as a work around. Follow your camera's instructions for shooting a custom white balance. For astrophotography, this usually entails shooting a gray card in the sunshine at noon on a clear day in the summer. This frame is then selected in the camera's custom white balance menu. The camera then sets the white balance for all subsequent images shot with this setting as standard. This custom white balance information is stored in the metadata that accompanies each image file that is shot with it. In Images Plus v 2.80 and higher, you apply a custom white balance that is set in the camera when it is shot and stored in the image file's metadata section. Select "At Capture White Balance, Mono Bayer Color Data". 3. Manually Adjust the White Points in Photoshop When a raw image is opened in some astronomical image processing programs, there may not be an option to apply a color balance. All you have is the raw data. White balance tags included with the file are ignored. In this instance, we will need to manually adjust the white balance in Photoshop based on a calibration image. The light file should first be calibrated with at least a bias image if you don't have a dark frame.
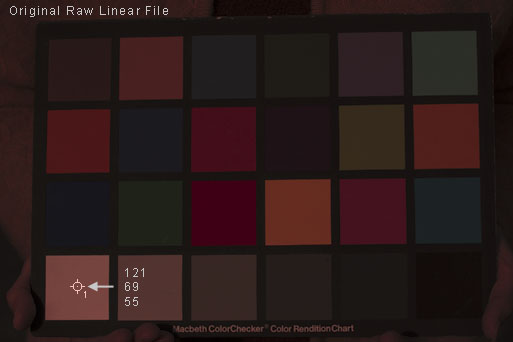
The calibration image is simply a gray card or a Macbeth color checker shot in noon sunshine on a clear day in the summer. We will shoot it in raw file format, then process it the same as we would our astronomical image. Then we will open the image in Photoshop and record our own custom daylight white balance adjustments by adjusting the white points in Photoshop to make the pixel values in the individual color channels all the same. This is the very definition of neutral or gray. Remember, white is neutral in color, and it is just a lighter tone of gray. Then we will apply these exact same adjustments to our astronomical images. The Digital Gray Card is a good card to use that is inexpensive and spectrally uniform.
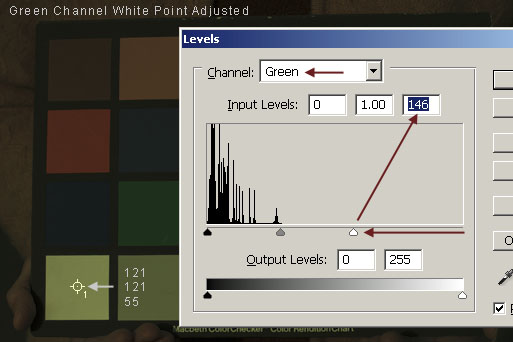
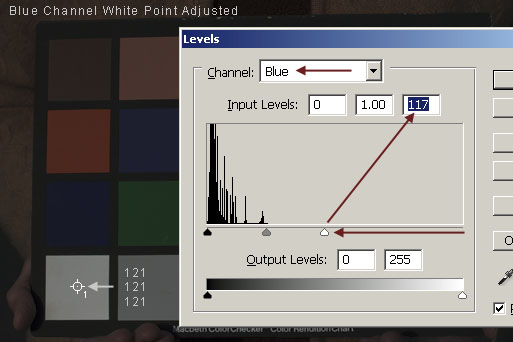
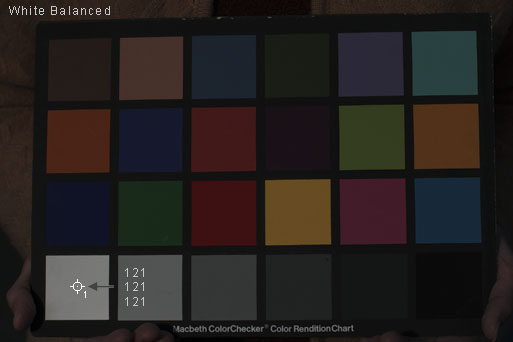
But the Image is Still Dark! In the previous steps, we adjusted the white points in the green and blue channels to white balance the image. In this example with the Macbeth color chart, we adjusted the color for a sample point we picked in the white square. We made the color neutral, which correctly set the white balance in the image. However, we did not set it to pure white, which would be pixel values of 255,255,255 because this "white" square was not overexposed in the original image. This is how we attain accurate star colors. Just as with the G2V calibration method, the star, or white square in this example, must not be saturated or clipped (overexposed). If the pixel values were maxed out at 255 in one or more of the channels, we wouldn't know how to adjust the other channels to white balance the image. If you are using a digital gray card, the linear raw pixel values for the card may only be in the 50 to 100 value range (for an 8-bit readout with numbers that range from 0 to 255). In this case you would still adjust the white points of the other channels to make them equal to the highest channel. In this particular case, "white balancing" does not mean to make the pixels under the color sample point pure white at 255,255,255. It just means to make them neutral, with equal pixel values. It is important for them not to be pure white at this stage in our image processing! In the next section, we will apply a non-linear curve to brighten the image and make it look like we expect a normal photographic image to look.
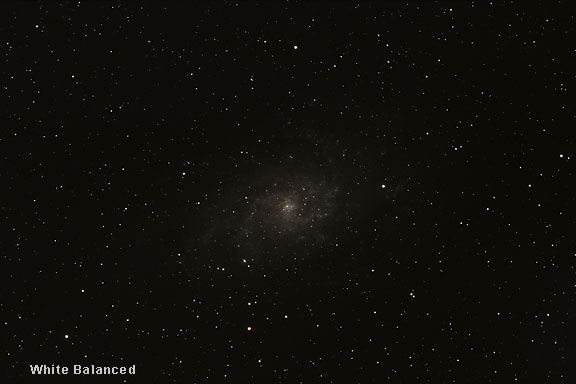
As a preview, here is the non-linear curve applied to the image of the Macbeth color chart after it has been white balanced. It is only after this step that we would set the pixel values for the brightest star (or the white square in this image) to white at 255,255,255. Accurate Daytime Color and Modified DSLR Cameras It should be noted that with DSLR cameras where the long-wavelength filter has been removed or replaced, not all colors will be accurately reproduced in daytime images. This is because the digital sensor in the camera has different sensitivity than the human visual perception system. That is what the manufacturer's original filter is for, correcting the spectral sensitivity of the sensor to better match our vision. Some objects will reflect or absorb more long red wavelength light, and even though we may not be able to see this with our eyes, a modified camera will record it. So, even with these white balancing methods, there may be some colors in daytime images that are not recorded correctly by modified cameras. For critical color recording of daytime images with a modified camera, it is necessary to use a filter over the camera lens that matches the manufacturer's original long-wavelength filter that was removed from the camera. For astronomical images, we do not want to use such a filter because we are interested in recording the long red wavelengths of hydrogen-alpha emission. Filters and Custom White Balance If you use a light pollution filter, like the Hutech IDAS LPS filter, or Astronomik CLS filter, or Lumicon Deep-Sky filter, then you need to put it on the camera when you shoot the custom white balance. All of the steps are the same. You need to do this for both stock unmodified cameras as well as modified cameras. You need to shoot a custom white balance for each different filter if you have more than one. If you are using a narrowband filter, like a hydrogen-alpha filter, or OIII filter, then there is no use in setting a custom white balance. Only the red light of hydrogen-alpha passes through the filter, and there will be no white balance at all. All of the data will be monochrome and recorded only in the red channel. Likewise with an OIII filter, all of the data will be recorded in the blue and green channels and none in the red channel. You need all three colors: red, green and blue, to create a "true-color" image, you can't do it with just one, or even two, colors. If you use a different kind of light pollution filter, like a UHC filter, whether you can get accurate color with a custom white balance will depend on the passbands of the particular filter. For example, the Lumicon UHC filter passes only blue-green light, so you can't get accurate color with it. The Baader UHC filter however, passes some blue, green and red light, so you should be able to do reasonably accurate color with it, if you use a custom white balance. The Color of the Sky Background Normally, in a long-exposure deep-sky image taken with daylight color balance, or calibrated with any of the three methods detailed above, the overall color balance of the image will turn out very unappealing. We saw this with our JPEG example of Orion. This is because the camera is very good at recording the true color of the sky, which is reddish brown under the darkest skies, and red or green under skies suffering from light pollution. This color is actually correct. So if your astronomical image still looks red after applying this white balance calibration, don't panic! This is how it is supposed to look at this stage in the processing. We will correct this when we neutralize the color of the sky background later. This reddish brown color really comes from the sky foreground - the sky in our planet's atmosphere. The red can come from auroral sky glow, or air glow, or from light pollution. If our goal is to show a deep-sky object as it really looks, this color should be removed from the image. We will cover how to do this in a later section by neutralizing the sky background. Even though it can be tempting to select tungsten color balance in the camera because it seems to offer a quick fix, this impulse should be resisted. Selecting tungsten or any other setting besides daylight or a custom G2V white balance (Gray card in the Sun) will cause the colors of the stars recorded in the image to be inaccurate. If we use one of the three methods of white balancing discussed above, and then later neutralize the color of the sky background, both the colors of the stars and the deep-sky object will be correct. Apply the White Balance Corrections to the Astronomical Image Now take the stacked and aligned raw linear image of M33 and apply the white balance corrections to it. Here is the M33 image that we are working on with the corrections applied to it.
The white point has been moved to input level 146 in the green channel and 117 in the blue channel. Remember, these corrections will be different for your camera. Our original raw image is now correctly white balanced to daylight and all of the star colors and other colors of objects in the image should be correct. In the next step we will apply a non-linear stretch to make visible the details in the image, and then we will remove the brown color that comes from the sky foreground. |
||||||||||||||||||||||||||||
|
Back | Up | Next |