The major factor in creating a pleasing deep-sky astrophotograph is the signal-to-noise ratio in the final image. This can be optimized by recording as many photons as possible. Calibrating with support frames - particularly dark frames, will also help greatly improve the final image because calibration removes undesirable signals. These are the ways to gather more photons:
The signal-to-noise ratio between the image and the sky background can also be increased by shooting from a darker site and by using filters. Usually the aperture is fixed by the instrument we have access to, as well as the detector. This leaves shooting longer exposures, combining sub-exposures, shooting from a darker site, and using filters as the four variables most easily controlled to improve our images. The length of a single exposure will be limited by thermal signal and saturation. Because of this, we have to divide our total desired exposure into parts called sub-exposures. Each sub-exposure should be long enough so that the read-out noise contribution is small and the exposure is photon-noise limited. The majority of noise in a digital image comes from photon noise, dark current noise and read noise. Dark current noise and read noise dominate when the total number of photons being gathered is small. Photon noise dominates when a large number of photons are recorded. Short exposures are usually called "read-noise" limited because the read-noise dominates. An image is photon-noise limited when the exposure is of sufficient length so that photon noise is the major source of noise in the image instead of read-out noise. Short exposures have poor signal-to-noise ratios because they have few photons with little signal in relation to the noise. Photon noise will always be present no matter what we do. Photon noise, however, only increases as the square root of the total number of photons recorded. So, photon noise is relatively easy to deal with in the overall signal-to-noise ratio simply by gathering more photons. The length of an exposure that is photon-noise limited will depend on how dark the sky background is. It is easier for an image to be photon-noise limited under a bright sky. However, more total exposure in needed because the contrast between the object and sky background is less to start with because of the bright sky. Under really dark skies, longer exposures are required to overcome readout noise and become photon-noise limited. Another consideration is the way the available steps of tone in the dynamic range are allocated at different ISO settings. More total dynamic range in the subject being photographed can be accommodated by a lower ISO. However at high ISOs more steps of the bit depth are allocated to the shadow areas, where they are better spent helping to differentiate true detail from noise. The price to pay for this is that the dynamic range that can be recorded in the subject goes down as the ISO increases. Obtaining the optimal signal-to-noise ratio is a balancing act between exposure length, ISO, ambient temperature, thermal signal and thermal noise, sky brightness, and the noise characteristics of the camera. A simple rule of thumb is use a lower ISO for bright objects, and a higher ISO for dim objects. Observing Site Darkness At bright observing sites the sky background will saturate quickly, requiring shorter exposures. The relatively good thing about bright observing sites is that the photon noise from the sky will quickly overcome the readout noise, so readout noise will not be a prime consideration. However, readout noise will add up because it is present in each individual sub-exposure. Since there will be a lot of sub-exposures, we will need more photons from the actual deep-sky object to overcome this additional readout noise. We also need more exposures to gather more photons to separate the deep-sky object from the brightness of the sky foreground (light pollution in the Earth's atmosphere). At bright observing sites, the images will be photon-noise limited. The only way to improve signal-to-noise between actual photon signal and photon noise is to gather more photons. This means more exposures because each individual sub-exposure is saturation-limited in how long we can expose. The situation is different at a dark-sky observing site. Here we must be careful to expose long enough so that the images are again photon-noise limited and not readout-noise limited. This means longer sub-exposures where drive tracking may come into consideration if the images are not guided. Longer exposures at a dark-sky site will always produce better signal-to-noise ratio in a shorter amount of total exposure time because there is more contrast between the object and sky background to start with. ISO in DSLR Cameras As we discussed in chapter 3, The ISO rating in a DSLR camera is not really a measure of the camera's sensitivity to light. That is determined by the sensor's quantum efficiency, Bayer filter transmissions, microlens fill factors, and other considerations. In a DSLR, ISO defines the relationship between the number of photons recorded by the sensor and the digital numbers that are output. Increasing the ISO produces higher digital numbers and a brighter image for a given number of photons that are recorded. However, this comes at the cost of a lower signal-to-noise ratio if exposure times are reduced as the ISO is increased, as is normally the case. Dynamic range is also lower at higher ISOs. Faint deepsky objects taken at the same exposure time but higher ISOs actually have less readout noise and a higher signal-to-noise ratio. This is why higher ISOs are recommended for faint deep-sky objects. Different output values for different ISOs are accomplished by electronically amplifying the signal that is produced by the digital sensor and changing the gain - the number of electrons mapped to each digital number. A given number of photo-electrons are recorded in a given amount of time based on the inherent sensitivity and quantum efficiency of the CCD or CMOS sensor. When the ISO is increased, the gain of the camera is increased, which basically means that the data is multiplied by a factor to give the increased ISO number. This method however slightly decreases the dynamic range of the subject that can be recorded. It is the exposure being decreased as the ISO is increased that causes images to look more noisy. Both the signal and the noise are multiplied by the same gain factor as the ISO is increased, so that is not changing the signal-to-noise ratio. Less signal is recorded in the shorter exposure, and even though the readout noise also goes down at a higher ISO, it is less signal being recorded that reduces the overall signal-to-noise ratio. Let's look at an example with the 5D Mark II. Let's say 10,000 electrons are recorded in a 10 minute exposure at ISO 100. The readout noise is 23.5 electrons at ISO 100. The photon noise is the square root of 10,000 or 100 electrons. So we have a total of 123.5 for the noise and 10,000 for the signal for a signal-to-noise ratio of about 81 (10,000 / 123.5 = 80.97). Now let's double the ISO and cut the exposure in half, which is what we would normally do for a daytime image. Now we have 5,000 electrons worth of signal. The readout noise drops to 11.9 electrons at ISO 200. We have about 70 electrons of photon noise. Total noise is about 82 electrons. The signal-to-noise ratio is now 5,000 / 82 = 60. From these two examples we can see that the higher ISO image looked worse because we cut the exposure in half and gathered less signal, and reduced the signal-to-noise ratio, not because higher ISOs have more noise. For a given aperture, f/ratio, object, and observing site, it is the total exposure time that is most important in improving the signal-to-noise ratio because longer exposures, or averaging sub-exposures, simply record more signal. Saturation A pixel well can only hold so many electrons during an exposure. Once it is full, the pixel will be displayed in the image as white. It will have no detail. This situation is called "saturation" and at this point the data is said to be "clipped". The maximum length of an exposure must take saturation into consideration. Long exposures are good, but even at the darkest observing site, and even under cold conditions where thermal noise is not much of a problem, at some point the brightest objects in the frame, the stars, will begin to saturate. If we continue to expose, then bright parts of the deep-sky object itself will saturate, such as the core of the Orion Nebula or Andromeda Galaxy. Saturated stars have no color and saturated deep-sky objects have no detail. If we are shooting extremely faint deep-sky objects, then we may be willing to sacrifice color in the brightest stars so that we can use long exposures to better record faint object detail. In general we will be trying to achieve a compromise between exposures that are long enough to deal with noise while balancing saturation in stars and in the object of interest. ISO, Gain, and Dynamic Range The dynamic range of a DSLR camera is determined by the number of photo-electrons that can be held at one time in a pixel well (the full-well depth) divided by the noise. At ISO 100, the entire full-well depth of the sensor is mapped to the available bit depth. For example, with modern cameras, the full-well depth may be about 50,000 electrons. So 50,000 electrons are mapped to 12 bits (4096 steps) of bit-depth at ISO 100 in a 12-bit camera. Doubling the ISO by doubling the gain allows only 1/2 of this full-well depth to be mapped to the 4096 steps of bit-depth. Increasing the ISO maps a smaller amount of dynamic range into the same bit depth and decreases the dynamic range. At ISO 1600, only about 1/16th of the full-well capacity of the sensor can be used. The situation with decreasing dynamic range as ISO goes up is not quite as bad as it seems. One full stop is not lost for each doubling of the ISO because as the ISO is increased, the readout noise also goes down. Remembering that the dynamic range is defined as the full well depth divided by the noise, let's look at an example. The Canon 5D Mark II has a full well depth of 59,400 electrons at ISO 100 and a readout noise of 23.5 electrons at that ISO. 59,400 / 23.5 = 2527 or about 11.25 stops. At ISO 1600, the 5D Mark II can access just 3,710 electrons out of the full well depth, but the readout noise has fallen to just 2.5 electrons. So the dynamic range is 3,710 / 2.5 = 1,484 or about 10.5 stops. So even though we lost access to 4 stops off the top of the full well, we really only lost about 0.75 stops of dynamic range because the readout noise is so much lower at ISO 1600. High ISOs can be useful for astronomical images of dim subjects which are not going to fill the well anyway. For faint objects, there are only a small number of these scarce photo-electrons, and by mapping this limited dynamic range into the full bit depth, greater differentiation between steps is possible. This helps tell the object signal from the noise, and also gives more steps to work with when this faint data is stretched later in processing to increase the contrast and visibility. Optimum ISO The optimum ISO to use in a DSLR camera is a tradeoff between dynamic range and tonal resolution. The total number of steps of tonal resolution is fixed by the analog-to-digital converter at 4096 steps in a 12-bit camera and 16,384 in a 14-bit camera. These steps are spread out between the maximum black and maximum white (the dynamic range) that the camera can record. In a deep-sky astronomical image, the dynamic range in the scene is usually quite large between bright stars and faint nebulosity. If the camera's entire dynamic range is spread out over this great range in the scene, fewer tonal steps will be available for the really faint detail. This is where it is most difficult to distinguish actual image data from noise. Having more tonal steps in these shadow areas helps here. Almost all deep-sky images will also have their contrast stretched, or increased, to make faint details more visible. When fewer steps in the shadows are stretched it increases the chances of producing posterization. Posterization is seen as visible banding or steps in an area that is supposed to be even-toned or smoothly varying, such as a gradient of brightness in a blank sky that fades from light to dark. Low ISOs allow the greatest dynamic range to be recorded with a DSLR camera. But in some cases it is better to sacrifice some of the dynamic range to force the total available tonal steps to be used more in the shadow areas. It comes down to a choice of what is more important in an image - preserving star colors and highlights at longer exposures, or improving faint detail when stretched later in processing. This can be an easy decision if the object of interest is a star cluster with no nebulosity. Then a lower ISO should be used to preserve the star colors and maximize the dynamic range that can be recorded. It's also easy if you are primarily interested in an object with a lot of faint nebulosity and not so much interested in preserving star colors. Then use a higher ISO. Stay away from extreme ISO settings that require a special custom function as these are not "true" ISO settings, they are merely multiplies of the highest real ISO setting. They produce no additional benefits at the cost of a loss of dynamic range. The highest true ISO setting usually has the lowest readout noise associated with it and may be beneficial for photographing faint objects.
Exposure Length With digital astrophotography we can shoot several shorter exposures and add or average them to equal one longer exposure, within reason. When we combine these sub-exposures together we get the total "integration" time, a fancy way of saying the total exposure time. You normally get a higher signal-to-noise ratio in a longer single exposure than an equal amount of sub-exposures, because the read-out and digitization noise is added from all of the sub exposures. But really long exposures can result in saturation. Increasing the exposure in a single image will increase the signal-to-noise ratio, and brightness of the sky background and objects in the image. Individual shorter exposures will not be as bright. Combining several shorter images by adding will make the result brighter as well as improving the signal-to-noise ratio. Adding can result in clipping however, where highlight detail is lost. Combining several images by averaging will result in a much higher signal-to-noise ratio in the combined image, but with the same overall brightness as a single image. However, the brightness can be much more easily increased later in processing because of the overall better signal-to-noise ratio. The improvement in signal-to-noise ratio from a given number of sub frames is exactly the same whether the frames are added or averaged. There are some benefits to shorter exposures. If you keep them short enough, and you are accurately polar aligned, and have a mount with decent periodic error, you might not have to guide your exposures at all. Short exposures make the mount's tracking less critical. If something goes wrong, say a plane flies through the field, only one short exposure is ruined instead of one long exposure. Polar alignment also becomes less critical for shorter exposures. The most important consideration is to expose each sub-exposure long enough so that the signal is kept out of the noise floor of the camera which consists primarily of the read-out and digitization noise. As Rick Krejci has found in his series of exposure tests where he averaged images together, for all practical purposes, the combinations of the number of frames, ISOs and exposures listed in the table below are all equivalent. In all of these cases, even though the ISO is different, the total exposure time is the same.
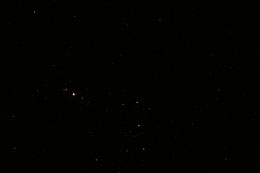
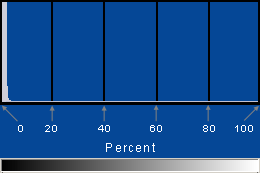
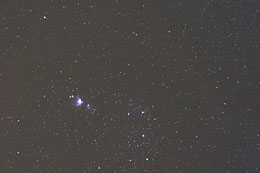
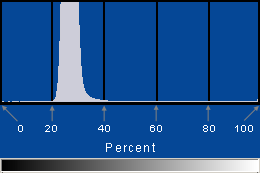
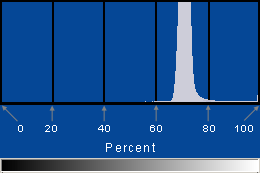
It is important to note that a single four-minute exposure at ISO 400 is not equal to a single two-minute exposure at ISO 800. It is the total exposure time that is critical for astronomical images. This is non-intuitive to daytime photographers because they are used to doubling the ISO and halving the exposure and thinking they are getting something for nothing. But in reality they are not because they are getting a lower signal-to-noise ratio. If you are going to shoot without guiding, make a series of test frames of different exposure times and determine the longest sub-exposure you can use without trailing. This will usually be around a couple of minutes. Then adjust the ISO so that the image histogram's main "mountain" peak is a between 20 percent and 40 percent of the way from the left to the right. Exposure and the Histogram A histogram is a bar graph that displays the number of pixels at each brightness level in an image. Black is on the left-hand side of the graph, and white on the right-hand side. Shades of gray run in between. You can usually display the histogram for an image shot in a DSLR camera by pressing the information button several times on the back of the camera. Read your camera manual to find out exactly how to display the histogram on your particular camera model. Most of the pixels in an deep-sky image are from the sky background and look like a kind of mountain on the histogram. If your image is underexposed, this mountain will bump up against the left-hand side of the histogram. If it is grossly overexposed, the mountain will bump up against the right-hand side of the histogram. If you look closely at the histogram examples below, you will also see a thin white line that runs from the mountain to the right-hand side. This represents the stars in the image. Stars are usually white in their cores (completely saturated) with surrounding pixels that fall off in brightness until they merge into the sky background. As the exposure is increased, more and more pixels become saturated, and a thin white line representing them begins to climb up the right wall of the histogram. These pixels are all maximum brightness and have maximum pixel values. If the exposure is increased drastically, even the sky background will become saturated and the mountain will run into the right hand side of the histogram. The following examples show the effects of exposure on the brightness of the sky background, and the corresponding histogram of the image. A grayscale gradient has been added below the histograms to indicate the brightness of the corresponding pixels in the image.
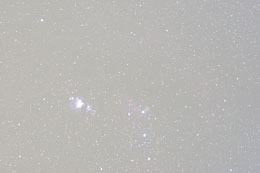
These images of Orion's belt and M42 were taken from a moderately dark-sky observing site with a naked-eye limiting magnitude of about 6th mag with a Canon 20Da DSLR camera at ISO 800 at f/4. Deep-sky astrophotos are not any different than daytime pictures. Underexposed pictures are very dark. Completely underexposed pictures are black. Completely overexposed images are white. This gives us an idea of the relationship between exposure and image brightness. For a normal daytime scene, we would like to have all of the pixel brightness values inside the walls of the histogram and none cut off on either the black end or white ends. Canon puts lines in the histogram at the 20, 40, 60 and 80 percent of maximum saturation. Nikon also displays histograms for the images, but the division lines are at 25 percent intervals instead of 20 percent. For long-exposure deep-sky astrophotography, if you are going to make a mistake on the exposure of an image, it is far better to err on the side of longer exposure. A good result can still be obtained by adjusting the black point later in processing with an image whose histogram is shifted to the right. In an underexposed image the majority of pixel brightness values will be very dark, and this is where most of the noise is present in an image. This makes it extremely difficult to separate the actual image detail from the noise. If you are going to manually guide or use an autoguider, your maximum exposure time will be limited by the brightness of the sky background, thermal signal generated in the camera based on the ISO, exposure length and ambient temperature. Make a series of test frames to determine how long you can expose based on these factors. You'll be able to expose longer and at lower ISOs when the ambient temperatures are low.
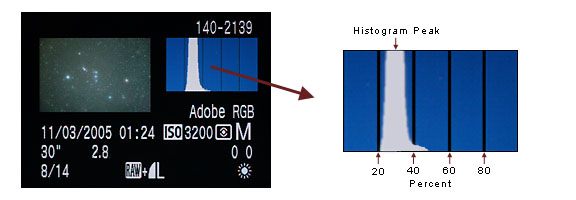
Note that the histograms displayed on the LCD on the back of the camera are for the JPEG processed images with the in-camera settings applied, even if Raw file format is shot in the camera. The in-camera processing that would be applied to the JPEG image applies a non-linear curve to the raw data for display of the histogram, but not the actual raw image data itself. If you open up a raw linear file from the same image, the histogram for it will not look anything like the histogram from the JPEG image. In a linear raw file, most of the pixel values will be at the far left hand side of the histogram. This is normal and does not mean that the image is drastically underexposed. After you have framed your target, focused and acquired a guidestar, take a test exposure. Examine the histogram of this exposure on the back of the camera. For the latest generation of low-noise DSLR cameras, your sub-exposure will be long enough when the "mountain" is completely separated from the left hand side of the histogram wall. I generally try to put the peak of the main "mountain" of the histogram somewhere between 20 percent and 40 percent because this helps separate the very faintest object detail from the noise in the camera. Placing the histogram between 20 and 40 percent doesn't mean that the width of the mountain will be this wide, just that this is where the peak of the mountain should lie. Most of this mountain represents the brightness of the sky background. The width of this mountain is determined by the range of brightness in the object being photographed and the brightness of the sky background. If you shoot an area of blank sky with only stars in it, the mountain would represent only the sky background and any gradients present in it. Adjust the exposure until the peak of the histogram is in this 20-to-40 percent range. This will be the correct exposure for each sub-exposure for your local sky conditions. Exposing longer will lose detail in highlights of the object if it has a large brightness range. Shorter exposure times will put the signal too far down in the camera noise. Under cool ambient temperatures (approximately 50F), with the latest generation of low-noise cameras at really dark-sky sites, such as Cherry Springs in Pennsylvania, or Massai Point in Arizona, exposures may be as long as 3 to 6 minutes at f/2.8 at ISO 800. Exposures at moderate dark sky sites may be in the 1 - 2 minute range. Exposures at light-polluted sites may only be 10 - 15 seconds exposures at f/2.8 at ISO 800. Taking test exposures and examining the histogram are the easiest way to determine the correct exposure your site on a particular night given the local atmospheric conditions as far as haze, humidity, light pollution, and sky glow. In any event, whether guided or unguided, you should shoot as many sub-exposures as you can. The more total exposure time you have, the more photons the camera will have recorded resulting in a higher signal-to-noise ratio in the final image. When you preview the image on the display on the back of the camera, you will see that the sky looks fairly bright when the histogram mountain reaches about the 25 percent point. You may think that this is overexposed because when you look at the night sky with your unaided eye it seems black. This is, however, the correct exposure. You do not want the sky completely black in your images. If it is truly black, you will not be able to capture the faint detail in the object you are photographing. In most cases, this faint object detail is barely brighter than the sky background. If it is underexposed, with most of the pixel brightness values on the far left side of the histogram, it will be located in the noise in the image and difficult, if not impossible, to extract. With brighter objects such as star clusters, if you want to try to record star colors so that all of the stars are not saturated to pure white, try exposing so that the histogram's peak is about 15 to 20 percent of the way from the left hand side, and use a low ISO. It may help to open the image in a processing program and examine the pixel values for the stars in the image to make sure that they have not reached the point of saturation where they will only record as white. In any given star field, you will usually have some bright stars whose cores will saturate. This is ok. Star colors can still be seen in the halos of these stars, and in the cores of the fainter stars in the image that have not saturated. With older DSLR cameras, the in-camera thermal noise may be the limiting factor in exposure length, especially from amp glow. If amp glow totally saturates pixels, then dark subtraction cannot replace the data lost. In this case you will have to use shorter exposures, and shoot many more sub-exposures.
A Word about M42, The Orion Nebula Many beginning astrophotographers will shoot M42 as their first deep-sky object. I know I did. It's big and bright and seems like an easy target. And it is, and it isn't. What makes M42 difficult to shoot is the tremendous dynamic range present in the nebula. The dynamic range is the range of brightness from the brightest part in the inner core of the nebula near the Trapezium, to the faintest parts in the outer loops. This dynamic range is so large in M42 that it is extremely difficult to record detail in both the brightest and faintest sections in a single exposure. So, don't hesitate to try shooting M42, just don't expect to record detail in both the bright core and faint outer loops at the same time in a single exposure. The bright core is an excellent first subject for a beginning deep-sky astrophotographer, but to capture both in a single image requires more advanced techniques. Recording the entire dynamic range of M42 in a single image requires shooting short exposures to record detail in the bright parts and long exposures for the faint parts, and then compositing these different exposures together into one final image, either by using masks in Photoshop, or by using the high-dynamic range function in Photoshop. Number of Sub-Exposures For light-polluted sites, you will need shorter individual exposures, but many more of them total. For example, say you want to have a total of 60 minutes of exposure time. At a darker site you might shoot 12 five-minute exposures. But at a site that is not as dark, you would think that 30 two-minute exposures would give you the equivalent final image (60 minutes), but in fact, you will need to shoot more to overcome the additional read-out noise present in each frame. There will be more total read-out noise because there will be more total frames. If your site is twice as bright (less than one magnitude difference), you will need twice as much total exposure to achieve the same quality results as at the darker site. If your observing site is 2 magnitudes brighter than a dark sky site, you will need about 6 times longer total exposure (one magnitude = 2.51, so two magnitudes = 2.51 * 2.51 = 6.3). This is a fact of life in the world of digital astrophotography. On the positive side, you can shoot from observing sites with brighter skies, but the drawback is that you need more sub-exposures and longer total exposure times to equal the results at a darker site. Recording faint objects in the night sky is all about the signal-to-noise ratio. Faint objects against a bright sky background are naturally more difficult to image than the same object against a dark sky background. Although the sky background is actually signal also, it's not a signal we are particularly interested in. In addition to the sky background, the signal of the object must also contend with noise that is generated in the camera. When attempting to image faint detail in a reasonable number of exposures, the individual sub-exposure must be long enough to get this object detail up out of the camera noise. The easiest way to initially improve the signal-to-noise ratio is to shoot under the darkest skies that you can find. The next step in improving the signal-to-noise ratio is to increase the exposure time for an individual exposure, but this is usually limited by the brightness of the sky background or tracking considerations. The longest exposure possible must also be balanced against other factors such as bright areas of the image loosing detail if the exposure gets too long, and the buildup of thermal noise. Finally, we can improve signal-to-noise by adding or averaging together many sub-exposures. Ideally, we want the darkest site we can get, combined with the longest sub-exposures the sky and object will stand, and as many sub-exposures as possible to give the longest total exposure time.
Time Between Exposures Allow enough time between exposures for the raw data to be written to the camera's memory card or transferred to the computer's hard drive. Slower memory cards take longer to write to. Older cameras use a slow USB1 connection and can take quite a while to download images. Modern cameras usually have a large memory buffer in which to store images as they wait to be written to the memory card, and USB2 connections are fairly fast, so pausing a long time between frames is usually not necessary. I use a 10 second pause between frames. Controlling Sources of Heat Cameras generate thermal signal from heat. While the camera is on, the internal temperature gradually builds up, increasing the thermal signal, and its associated thermal noise during an exposure. The thermal signal can be subtracted with a dark frame, but the thermal noise can not. So the less thermal signal in a given frame the better. This means that images taken at a cooler ambient temperature will naturally have less thermal signal and noise in them. The temperature inside the camera goes up for about the first couple of hours if the camera is used continuously, then it stabilizes and levels off. Because the thermal signal increases at higher temperatures, the images at the start of an imaging session have less thermal signal, and associated thermal noise, than those taken at the end if you shoot continuously. It is not so much the thermal signal that is the problem because it can be subtracted with dark frames. The problem is the thermal noise - because it cannot be removed. Any method we use to keep the camera cooler will help to reduce the thermal signal and hence the thermal noise. Here are some suggestions for controlling heat in the camera:
Any method that we can use to cool the camera will help produce less noise in the image, so it is definitely worth the effort on most nights, and especially in the summer.
Binning Astronomical CCD cameras can combine, or "bin", pixels. This means they can take a section of 2x2, 3x3, or even 4x4 pixels and make it into one larger pixel. This larger pixel can hold more electrons and has less readout noise. Therefore it is more sensitive and has more dynamic range. The tradeoff is spatial resolution. Because this super pixel is larger, it can not resolve as fine detail as the individual smaller pixels. Because DSLR cameras use a Bayer matrix of colored filters over each individual pixel to create one-shot color, we can not use binning in hardware in the camera to increase sensitivity in the same way we do with a dedicated astronomical CCD camera. We can "bin" pixels in a DSLR through software interpolation, and this can reduce noise, but it does not provide any true increase in sensitivity or dynamic range.
|
||||||||||||||||||||||||||||||||||||||||||||||||||||||||||||||||||||||||||||||||||||||||||||||||||||||||||||
|
Back | Up | Next |
||||||||||||||||||||||||||||||||||||||||||||||||||||||||||||||||||||||||||||||||||||||||||||||||||||||||||||