Astro Photography Tool (APT) is commercial software by Ivaylo Stoynov that controls your Canon DSLR camera and records high-quality JPEGs from Live View. You can open the JPEGs in AutoStakkert!, AviStack, Images Plus or RegiStax for grading, aligning and stacking. APT controls most of the important settings, such as shutter speed, ISO, aperture (of a Canon camera lens), and white balance, through a single USB cable hooked up to your computer. In addition to capturing Live View for planetary work, APT will also help you focus, and automate a series of still-frame exposures in an imaging session for long-exposure deep-sky imaging. Three great things about APT:
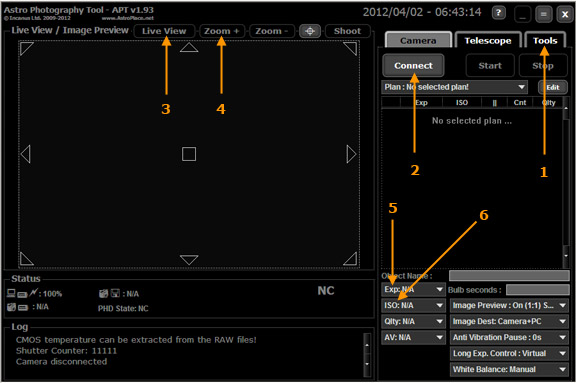
Before installing APT, install the Canon software that comes with the camera first to be sure you have the correct drivers for the camera, so the operating system will see it when it is connected via the USB cable. After installing the camera software, Canon's EOS Utility will open when the camera is connected to the computer and turned on. EOS Utility will control your camera, but it will not record Live View. You can simply close EOS Utility and launch APT, or you can go into EOS Utility's preferences and set it so that it does not open when the camera is connected. Note that APT only works on Microsoft Windows with Canon DSLR Cameras. APT Step-by-Step Procedure for Planetary Imaging
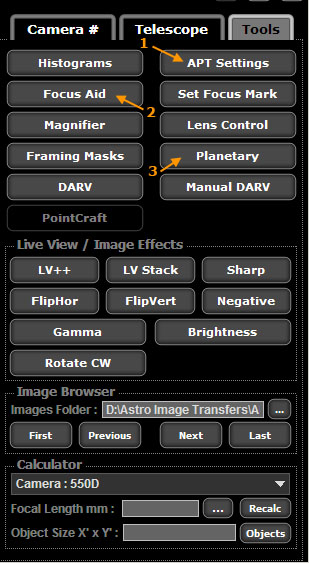
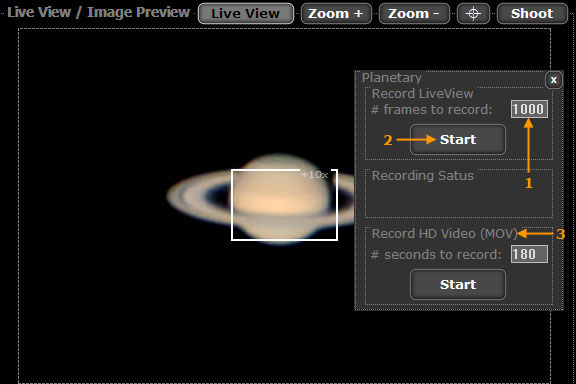
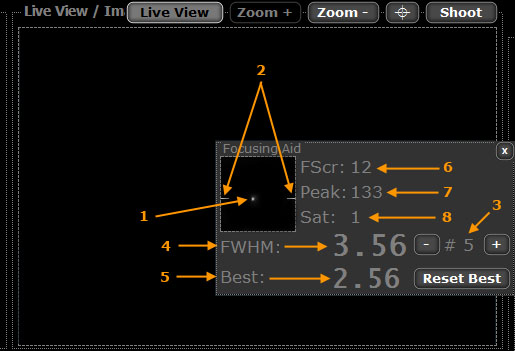
The frames will then be recorded as high-quality JPEG files to the directory you specified during setup. You can open this series of JPEG images in a program like RegiStax, AviStack or AutoStakkert! by dropping and dragging them from Windows Explorer into the program. Recording HD Videos with APT APT's Planetary function also offers the experimental ability to directly record high-definition videos to your camera's memory card and then transfer this file to your computer (Figure 4, Number 3). This approximates using your camera in Movie Mode without having to turn the mode dial on the top of the camera to Movie Mode. However, you may have different exposure settings set for HD Movie Mode on the camera which are different from the correct settings for Live View recording, and you won't find out until the HD movie is actually recording with this function. Once you are recording an HD movie, there is no way to adjust the exposure from inside of APT. Focusing with APT's Focus Aid Tool I recommend focusing on a star near to the planet you want to shoot. Using APT's Focusing Aid tool on a star will help you quickly and accurately focus your telescope. It is much more difficult to focus by eye on low-contrast planetary detail, especially in less-than-great seeing. The numerical readouts will give you an objective assessment of the accuracy of your focus instead of a subjective visual guess as to what is the best focus. Use a reasonably bright star as close as possible to the planet you want to shoot. This will minimize the chance of your primary mirror moving and throwing off collimation or focus when you move to the planet. Start Live View and zoom into the star at 5x. Launch the Focus Aid dialog under the Tools tab (Figure 2, Number 2).
Move the Focus Aid window so that it is over the star (Figure 5, Number 1). Two small bars should appear to the left and right of the star (Figure 5, Number 2) locking on it for the numerical readouts. APT will average a number of user-specified frames for better results to mitigate the effects of seeing. Click the plus or minus to change the number of frames averaged (Figure 5, Number 3). 5 Frames is a reasonable number for good seeing. I use 10 or more frames for average or poor seeing. As APT averages the frames, it displays several numerical readouts. The FWHM is basically the size of the star (Figure 5, Number 4). This number will rapidly cycle due to the effects of seeing. The Best readout (Figure 5, Number 5) is the lowest FWHM value during a particular period of time, until you click the Reset button. Lower values for FWHM and Best mean a smaller star, which means better focus. After you adjust the focus, give the scope and camera a while to settle down. Click the Reset button after adjusting the focus. Watch the numbers as you adjust focus until the Best readout is as low as possible. While focusing, it is important to adjust the exposure so that the star that is not overexposed and saturated. Use the Peak and Saturation readouts (Figure 5, Numbers 7 and 8) to check this. If you start out with a star that is grossly out of focus, you may have to adjust the exposure and ISO so that it is bright enough for readout measurements to be made. If the star is not bright enough, the bars will not show up (Figure 5, Number 2). Keep an eye on the Peak and Saturation numbers as you focus as they will increase when the star is better focused. A Peak number of 255 means the star is saturated. If the star saturates, cut the exposure or ISO down. The Saturation readout should have a value of 1. If it is more than that, reduce the exposure. F Scr (Figure 5, Number 6) is the Focus Score. It gives a rough estimate of focus. Lower values mean better focus. Don't forget to re-adjust the exposure and ISO after you have focused and moved back to the planet. Other APT Features APT was originally designed to shoot single frames for stacking long-exposure deep-sky images. You can set an exposure plan under the Camera tab. Unfortunately, we can't cover all of the features of APT in this section. Please refer to APT's web site and user manual for more information on the features of the program. However, there are a couple of other features that are useful for planetary imaging.
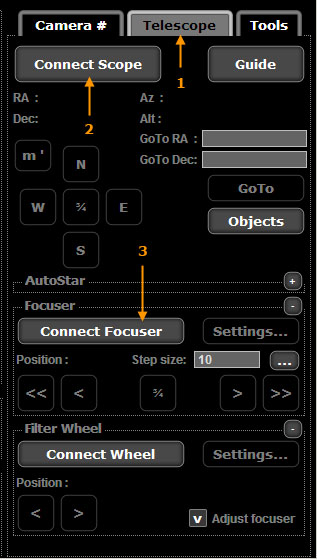
Go To Mount Control Under the Scope tab (Figure 6, Number 1) we can control a Go To mount (Figure 6, Number 2) if it has an ASCOM driver. Being able to nudge and bump the star for focus, or to exactly center a planet at high-magnification from inside the imaging-control software is very nice if you need to re-center the object. Motorized Focuser Control Under the Scope tab (Figure 6, Number 1) we can also control a Go To mount (Figure 6, Number 3) if it has an ASCOM driver. Being able to control a motorized focuser from inside the same software with numerical focus evaluation is especially nice as you can adjust the focus while watching the readouts. Night Vision Mode APT has a night-vision mode where the display is in red.
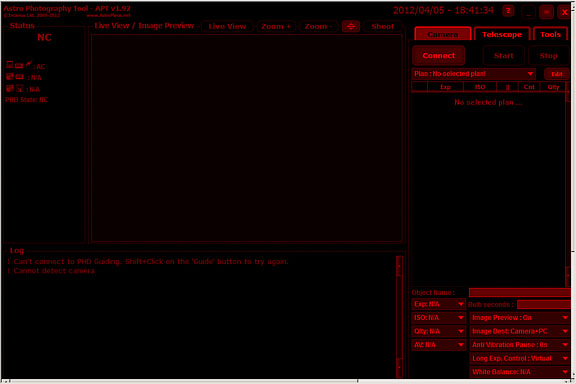
|
|||||||||||||||||
|
Back | Up | Next |