Canon's EOS Utility (EU) is the camera remote-control software that comes with the purchase of your Canon DSLR camera.
With EU you can view the Live View video feed on your computer and control the camera over a single USB cable. It will give you almost complete control over the camera allowing you to change the shutter speed, ISO, aperture (of a Canon camera lens), white balance, and other settings. If your camera shoots high-definition video, you can control it from your computer, but only record it in the camera.
In addition to capturing high-definition video for planetary work, EU will also automate an imaging session for long-exposure deep-sky imaging.
You should have received a copy of Canon's software when you purchased your Canon DSLR camera. Once you install the EOS Utility you can download and install the latest version from Canon's web site. Click on your camera model and then on "Drivers and Software", select your operating system, and download the latest updated version of the software. If you camera model is not listed because it has been discontinued, you can try clicking on a current model and downloading the software from that link, it will probably work with your camera. You can not install an update without first installing the original version that came with the camera.
Important things to note:
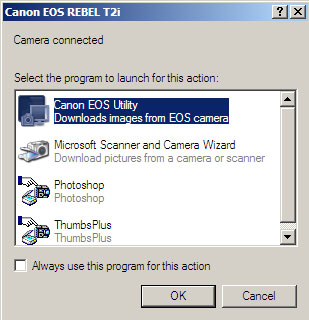 |
| Figure 1: After connecting your camera to your computer with a USB cable and turning the camera on, you will get this dialog box asking which program you want to use with your camera. |
Canon's EOS Utility is a full-featured piece of software that will allow you to control most functions in your Canon DSLR camera from your computer. Simply install the software, connect the camera to the computer with a USB2 cable, and turn the camera on.
After the computer recognizes the new hardware the first time, the computer's operating system will give you a dialog box asking which program you want to use with the camera (Figure 1).
You can select Canon EOS Utility and check "Always use this program for this action" if you would like Canon EOS Utility to open automatically every time you connect your camera.
If you want to use another program for capturing planetary videos, just click "cancel" and the dialog will close without any programs opening. Then you can open another program manually.
Please Note that this section is not meant to be a comprehensive coverage of every function of Canon's EOS Utility. Please read and refer to Canon's manual for the EOS Utility for a more complete discussion of what the software can and can not do. Also note that not all functions are available for all cameras.
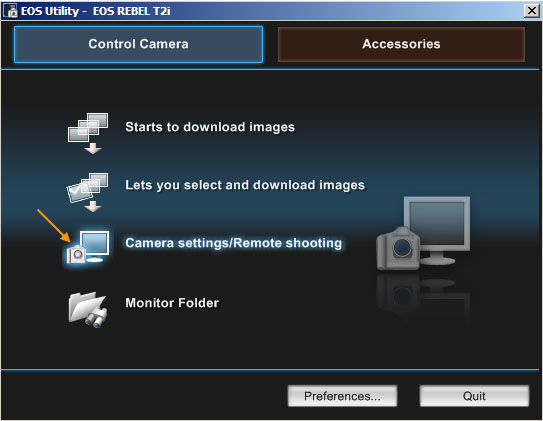 |
| Figure 2: Initial Canon EOS Utility Dialog Box |
When EOS Utility opens for the first time, you will get a dialog box (Figure 2) asking what you would like to do. To control the camera, select Camera Settings / Remote Shooting.
Preferences
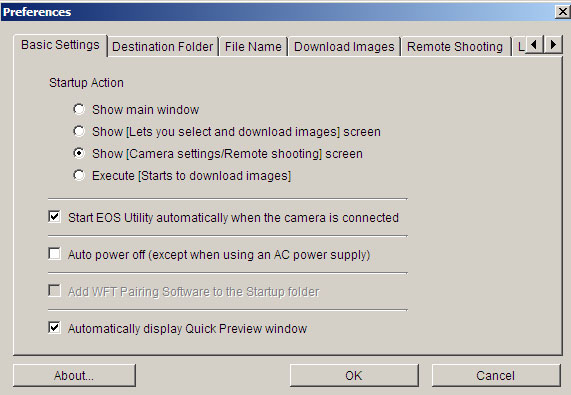 |
| Figure 3: EOS Utility Preferences Dialog Box |
The Preferences dialog (Figure 3) will let you select different settings such as what to do when it first starts up, and where to save the images if you select to save them to the computer.
I recommend the following settings for Preferences:
Capture Window Settings and Controls
This is where it all happens when you are controlling your camera with EOS Utility.
There are a lot of settings, just like in the camera. Maybe even a ridiculous number. In the days of film cameras, you had basically three settings: shutter speed, aperture, and ISO. With digital cameras you have dozens and dozens. This makes things more complicated, but it also gives you more control.
There is only one basic settings for using the EOS Utility for shooting movies for high-resolution planetary imaging through a telescope at 1:1 resolution.
In a camera that has 640 x 480 Movie Crop Mode, the video is recorded at 60fps. Most other cameras can capture 1:1 pixel resolution by recording Live View at 5x zoom.
Shutter speed and ISO are used to control the brightness and exposure of the image. If we are shooting at 60fps, we won't be able to use a shutter speed longer than 1/60th of a second to make the image brighter because the shutter speed is limited by the framing rate.
For really bright objects like the Moon, we can use a higher shutter speed with a lower ISO. A lower ISO will give less noise in the video.
For faint planets like Saturn at high focal ratios, like f/30, we can only increase the ISO to make the image brighter. In this case we will need to stack more frames to deal with the noise. But unless there is a storm occurring on Saturn, we can shoot longer because there really isn't any planetary detail that will get smeared on Saturn due to planetary rotation.
Aperture is normally another variable that can be controlled with a camera lens to adjust exposure. But with a telescope the aperture is fixed. The focal ratio can be changed with a Barlow or eyepiece projection to give more magnification, but this is usually not done to control exposure. Once the Barlow or eyepiece projection is inserted into the optical system, the focal ratio is again fixed and can not be adjusted.
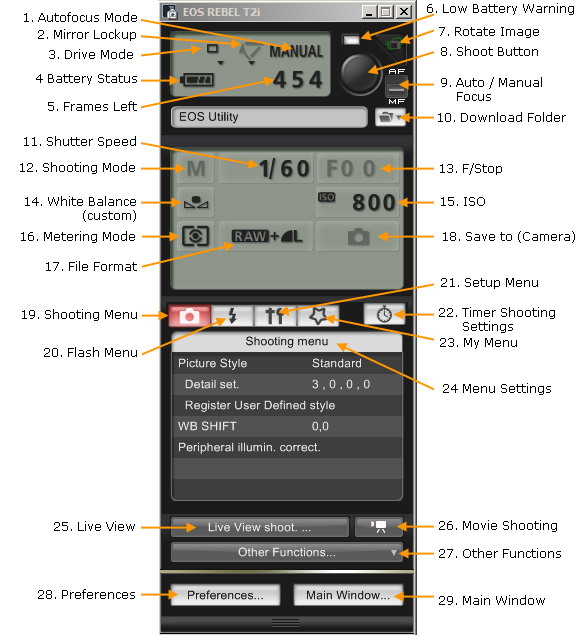 |
| Figure 4: EOS Utility Capture Window Settings and Controls |
Autofocus Mode - Displays whether the camera is in manual or autofocus mode. If in autofocus mode, it will show One Shot, AI Focus or AI Servo. For use with a telescope, the display will say "Manual". When using a Canon camera lens with micro-processor in the lens, you can autofocus the lens by holding the mouse cursor over the Shoot Button (#8). If the AF/MF switch on the lens is set to MF, "Manual" will be displayed. -
 |
|
Figure 5: Right click the tiny triangle to change the setting for Mirror Lockup and Drive Mode.
|
Mirror Lockup - By holding the mouse cursor over the little triangle beneath this icon, and right clicking, you can enable mirror lockup. One press of the shoot button is required to lock the mirror up, and another press of the shoot button is required to open the shutter. If the camera is set to Bulb, a third press of the shoot button is required to close the shutter. The Mirror Lockup icon will blink when the mirror is in the locked up position.
Drive Mode - By holding the mouse cursor over the little triangle beneath this icon, and right clicking, you change the Drive Mode from single frame to continuous shooting for still frames. Battery Status - Displays how much charge is left in the battery. Frames Left - Displays the number of frames left based on the quality settings and size of the memory card. Should be used as a general indicator only. The Frames left display will turn into an exposure counter during Bulb exposure. Low Battery Warning - Turns red when the battery level is low. Change the battery or switch to a 12-volt DC or 120-volt AC adapter. Rotate Image - Rotates images that are already shot by 90 degrees. Rotate images must be set in preferences. Shoot Button - The equivalent of the shutter release button on the camera. Auto / Manual Focus - When using a camera lens with autofocus turned set to on with the switch on the lens, you can turn autofocus off, and manually focus the lens via EOS Utility software. Download Folder - Clicking this icon lets you select the download folder in the preferences dialog. The name of the download folder is displayed to the left of this icon. Shutter Speed - Change the camera's shutter speed by right clicking on the icon and then left clicking on the single arrow to change the shutter speed in single increments, or by clicking on the double arrow to change the shutter speed to either the Bulb setting (left double arrow), or the shortest shutter speed (right double arrow). Shooting Mode - Displays the shooting mode selected on the main dial on the top of the camera. F/Stop - Displays the F/stop setting if a lens is attached to the camera. Displays F 00 if no lens, or a telescope, attached. Right click to change by clicking on a single arrow. The single arrow changes the f/stop in 1/3 or 1/2 stop increments (depending on what you have set in the custom functions menu). The left-pointing double arrow moves the f/stop to wide open, or stopped down all the way with the right-pointing double arrow. White Balance - Right clicking on this icon allows you to change the white balance setting from AWB (Auto White Balance) to Daylight, to Custom, and the other available settings. ISO - Displays the ISO setting. Change the camera's ISO by right clicking on the icon and then left clicking on the single arrow to change the ISO to a lower setting in single increments, or by clicking on the double arrow to change the ISO to either AUTO (left double arrow), or the highest ISO (right double arrow). Metering Mode - Displays the metering mode. Right Click to change between Evaluative, Partial, Spot and Center-Weighted Average metering. File Format - Right click to change the file format (Raw, JPEG or Raw + JPEG) that single frame images are stored in. Save to - Right click to select between saving images to the computer only or computer and camera memory card combined. Shooting Menu - Left click to change the settings available under the shooting menu:
Flash Menu - Left Click to change flash settings. Setup Menu - Left Click to change settings such as the date and time, and Live View / Movie Function Settings. Right click to change a sub-setting. Timer Shooting Settings - Left Click to access the Timer Shooting Settings. This will allow you to shoot multiple single frames with an interval timer. This is usually used for stacking multiple frames for long-exposure deep-sky imaging. My Menu - Left click to access the "My Menu" settings. Right click on My Menu Settings to change them. Menu Settings - displays sub menus selections. Live View - Left click to activate Live View and display the Remote Live View window. Movie Shooting - Left click to activate the camera's movie mode. This is equivalent to manually turning the main dial on the top of the camera to Movie Mode. Other Functions - Left click to:
Preferences - Left clicking calls up the preferences dialog (Figure 3 above). Main Window - Left clicking calls up the main EOS Utility window (Figure 2 above).
Woa! That's a lot of settings! Don't let them overwhelm you. In the step-by-step procedure outlined below, we will cover the critical settings and simplify as much as possible. Most settings will just be left to the defaults.
Remote Live View Window
 |
| Figure 6: EOS Utility Remote Live View Window and Controls |
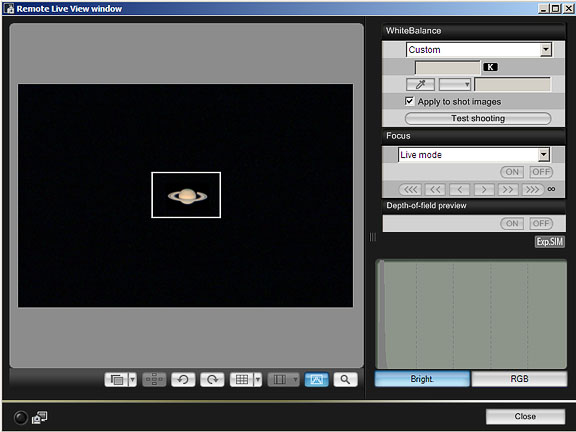
Pressing the Live View Shooting Button in the main Camera Control Window (Figure 4, Number 25) will launch the remote Live View Window. In this window you can see on your computer what would be displayed on the LCD on the back of the camera for remote control operation.
The Remote Live View Window is useful for framing and focusing on large bright objects like the Sun and Moon if you are going to shoot single frames. You can click the magnifying glass icon on the bottom to magnify the image for easier focusing.
Press the Close button at the lower right of the window to turn off Live View and close the window.
You can not, however, record Live View in the Remote Live View Window, so it is not useful for high-resolution lucky planetary imaging. You must use another program to record Live View.
Zoom View Window
To record 640 x 480 Movie Crop Mode at 60 fps in EOS Utility you must set the main camera mode dial on the top of the camera to Movie Mode.
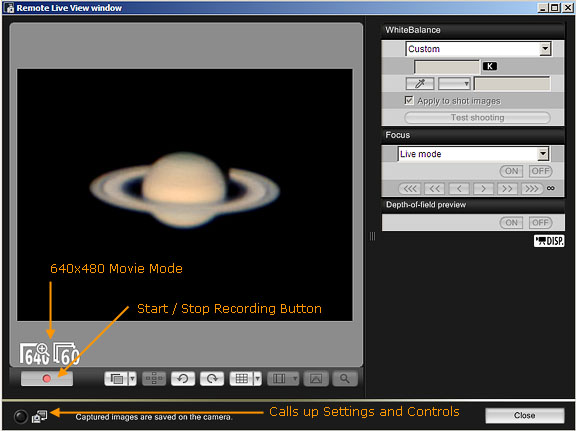 |
| Figure 7: EOS Utility Remote Live View Window for Movie Mode |
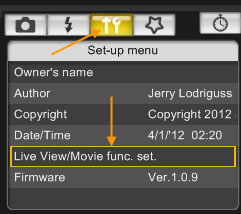 |
| Figure 8: Setup Menu |
|

|
|
Figure 9: Movie Settings - hold your mouse cursor over the image to see Movie Mode options for the Canon T2i (550D).
|
|
|
Click the Live View button (Figure 4, number 22) to launch the Remote Live View Window in Movie Mode.
In Movie Mode you can record in the standard high-definition Movie Modes such as 1920x1080, 1280x720, 640x480 standard definition, or 640x480 Movie Crop Mode on those cameras that have that mode available.
Once you are in Movie Mode, you can change the high-definition mode by clicking the Camera Settings / Remote Shooting button in the lower left hand corner of the Remote Live View Window.
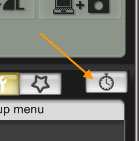
This brings the main Camera Settings dialog to the front. Click on the Set-Up Menu button (Figure 8), and right click on the Live View / Movie Function Setting sub menu (Figure 9). Here, depending on your camera, you can select between various high-definition movie modes, and 640x480 Movie Crop Mode if you camera offers this function.
Clicking on the red Start / Stop Movie Recording button at lower left will begin recording a video movie (Figure 7). Just above this button, the resolution of the movie that will be recorded is displayed. While a movie is recording a large red dot with the recording time elapsed will be displayed next to the movie resolution.
Step-by-Step Imaging Procedure using EOS Utility
Turn the computer on. Turn the camera off. Set the Mode dial on the top of the camera to Movie. Connect the camera to the computer with the USB cable. Turn the camera on. Launch the EOS Utility. Click the Live View Icon (Figure 4 Number 25). Click the Settings and Control Icon (Figure 7 lower left). Click the Setup Menu (Figure 8). Click Live View / Movie Function Setting(Figure 8). Select Movie Crop 640x480 60 fps for the Canon T2i (550D), 60D or 60Da (Figure 9). Set Movie Exposure to Manual (Figure 9). Ok the dialog box to close it. Adjust the shutter speed and ISO to get the correct exposure for the subject (Figure 4 numbers 11 and 15). Focus the telescope. Click the red Start/Stop Recording button (Figure 7) to start the movie recording. Click the red Start/Stop Recording button (Figure 7) to stop the movie recording. Close the Remote Live View window when you are finished recording planetary movies. Download the movies from the camera's memory card to the computer.
Tips for Shooting Video with EOS Utility
EOS Utility for Single Frame Still Images
You can use EOS Utility as an interval timer to completely automate an imaging session for long-exposure deep-sky astrophotography.
First click on the Remote Timer icon (Figure 10) in the Settings and Controls dialog (Figure 4).
The Timer Shooting Settings button dialog will open (Figure 11).
 |
 |
|
Figure 10: Remote Timer
|
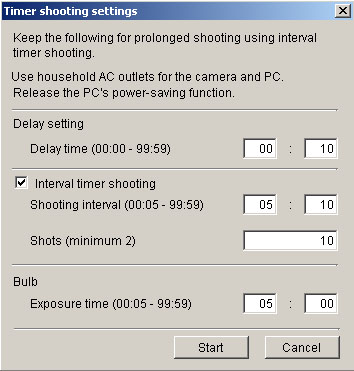
Figure 11: Remote Timer Dialog set to shoot ten 5-minute exposures with a pause of 10 seconds between frames, and an initial delay of 10 seconds before the first frame.
|
Here you have four basic timer shooting settings:
Delay button - The delay before the first shot is taken. This can be set from anywhere from 0 seconds to 99 minutes and 59 seconds. Normally you would want to set it to something like 10 seconds to be sure everything is settled down before the first image is started. Interval Timer Shooting button - This is the interval between shots. Note that you must add the exposure time to the interval. For example, if you want to shoot 5 minute exposures with a 10-second pause in between frames, you should set the shooting interval to 5 minutes and 10 seconds. Shots button - The total number of shots you want to take. Bulb button - If you are shooting exposures longer than 30 seconds, you need to set the camera to the Bulb exposure setting. When set to Bulb, you can specify the exposure time here, such as 5 minutes for a single frame.
|
EOS Utility for Video Shooting - The Bottom Line
Only connect and disconnect your camera from the computer and USB cable with the camera power off.
Put the camera in movie mode with the dial on top the camera.
Change the Movie Function Settings to 640 x 480 Movie Crop Mode at 60 fps.
Adjust the exposure (shutter speed) and ISO to adjust the brightness of the image.
Use daylight white balance to achieve correct color balance in the camera.
After recording a video in Canon's MOV file format, you must convert it to an AVI format so it can be opened in an image processing program like AutoStakkert!, AviStack or RegiStax .
|
|