Take a little time to think about what you want to shoot, and how you are going to shoot it before you go out. Not every object in the sky is up every night. For example, M42, the Orion Nebula, is not even visible in June. Basically, you will get the best pictures when the object that you want to shoot is highest in the sky. If you plan ahead of time, you can maximize your time out under the clear dark sky. Think about the size of the object that you want to photograph. If you are shooting from your back yard downtown in a light-polluted city, and you have a short focal-length telescope, you are not going to be very successful trying to shoot a very small, faint, galaxy. When you are first starting out, try to stick with the big, bright, deep-sky objects. The Orion Nebula, the Pleiades, and the Andromeda Galaxy are famous because they are big and bright. These are good subjects to start with. Because they are big, you can shoot them with a shorter focal length, which minimizes tracking errors. Because they are bright, you can shoot them with shorter exposures, which also minimizes tracking errors. Framing the Subject There is an unwritten tradition in astrophotography to frame your subject so that the image is oriented north-south / east-west. This is simple to do by aligning the bottom of your camera with either the right ascension or declination axis. It is not a law however. You can frame your subject any way that you find aesthetically pleasing. If you align your camera this way, it is easy to figure out directions in the image. This can help if you are trying to troubleshoot some type of problem like star trailing in your images. For example, if your images consistently trail in the north-south direction, you will know that your problem is poor polar alignment. If they trail in the east-west direction, your problem is probably periodic error. Some big objects are situated in the sky so that some of them are framed better with the long side of the frame oriented north-south. Others are situated so they are better framed with the long side of the camera oriented east-west.
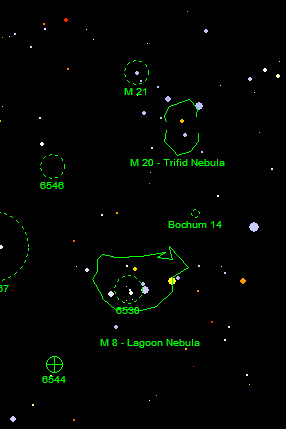
It's easy to figure out how your camera needs to be oriented if you do a little research before you go out. Look up the object in a desktop planetarium program or a star atlas. Most will have an outline of the object itself and you can see how to frame it. This will save you some trial and error at the scope and you won't have to re-focus if you decide you need to rotate the camera 90 degrees. Most desktop planetarium programs will let you input the size of your DSLR sensor, and the focal length of your scope so that it can calculate your field of view, and then plot an overlay on top of a map with the deepsky object. That way you will know exactly how to frame it so it will look the best. Battery Charging If you think that the weather prospects look good in a couple of days, and that you might be going out to do some astrophotography, make sure your camera batteries, and 12-volt deep-cycle battery are charged and ready to go. If you don't think about this ahead of time, you may find that a potentially good night is wasted because your batteries weren't charged. Sensible Precautions If you are going out observing at a remote location, or even just in the woods near your house, let someone know where you are going and when you plan to be back. Take a cell phone along, but realize that many remote locations do not have cell phone service. If you run into trouble, such as with a dead car battery, and you can't call, someone will know to come looking for you and they will know where to find you. Be aware of any potential hazards from wild animals and humans at your observing site. The general rule of thumb, in both cases, is that if you don't mess with them, they won't mess with you. However, if you are in bear country, observe common sense rules such as not leaving any food out. In mosquito-prone areas, use an insect repellant with DEET. It is the only scientifically proven insect repellant. This is important because of illnesses like the mosquito-borne West Nile Virus and tic-borne Lyme disease. When to Shoot The very first thing you are going to need to shoot astrophotos is clear skies! The Clear Sky Chart by Attilla Danko is an excellent reference for planning observing and astrophotography sessions. The Clear Sky Chart What the local weather forecast considers "clear" is not always what an astronomer or astrophotographer would consider clear. So you can't always trust a weather forecast. However, you can find a tremendous amount of useful information about cloud forecasts and the weather at the Clear Sky Chart.
The Clear Sky Chart uses data from the Canadian Meteorological Centre to predict clouds and clear skies for astronomical observing. It provides forecasts for astronomical observing conditions for more than 1900 observing sites in North America. High in the Sky Usually, the best time to shoot an an astronomical object is when it transits the meridian. The meridian is an imaginary line that runs from north to south and passes through the zenith overhead. When an object is transiting, it is highest in the sky. This is when you will be viewing the object through the least amount of the Earth's atmosphere. When you observe or photograph an object that is low in the sky, you are looking through more of the Earth's atmosphere. This not only dims, but also blurs the subject. A planisphere or planetarium program is a very useful tool in planning a night's astrophotography. With them, you can tell when an object transits the meridian for the time of night you will be shooting. If you have a choice of shooting the Andromeda Galaxy when it is high overhead in the fall at midnight, or the Orion Nebula when it is just clearing the horizon before dawn at the same time of year, shoot Andromeda. You will get a much better picture because it is high in the sky. Wait a couple of months until Orion gets high in the sky before you shoot it. Different objects are best placed in the sky at different times of the year. For example, spring is considered to be galaxy season. In the spring time the winter constellations and winter Milky Way are setting at about the same time the Sun is setting. The summer constellations and summer Milky Way are just rising before dawn. The only things that are up all night are the realm of the galaxies in Ursa Major, Coma Berenices, Leo and Virgo. Not surprisingly, the winter Milky Way is best shot in the winter, and the summer Milky Way in the summer. You can cheat a little bit if you can manage to stay up all night and shoot the coming seasons attractions at the end of the previous season. This is actually not that bad of an idea. Things usually calm down after midnight. Light pollution goes down as people go to bed and businesses turn off their lights. There are less airplanes flying through your frames. There are less people driving around and mucking about. The world is more peaceful and serene in the hours between midnight and dawn. The Light of the Moon As they say, it's always darkest just before the dawn, except when the Moon is up. And the darker the sky is, the better your pictures will be. Which brings up the subject of the Moon. Unless you want to take pictures of the Moon itself, it is generally best to try to shoot deep-sky objects when the Moon is not visible in the sky. The Moon puts out a lot of light, and can brighten the sky considerably. The Moon shines by reflected sunlight. Any Moon greater than a crescent will adversely affect observing and photographing faint deep-sky objects. So if you want to shoot faint stuff, pick a clear night when the Moon is not up, or shoot before it rises or after it sets. You can, however, shoot objects like star clusters and globular clusters when the Moon is up. Other Considerations Don't try to shoot when it is too windy. A telescope magnifies small objects, but it will also magnify any movement from the wind blowing the scope and camera. It doesn't take much wind to shake a telescope and ruin an image. On windy nights, or on nights of poor seeing, you can shoot with wide-angle lenses which lessen the effect of both. Where to Shoot For long-exposure deep-sky astrophotography, the most important thing about an observing location is that it have clear, dark, transparent skies. For high-resolution planetary work, the most important thing about an observing location is that it have good seeing. These two sets of requirements are not mutually exclusive, but they don't always go together. For example, you don't really need dark or transparent skies at all to do high-resolution planetary work, and you don't really need great seeing to do deep-sky work. Let's go over a couple of definitions because some people don't completely understand the difference between seeing and transparency.
Seeing really has little to do with transparency. Sometimes you can get the best seeing in a very stagnant air mass on a hot and humid summer night when the transparency is very poor. And sometimes you can get a wonderfully transparent night with terrible seeing. The Clear Sky Chart, which we discussed in the previous section, also provides information on seeing and transparency conditions for that particular observing location. Shooting Faint Stuff To shoot faint nebulas and galaxies, you will get better results, and quicker results, with a dark sky. Detecting and photographing faint stuff in the sky is made possible by the contrast between the deep-sky object and the brightness of the sky background. If the sky is really bright, like in the daytime, you can not see any deep-sky objects at all. If the sky is really dark, the object will stand out more brightly from the sky background. Some people think that their backyard is darker than their front yard because they can't see the streetlight across the street from the back yard. But if your house is downtown in the middle of a big city, it really isn't any darker in your backyard than from your front yard. You may be shielded from the direct glare of the streetlight, but the sky is really bright from the accumulated glare of the millions of lights in the city and not just that one streetlight across the street. This causes what astronomers and astrophotographers call light pollution. Light pollution is bad for deep-sky astrophotography.
A true dark-sky site is far away from any urban areas. Often it is an hour, or even several hours, away. But the darkness of the night sky is very important in the quality of the images we shoot. I live in the suburbs of a metropolitan area with 6 million inhabitants. If I can find a decent dark-sky site about an hour's drive away where I can see the Milky Way, you can too. Shooting from a reasonably dark-sky site can make all of the difference in the world in the quality of your deep-sky astrophotos. A little bit of a drive is really worth it. The World Atlas of Artificial Night Sky Brightness The World Atlas of Artificial Night Sky Brightness compiled by P. Cinzano, F. Falchi and C. D. Elvidge at the Istituto di Scienza e Tecnologia dell'Inquinamento Luminoso in Italy, is an excellent resource to find out exactly how dark your observing location is, and to find darker skies within driving distance.
The best I can do within an hours drive from my home in suburban Philadelphia is to shoot from the yellow area to the southeast of Philadelphia. I can see the Milky Way from this location when it is overhead but not near the horizons. The northwest is severely compromised at this location from the light dome from the city. To reach truly dark skies, a 6-hour drive is required to either Cherry Springs (number 2) or Spruce Knob (number 1). The Clear Sky Chart also provides a link to a light pollution map for the observing location. The Digital Advantage vs. The Light Pollution Disadvantage Digital sensors do make it possible to shoot from urban locations with lots of light pollution. This wasn't possible before with film. However, there is a steep price to be paid for this ability, and it comes in the form of needing more total exposure to get a good picture. Deep-sky objects like nebulas and galaxies are faint. To take good images of them, we need long exposures. With digital cameras we break these long exposures up into a bunch of shorter exposures and then add them together. Combining shorter exposures equals a longer exposure. But here is the problem with shooting faint stuff under bright skies - you need a LOT more total exposure to make the faint stuff visible. Roughly, you need to increase your total exposure by the amount that your sky is brighter. For example, if you can take a good deep-sky picture at a true dark sky site with one hour of total exposure, then at an observing site where the sky was twice as bright, you would need twice as much exposure, or 2 hours, to equal the quality of the results at the dark-sky site. Compared to a true dark-sky site with no light pollution at all, downtown in a big city is about 40 times brighter. Yes, it is that bad. So for really faint stuff, you would need 40 hours of total exposure in the city to equal the quality of a one-hour exposure at a true dark-sky site. You may be lucky and live in the suburbs where the light pollution is not quite that bad, but it still might be 10 to 20 times as bright as a true dark sky site. This is why its worth driving an hour or more to a dark sky site. Even including the driving time, you will get better pictures in a shorter amount of time at a darker site. A total exposure of about 1 hour at f/6 at ISO 1600 will make an excellent, high-quality image at a true dark-sky site for moderately bright nebulas and galaxies. This is a realistic exposure. Fainter objects will require more exposure, and brighter objects less exposure, to produce a really good picture. You can shoot the brightest objects, like the core of M42, and star clusters like the Pleiades and M13, in much less time from a suburban site. So don't be discouraged, there are things up there that you can shoot, even from a city. And learning the basics of the craft, such as polar aligning and focus, can easily be done from your driveway. You don't need a dark-sky to do this stuff. But when you are talking about faint stuff, you really need to go to a dark-sky observing site, or pay the price of very long total exposures. You can produce images with less total exposure, of course, from anywhere. But they won't be as good as images with longer total exposure. They will have more noise in them, and may look pretty bad. But when you're first starting, you may be thrilled to get anything at all. As you get better, you'll want to improve your images. The way to do this is with more total exposure, and by shooting at a dark-sky site. If you do photograph at locations with less than perfect skies, try to shoot in the direction of the least amount of light pollution. For example, most of my observing sites in New Jersey are severely compromised in the northwest by the light pollution from Philadelphia. Therefore I try to shoot objects in the eastern half of the sky or overhead. If I want to shoot an object that is transiting low in the south, such as in Canis Major in the winter, or Sagittarius in the summer, I pick an observing location where the light pollution from Atlantic City is in the east and not in the south. Shooting High Resolution Images The seeing can be affected by three main factors:
|
|||||||||||||
|
Back | Up | Next |
|||||||||||||