|
A Basic Setup for Astrophotography
|
Back |
Up |
Next
|
|
|
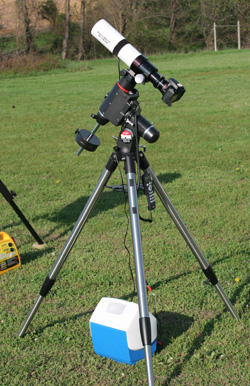
A basic setup for long-exposure deep-sky astrophotography consists of a Canon 1000D (Digital Rebel XS) DSLR camera with Live View for focusing, a Stellarvue 70mm f/6 ED doublet refractor, an Orion Sirius German equatorial mount, a 2-inch adapter, and a 12 volt deep-cycle battery. The battery is kept in a small cooler to protect it from the cold at night.
|
- DSLR Camera - You can get started in astrophotography with an amazingly simple set of equipment: a camera and a lens. Focus the lens on infinity, put the camera on a solid surface on something like a beanbag, aim it at something interesting, and away you go. A tripod, of course, will make this much easier.
Any of the new DSLR cameras with Live View are great for astrophotography. I used a Canon 1000D (Digital Rebel XS) with the 18-55mm f/3.5-5.6 IS zoom lens for most of the pictures in this book.
- Lens - I use the Canon 18-55mm zoom lens that came with my camera for wide-angle astrophotos. Its cost was included in the price of the camera.
A 50mm f/1.8 lens is also a great inexpensive lens for astrophotography.
- Memory Card - You will need a memory card to use in your DSLR camera since they don't come with one. I use a 4Gb Sandisk SD/HC memory card. Actually, I have two since they are so inexpensive.
- Ball Head - The next step up from fixed tripod astrophotography would be to shoot longer time exposures with a barn-door tracker, or piggyback with a wide-angle lens on top of your scope on an equatorial mount. You will need something with which to attach your camera.
A ball head is a simple and easy way to do this. You can aim your camera pretty much anywhere in the sky with a ball head, and you won't even need to re-aim the scope. The ball head mounts to the barn-door tracker or to your scope with a simple 1/4 - 20 bolt.
You can get an inexpensive Giottos ball head if you have a lightweight camera and lens. For larger heavier cameras and lenses, you will probably want a more substantial one, such as this ball head from Slik.
-
|
|
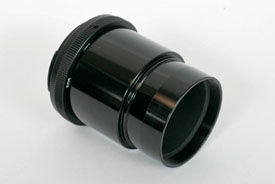
A T-Mount and 2-inch adapter with extension is used for a refractor.
|
2-Inch Camera Adapter - To use your camera through a telescope, you will need a special adapter. In most cases, you will want to take the lens off the camera, and use the telescope as a lens.
Most telescopes come with either a 1.25-inch or 2-inch focuser. You really want to use a scope with a 2-inch focuser, otherwise you will almost certainly get severe vignetting in your images.
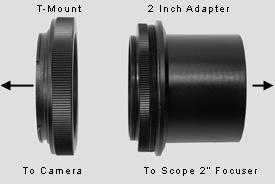
To use a 2-inch focuser, you will need a 2-inch adapter tube that goes in the focuser, and a T-mount that mates this tube to the camera's specific lens mount. A T-mount ring is a coupling that has the bayonet mount of your particular camera model on one side, and a standard T-thread on the other. The 2-inch adapter threads into the T-ring.
These adapters are relatively inexpensive. A good T-mount adapter is made by Bower for Canon, and for Nikon.
|
|
A T-Mount and 2-inch flush-mount adapter is used for a reflector.
|
There are several kinds of 2-inch adapters. Some have a built-in extension tube. You will need a two-inch adapter with extension for a refractor since most refractors are made to be used visually with a diagonal. When you remove the diagonal and replace it with a camera, the focuser tube may not be able to move far enough out to let the camera come to focus, so you need an extension.
For a reflector, you will probably need a 2-inch adapter that does not have an extension tube built in. You will need one that mounts the camera flush with the end of the focuser.
For some telescopes, such as some Schmidt-Cassegrain Telescopes (SCT), you may need a special adapter that threads into the back of the scope to mate to the T-mount adapter for your camera. This is because many SCT's do not have a focuser on the back, but focus by moving the primary mirror.
- Telescope - There are a lot of good 70 to 80mm apochromatic refractors, as we saw in the section 204, Telescopes for Astrophotography. Any of these are good for astrophotography.
Most of the pictures in this book were taken with an inexpensive Stellarvue Travelhawk 70mm ED apochromatic refractor.
Visually, this inexpensive refractor does not have much color around bright stars. Photographically, it does have some blue / purple fringing around bright stars. You can use a minus violet filter to correct most of this problem if it bothers you. The Baader Fringe Killer is a good one.
- Optical Accessories - Since the focal plane of most refractors is curved, I needed a field flattener. I used an Astro-Tech 2-inch field flattener.
I also use a William Optics 0.8x focal reducer / field flattener. It makes the focal length of my Stellarvue 70ED go from 420mm at f/6 down to 336mm at f/4.8. With it I essentially have an additional wide-field telescope.
- Mount - If you don't already own a mount, and you are on a tight budget, you should start out with a barn-door tracker. This will cost you about $25 to make.
I used an Orion Sirius computerized Go To mount for most of the images in this book. This mount comes with a tripod and polar alignment scope, so all you need is a camera, telescope and t-mount adapter and you are ready to take pictures.
- Timer Remote Control - I use a JJC timer remote control to take a series of long time exposures. It can be found on Ebay.
- Anti-Dewer - To prevent dew from forming on my telescope objective and camera lenses, I use a Dew-Not 3 Inch Anti-Dewer.
You can also get a controller to adjust the amount of heat applied by the anti-dewer, but these are expensive and are not absolutely necessary, but they will make your battery last longer.
- Fog Filter - I like to use a Tiffen Double Fog filter on my wide-angle constellation shots to make the bright stars stand out.
- 12-Volt Deep-Cycle Battery - To power my mount at a remote observing site, I use a Werker 12-volt 33 amp-hour deep-cycle battery.
- Focus - To focus, I use Live View on my DSLR camera. If you don't have a camera with Live View, you can use a Bahtinov mask. You can make these yourself for free.
|
A Basic Setup for Astrophotography - The Bottom Line
For really basic astrophotography of scenic shots and constellations, you don't need anything more than a camera, lens and tripod.
For longer tracked exposures with a wide-angle lens, you can get started with a very inexpensive home-made barn-door mount.
For long-exposure deep-sky astrophotography, you need a camera and telescope on an equatorial mount to track the stars to compensate for the Earth's rotation.
You'll also need a T-mount for your specific camera type and a 2-inch adapter to hook the camera up to the scope's focuser.
|
|