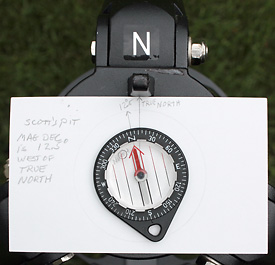
Even if you set up your equipment in your driveway, there are some steps that you can take to make set up easier. Likewise, if you set up at a remote location, even one you have never been to before, following these steps can speed your set up. You can even set up in the daytime before the Sun sets, and then zero in on the polar alignment after it gets dark enough to see Polaris. All you need are a compass and bubble level, and the latitude and magnetic declination of your observing site. To point the polar axis of your mount close to the north celestial pole in the daytime, you need to aim it in altitude and azimuth. The altitude is simply the latitude of your observing location. Many equatorial mounts have an altitude scale on them that allows easy adjustment. To adjust the azimuth, it needs to be pointed to true north (not magnetic north) and you can do this with a compass and the offset for the magnetic deviation of your site. Magnetic declination is the difference between magnetic north and true north. True north is what we really care about, and where we want our mount pointing. There can be a considerable difference between magnetic north and true north. We can easily look up the magnetic declination for an observing site on the internet at the National Geophysical Data Center by simply inputting the latitude and longitude of our observing site.
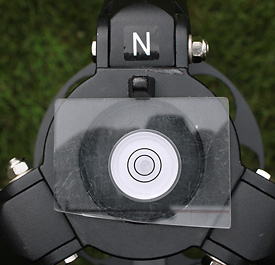
For example, the deviation for my home is 12 degrees 15 minutes West. That means the compass needle points to magnetic north which is 12 degrees 15 minutes west of true north. If you set up during the daytime, a compass and the magnetic declination can be very handy in getting you very close to north so you can set up your equipment before it even gets dark. Once you get your scope and all of your equipment on your mount, it may be too heavy to move if it is significantly off from true north. The next thing to consider is that there is a clear view of Polaris when it gets dark so that you can polar align your mount with its polar alignment scope. If Polaris is blocked by trees it will be impossible to use the polar alignment scope. Also consider any trees or other obstacles that might block your shot if you are going to need to shoot something that is low on the horizon, like a comet. Normally, you want to shoot objects when they are as high in the sky as possible, but comets and other special events, such as conjunctions, occultations, and eclipses can take place at low elevations. Think about using trees or other objects, such as the walls of a gravel pit, or a large boulder, or even your car, to block the wind if it will be windy at night. Wind can move your telescope during an exposure and ruin the image. Set up your mount's tripod on as solid and level ground as possible. Then use a bubble level on the top of the tripod and adjust the legs to level the tripod. This is not critical, but it can help in polar aligning because a movement in azimuth will affect the altitude, and vice versa, if the mount is not level. If the ground is soft, like sand or gravel or dirt, push down on the ends of the legs of the tripod to pre-sink them. You may have to use bricks to stop the legs from sinking in even more during the night from the weight of your scope and equipment. If the legs sink during the night, it can throw off your polar alignment and result in trailed stars in your images. After you have all of your equipment set up you can use your polar alignment scope to polar align the mount. I try to do this after I have all of the equipment on the mount.
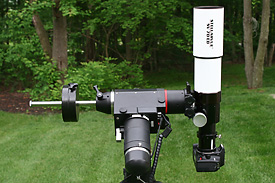
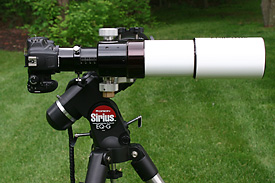
Once you have everything set up, and all equipment positioned, including your camera at its infinity focus position, you will need to balance your scope. If you only have a single scope, you can do this in two steps. If you have some type of non-symmetrical setup, like a large heavy camera on a Newtonian, or a side-by-side setup of a main scope and a guidescope on a tandem bar, you will need to balance in three steps. First, place the scope on the east or west side of the mount with the counterweight shaft parallel to the ground, and the scope pointing to the zenith overhead. Lock the declination axis. Be careful to hold the scope in case it is grossly out of balance, and unlock the right ascension. Then adjust the counterweight to balance the scope in right ascension. Now lock the right ascension axis. Second, unlock the declination axis, and while firmly holding the scope tube, place the scope so that the tube is pointing north and it is parallel to the ground. Balance the scope on the declination axis by sliding the scope forward or backward with the dovetail, or by moving the scope in its rings.
The next step is to set up all of your scope's electronics and anti-dewers and power them up. Then use the polar axis scope to polar align the mount. If you have a Newtonian, you should collimate it at this point. Also, if you have a finder, align it to the main scope. Finally, if you have a Go To mount, go through the initialization process to tell the mount the time, date location, time zone, and daylight savings time setting. Then complete the three, two, or one-star alignment process so the mount can point more accurately on Go To's. Once you have found the object you want to shoot, you should adjust the balance in right ascension so that the mount's drive gears are always lifting just a little bit of weight. This keeps the right ascension gear always engaged and prevents backlash and can yield better tracking. You don't want to make it really unbalanced, you just want a small amount of extra weight on the east side. So if the scope is on the west side of the mount and you are shooting an object in the east, you would want the counterweight side to be a little heavy. If you are shooting an object in the west and the scope is on the east side of the mount, slide the counterweight up the shaft a little bit so the scope side is heavy. Remember, you want the mount lifting just a little bit of weight.
|
|||||||||||||
|
Back | Up | Next |
|||||||||||||