ISO in digital cameras defines the relationship between the number of photons recorded, and the brightness value of the pixel in the resulting image. ISO stands for International Standards Organization, a group that sets the rules for how ISO is measured.
All of this doesn't really matter though with DSLR cameras because the quantum efficiency and other factors are fixed, and we can't change them. Almost every web site on digital photography will tell you that changing the ISO on a digital camera changes its sensitivity to light. This is simply not true. The sensitivity is fixed, it does not change. However, DSLRs offer the ability to change the ISO setting, which seems to give different sensitivities. DSLR cameras use a kind of a trick to let us change the ISO speed. This is done in the camera by multiplying the data recorded in the camera. How the Trick Works Lets remember that the purpose of of photography is to record scenes in nature. We photograph the brightness and colors of a scene by recording the photons of light from the objects in the scene. The brightness of an object in the scene is translated into the brightness of the object in the recorded image. Let's say a particular object has a brightness of 100 on some arbitrary scale. A digital camera with a particular fixed sensitivity will record this object with a brightness of 100 at some particular exposure. Let's say this correct exposure is 1 second. Since a digital sensor is linear, if we double the exposure, this object would then have a brightness of 200. If we cut the exposure in half, it would have a brightness of 50. It is a simple matter to label the camera's native inherent sensitivity differently by changing the ISO number. If the camera's native sensitivity is at ISO 100 and an exposure of 1 second gives a brightness of 100, then we can just arbitrarily change the ISO to 200, and expose for 1/2 second which would yield a brightness of 50. Then, and here is the trick, we simply multiply this number in the camera by a factor of 2x, and 50 becomes 100. We doubled the ISO from 100 to 200. Then we cut the exposure in half. Then we multiplied by 2x to get back to the brightness we would have gotten with a longer exposure. The Price of the Trick This seems like a great trick! And it does work to a certain extent. But, of course, there are a couple of very important considerations involved. We all know that you do not get something for nothing, and there is a price to be paid for this trick. The price of this trick is in two basic areas: noise and dynamic range. Digital cameras have a fixed range in terms of the detail that can be recorded in the bright and dark areas in a scene. This is called the dynamic range. When you multiply everything in the data by a factor of two, you throw away detail in the bright parts of the scene. Let's look at a real world example with 8-bit data. 8 bits means that we have 2 raised to the 8th power, which equals 256. With 8 bits of data we have 256 steps of tone to work with from 0 to 255. 0 would be black, and 255 would be white. Let's say your camera can record a brightness range of 0 to 255 at ISO 100. If you double the ISO to 200 and multiply every number by 2, then the data would go from 0 to 510. But the camera can only record up to 255. So the tones from 255 to 510 are all now labeled as 255, which, on this scale would be pure white with no detail. All of those tones from 128 to 255, which originally had detail in them, are now changed to 255 by the multiplication, and they don't have detail in them anymore. Increasing the ISO cuts down your dynamic range down.
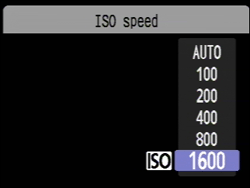
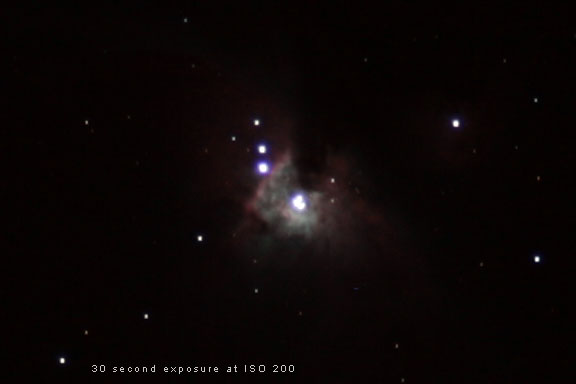
The other price is the apparent increase in noise. The noise actually stays the same, but since you have recorded only 1/2 of the light by cutting the exposure time in half when you doubled the ISO, the noise is more apparent. You will have a certain amount of noise from the camera in an image. You will also have a certain amount of data, or signal, from the photons of light that you record. The amount of noise in relation to the amount of signal is called the signal-to-noise ratio. If you cut the exposure in half by doubling the ISO, you have cut the amount of signal in half. The noise stays the same, but the signal-to-noise ratio has gone down because you only have half of the signal. The noise then seems worse in the final image. Common Misconceptions about ISO It is also a common misconception that increasing the ISO will allow you to shorten your exposure and produce the same results. This is a myth. Images with shorter exposure times that are shot at a higher ISO have a lower signal-to-noise ratio and appear noisier. Photographers think that higher ISOs are more "grainy" and noisier. They really aren't. For technical reasons, the readout noise of the camera is actually lower at higher ISOs. Images shot at higher ISOs seem noiser because they have a lower signal-to-noise ratio because they have less signal. If you shoot a 2-minute exposure of a deep-sky object at ISO 800, and a 2-minute exposure at ISO 1600, they both will have exactly the same amount of signal, because they both collected 2 minutes worth of photons. The 2-minute exposure at ISO 1600 will appear brighter because the data has been multiplied by two. But remember, you have also lost detail in the bright end of the scene. But, if you shoot a 2-minute exposure of a deep-sky object at ISO 800 and a 1-minute exposure at ISO 1600, and you think the images will be equivalent, you will be wrong. The 2-minute exposure will have twice the signal, and a better signal-to-noise ratio. The longer exposure will produce a better image. For a given aperture, f/ratio, object, and observing site, it is the total exposure time that is most important in improving the signal-to-noise ratio. A longer total exposure simply records more signal. The Benefits of Higher ISO In addition to the costs of using a higher ISO, there are benefits. There are also ways to overcome the problems of lower dynamic range and increased apparent noise. The benefit is that using a higher ISO makes faint detail in the image brighter. Since many of the deep-sky objects that we shoot are very faint, using a higher ISO can make these details more visible. Using a higher ISO allows us to use shorter exposures. We will have more usable frames with shorter exposures because accurate tracking is less of a problem and fewer frames are lost to trailing. Although shorter exposures at higher ISOs have a lower signal-to-noise ratio because less signal is recorded, we can overcome this by simply shooting multiple short exposures and stacking them together. We will discuss this in section 802, Stacking Light Frames, in the chapter on advanced techniques. We can solve the problem of losing detail at the bright end of the dynamic range by combining different exposures into high dynamic range images, another technique that we will discuss later in section 804, Image Correction and Enhancement.
|
|||||||
|
Back | Up | Next |