Video
Depending on how many photons were gathered in the stacked image, and how well calibration was performed, your working image at this point may have a lot of noise, or it may be relatively noise free. After stretching and enhancement, noise in the original image is aggravated. This noise, usually most visible in the blank sky background of the image, can be controlled and reduced through the use of software filtering. For noise reduction there are many options, such as Photoshop's Smart Blur filter, Photoshop CS2's new Reduce Noise filter for digital cameras, Neat Image, Grain Surgery, and many more. The solution I use is Picture Code's Noise Ninja. It works on high bit-depth images in a stand-alone application or as a Photoshop plug-in. Noise Ninja works very well at reducing noise. Perhaps too well. These noise reduction programs sometimes have a bit of a problem in distinguishing extremely fine high-frequency detail in an image from noise because they look virtually identical. Consequently, sometimes real detail gets removed, such as faint stars. We can control this in the filter by
I usually apply the filter to a copy of the background layer and make adjustments. This allows toggling the layer off to compare detail in the original image to the blended image at a high magnification so the noise is easily visible. I generally use Lighten as the layer blending mode to reduce noise in the sky background without losing faint stars in the image. The one drawback to this method is that some contrast and darker details can be reduced in the highlight areas, such as in the core of M33 in this example. Since there is little noise in the highlight areas to start with, they don't really need noise reduction. So the solution is, again, to mask the highlight areas and apply the noise-reduction filter to the shadow areas, just as we did as described in the previous section on color enhancement. In fact, the exact same layer mask can be used here. In Photoshop:
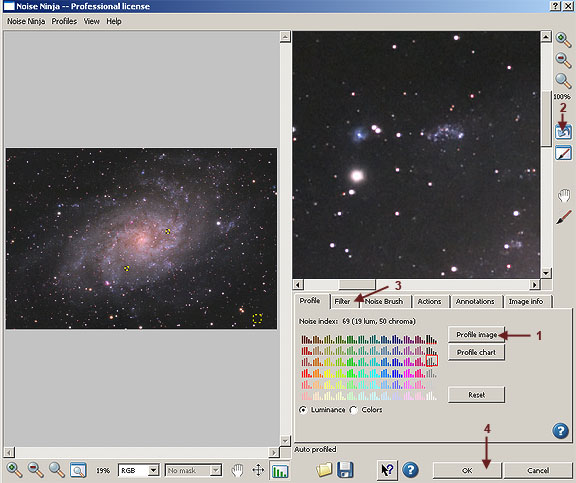
Then open the Noise Ninja filter: Filter > Picture Code > Noise Ninja. Noise Ninja will open and look like this:
In Noise Ninja, perform the following actions:
Noise Ninja will now apply the filter to only the shadow areas of the image because of the layer mask. If blotchy color noise is not a problem in the image, you can reduce the Filter Strength for Chroma Channels (the top slider) under the color section of the Filter Tab in Noise Ninja. Experiment with different blending modes and opacity percentages for the layer with the Noise Ninja filter. Shift-click on the layer mask to turn it off (a big red X will appear in the thumbnail image of the Layer Mask in the Layers Palette when it is off). After you have found a result that is optimum, you can save the image as a .PSD Photoshop file to preserve the layers and masks, or if you are sure of the result, you can flatten the image (Layer > Flatten Image) and save it as a .TIFF file. Flattening the image merges all of the layers together into a single image.
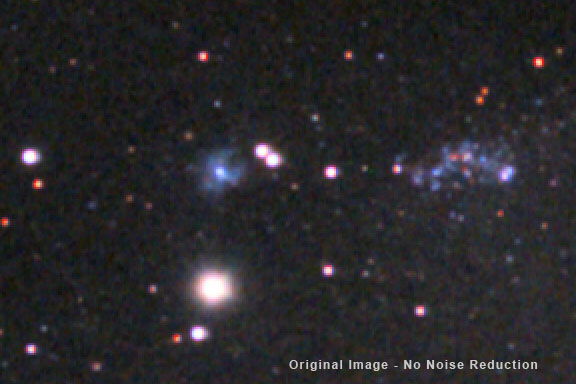
The noise in the original image is not too bad. The worst noise is the dark noise in the blank sky background. Full noise reduction with Noise Ninja is excellent, but some faint stars and star clouds have also been reduced, possibly too much. Using Lighten as the blending mode when the filter is faded is probably the best compromise between noise reduction and detail preservation. The difference is subtle, but the dark noise has been reduced and faint stars and star clouds have been preserved. It should be noted that it is very easy to apply too much noise reduction. The image will then look plastic. Noted astrophotographer Chuck Vaughn has pointed out that the human visual system is used to seeing detail down to the limits of its resolution. If an image has all of its noise and fine detail removed, it will not look natural. The secret of noise reduction is to find that point in the process where noise is reduced as much as possible while still retaining all of the real fine detail in the image. This happens at the point where the scale or frequency of the noise blends in a the same frequency as the real detail in the image. This point is generally arrived at by a trial and error method mediated by experience. |
||||||||
|
Back | Up | Next |