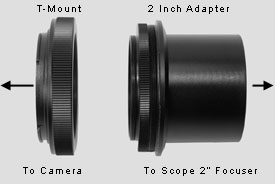
Getting into astrophotography can be done relatively inexpensively if you already have a DSLR camera and a telescope on a good equatorial mounting. If you know how to accurately polar align the mount, and don't mind pressing the shutter button manually every 5 minutes, you would only need a T-mount and 2-inch adapter to hook the camera up to the telescope and start shooting. You don't absolutely need anything listed here, but these accessories will make your life much easier. Camera Adapters
You will need one of these to attach your DSLR camera to the telescope for prime focus astrophotography. This lets you use the scope in place of your camera lens. A T-mount ring is a coupling that has the bayonet mount of your particular camera model on the back, and a standard T-thread on the front. An adapter threads into the T-ring, such as 1.25 inch and 2 inch tubes, that fit into standard telescope focusers. If your telescope has a 2 inch focuser, always get the 2 inch adapter. If you get the 1.25 inch adapter, it will almost certainly vignette the image. Depending on the type of scope you have, you may need a t-mount adapter with a 2-inch extension on it. You will usually need with a refractor because most refractors are designed to be used visually with a diagonal.. If you use a Newtonian, you will usually need a t-mount adapter that fits flush into the focuser, otherwise it may not have enough back focus.
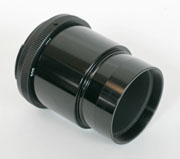
CNC Parts Supply has combined the two parts into one piece with a wide opening. If you have a full-frame sensor camera, this is the adapter you want to prevent vignetting.
Remote Release Switch A remote switch is basically a button on a wire that plugs into the camera that allows you to open the shutter remotely, and keep it open as long as the button is pushed, or locked down. This allows the exposure to be started without touching the camera, to reduce vibration and possible movement when the shutter is opened or closed. Some cameras require different plugs for their remote releases, so be sure to check to see which specific one your camera needs before buying one.
Or you can make your own remote release:
I would recommend that you spend a little more and get a remote release timer like those in the next section. A remote switch is ok for opening the shutter for a couple of frames, but once you get serious you will want to shoot a lot more frames and doing this manually for every frame is going to grow tiring quickly. Remote Timer Release
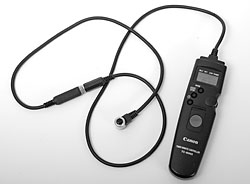
A remote timer release is basically a timer on a wire that plugs into the camera. Sophisticated timers like the Canon TC-80N3 and Nikon MC-36 allow the exposure length, number of exposures, time between exposures and a self-timer setting to be programmed. An entire exposure session can be programmed in, for example, 16 exposures of 5 minutes each with a pause of 10 seconds between each frame, allowing the photographer to take a nap while the camera merrily shoots away the night. These remote timer releases from Canon and Nikon come with a specific plug that only fits certain cameras, so check before buying to see which specific one you need.
Much less expensive Chinese clones of the Nikon MC-36 and Canon TC-80N3 are also available for almost all DSLR cameras on Ebay. Go to Ebay or Amazon and do a search for "Timer Remote Release". DSLR Camera Batteries / External Power Shooting long-exposure astrophotographs uses up a lot of power. If you are planning on shooting all night, especially in cold weather, you will need extra batteries, or an alternative power supply. If the LCD screen is used frequently, batteries will not last as long, and the camera will heat up more, so it's probably a good idea to use it as little as possible. If the in-camera battery dies in the middle of writing a file you may lose images and it may corrupt the images already stored on the card. Keep an eye on your battery level. If you work out of your driveway or backyard, and have access to 120 volts, you can use an AC adapter. Both Canon and Nikon sell them. If you work at a remote observing location without access to AC power, you will have to power your equipment off a deep-cycle 12-volt battery. Cercis Astro makes some good 12-volt adapters for DSLR cameras. Dan McCauley has also published a datasheet showing how to build your own 12-volt DC power adapter. It features both a linear design and switching power design and is easy to build if you are handy with electronics. Telescope Power Supply If you are shooting from your backyard, you can probably just run an extension cord and plug into your 110 volt household electricity. If you are shooting from a remote location without electricity, you will need an auxiliary power supply such as a 12 volt gel cell or deep-cycle marine battery. You may think you can run your setup off the car's 12 volt battery, but this is definitely not recommended or you run the risk of getting stuck in the middle of the woods with a dead car battery in the morning, like I have done on more than one occasion. Car batteries were made to deliver a lot of power all at once to start an engine, and then to be charged continuously by the car's alternator after the engine starts. Car batteries were not made to deliver a continuous voltage over a long period of time. Deep-cycle batteries are made to deliver a continuous voltage over long periods of time. Get a high capacity deep-cycle marine battery to run your astrophotography equipment for about $75 to $100. Cold weather can also lower the capacity of a battery if you plan to use it in an all-night astrophotography session. By the time you supply power to the mount's drive, an autoguider, anti-dewers, camera, and computer, you may be using a lot more power than you think. Computer Power Supply For using a computer in the field at a remote location without AC power, consider purchasing an additional deep-cycle battery to power your computer separately from your telescope and mounting. There have been many reports of autoguiders not playing well with computers when everything is run from the same power supply. Also, electrical interference may show up in your digital images if everything (Scope motors, drive corrector, anti-dewers, camera, and computer) is powered from a single DC battery. You may be able to get away with it and not have any problems, but unless you have a battery with a huge capacity, you probably will not be able to make it through a long winter night on a single battery anyway. Extra Memory cards It is good to have several large capacity memory cards for your DSLR camera, unless you download the images directly to a laptop. If you shoot raw format for your light frames, and also shoot all of the support frames required for advanced calibration (darks, flats, bias, flat darks, and flat bias), you can easily fill up a 1 gigabyte card on only one object. I don't recommend getting a single, gigantic-capacity memory card, such as a 16 gigabyte card and storing all of your images on that one card from an all-night astrophotography session. If something goes wrong with it, or it gets corrupted, you will lose a lot of hard work. Instead, get several smaller capacity cards and spread the night's images over them as the night goes on. That way if one does get corrupted, you will only lose part of your work. You will also need a compact flash or SD card reader for your computer. It will download images from your memory card much faster and more reliably than hooking up your camera to your computer. It will also save wear and tear on your camera. Focusing Aids Trust me, you will need something to help you focus, either hardware or software. The best and easiest solution is Live View focusing with one of the newer DSLR cameras. With Live View you can magnify the image of a moderately bright star 5x or 10x and focus very easily. You can also output the analog video signal out of the camera to a separate monitor or computer if the LCD on the back of the camera is at an awkward angle. If you have an older DSLR camera, the easiest solution is probably to use a Bahtinov mask. You can easily make this mask yourself out of black poster board from instructions you can find here at the Astrojargon Bahtinov Mask Generator. You can also purchase a high-quality Bahtinov mask at Spike-A. See the focusing section for a more in-depth description of how to use the Bahtinov mask. There are several ways to use the mask: looking through the viewfinder of the camera and focusing visually, examining the image after it is shot on the LCD on the back of the camera, or viewing the image with Live View in real time as you focus. If you decide you want to try to focus visually through the viewfinder of the camera, and use a scope where the back of the camera is pointing down towards the ground when the scope is pointing overhead, you will find it very uncomfortable to try to look through the camera to focus. In this case you might want to consider a right angle finder. although I don't really recommend them. If you have a Newtonian telescope, you probably won't need one. If you plan on using a computer with your camera and software to focus, you probably won't need one. If you plan on using a camera with live-view focusing, you probably won't need one.
The small amount of magnification built in to the right angle finder (2x in the case of the Nikon and 2.5x for the Canon) is enough to work if you are careful and have good eyes and experience, but these finders are dim and your eye has to be exactly centered in the "sweet spot" of the field of view of the finder to work at all. They are certainly too dim to find, frame and focus a deep-sky object. You can move the scope to a bright star to focus, but when you move it back to the object, you will not be able to see it through the camera on the main scope. You will either have to center it with an auxiliary guide scope, or find it with manual or digital setting circles, or computerized Go To software. Honestly, these right angle finders are expensive, and not that great optically and difficult to use. And for the price, it is difficult to recommend them, but I will list them here anyway as they can be useful in certain situations, and especially for low angle shots for normal daytime work. Right Angle Finders
Other Hardware Focusing Aids Another focusing solution is to use a knife edge or Ronchi screen that has a matching lens mount for your camera, and that replaces the camera on the scope to focus, such as the Stellar International Stiletto. The knife edge or Ronchi screen must be parfocal with the camera's sensor. After focusing with this hardware device, the camera is replaced and the image taken. These can work well because they do not require any computer equipment in the field, but they do not help with finding and framing dim deep-sky objects, and they do not work with extended objects such as the Moon. Stellar-International also offers the CVF focuser. It also replaces your camera for focusing. It works by projecting the scope or lens' image onto a groundglass which is examined under magnification. The CVF focuser is parfocal with your particular camera model, and will work for daytime subjects as well as stars and extended objects.
Live-View Focusing The Canon 20Da was the first astronomical DSLR camera to offer live-view focusing. The latest generations of DSLR cameras, all now offer this capability. During live-view, the mirror is flipped up out of the way of the light path and the shutter is opened. The live image is then sent to the LCD screen on the back of the camera in real time or "Live-View". The image can also be enlarged and magnified electronically. This live-view can also be fed to an auxiliary monitor or computer for easier viewing. The live-view video feed can be used directly to focus a star in real time. The location of the LCD screen on the back of the camera however can be at an awkward position such as when a refractor or SCT is pointed overhead. It can be much more convenient to use a separate external monitor in these cases. Many new DSLR cameras are also now offering LCD screens on the back of the camera that tip and tilt out away from the camera body which makes them very convenient to use on a telescope no matter where it is pointed. With these new cameras, the Live-View video can be sent through a single USB 2 cable to special software running on a computer for viewing, camera control, and long-exposure shutter release. With old camera models, two cables were necessary for computer control: one USB cable to control camera functions and one serial cable to control the long-exposure bulb remote release. For the Canon 20Da, a third cable was necessary for the live-view video out. Computer Software Assisted Metric Focusing Almost any recent-model DSLR camera can be used with software programs like Images Plus, and Maxim DL that can take over control of the camera and shoot a test exposure. The image is then downloaded to the computer and opened up and examined by the software. The software then calculates the size of the star. You then take a series of test exposures where the focus is changed slightly and examined for the size or brightness of the star. Through a process of trial and error you could achieve a very accurate focus. This process can be time consuming, especially when the atmospheric seeing was not that good which would naturally cause star sizes to vary, but with patience, it can yield very accurate focus. For older camera models, that do not offer live-view focus, this type of computer software assisted focusing is probably the best way to focus because it uses an actual image off the sensor, and is quantified by an objective numerical criterion. On newer cameras with Live View, other programs, such as BackYard EOS (BYE) and AstroPhotography Tool (APT) will display a real-time readout of the size of the star from the Live-View display. It is very easy to simply adjust the focus until the star diameter is the smallest as indicated by the numerical readouts which are an objective measurement of focus. This eliminates the subjective aspect of guessing when the star is smallest by visual inspection. Note that you need to use a fairly bright star to be seen on Live View. The drawback to computer software assisted focusing is that you must have a computer in the field with you, along with the extra complexity and logistics of powering it, and protecting it from cold and dew. External Video Monitor
Output to a Computer - Newer DSLR cameras with Live View focusing will output video directly to a computer via a USB2 cable with no additional hardware required. Computer Control Canon's computer-control software for most models made since 2007 allows total control of all camera functions via a single USB2 cable, including programming time exposures, display of the live-view video and even autofocus with Canon autofocus lenses. Nikon's software offers much the same functionality for models made since 2012 (with some exceptions) but the software costs extra. Computer Equipment Depending on how you focus, you may not need a computer for work in the field. You could use the Canon or Nikon Remote interval timer release to automate all of your exposures, or you could use a laptop computer in the field to run the camera and download images. You will need the computer if you decide to use a software assisted form of focusing. If you do use a computer, you won't need a remote interval timer release. Here are some computer accessories that you may find useful for astrophotography.
Hardware Cables for Long Exposures Almost every DSLR camera made offers the ability to take exposures longer than 30 seconds, but a special "Bulb" setting must be used. The shutter can be opened for as long as you like, but the shutter button must be held down the entire time, or a special long-exposure remote release cable used (see the section on remote release switches at the top of this page). Newer cameras in the Canon line can access the bulb setting through software computer control through the USB2 cable, but Nikon cameras need a second cable and special program to run long time exposures through a computer. Older DSLR cameras, such as Nikon's D40, D50, D70, and D80 and Canon's 20D, 30D, 350D and 400D, also offer the capability for longer exposures via a "bulb" setting, but it can not be accessed with the normal USB camera control cable. To use the bulb setting with a computer, you have to access it through the camera's remote release plug. In this case, both Canon and Nikon use a proprietary plug on their high-end DSLR cameras. The less expensive Canon Digital Rebels use a mini photo plug that is easily obtained. Nikon D70, D60, D50, D40, and D40X users can only remotely access the bulb setting remotely with an Infrared remote. In these cases, you will also need either a serial or parallel cable out of the computer to interface with the camera bulb plug, or IR remote. Some new laptops do not offer either parallel or serial plugs, and only have USB ports. In this case, a USB to Serial adapter is needed. Hap Griffin offers cables for controlling the DSLR from a computer via a serial or parallel port. Shoestring Astronomy also offers shutter control interface products.
Guiding Even with excellent polar alignment and tracking, for the highest quality work, astrophotos need to be guided during long exposures. Guiding means keeping a star perfectly centered to account for variations in the telescope's drive and atmospheric effects. Guiding is usually accomplished with either an off-axis guider or separate guide scope. Any type of telescope with a mirror, and especially Schmidt-Cassegrains, needs to be guided with an off-axis guider. This is because the primary mirror in the imaging scope can move while the guidestar in the guiding scope does not. An off-axis guider solves this problem by using the imaging scope to guide with. Many beginners try to re-invent the wheel and guide an SCT or Newtonian scope with a separate guide scope, but after they tire of hitting their head on the wall and get some experience with the frustrations of the inconsistency of this method, they realize that to produce excellent images, an off-axis guider is necessary. Off-axis guiders are more difficult to use, but guide star acquisition can be planned beforehand with star charts. For refractors, the best separate guidescope is usually a well made, small refractor in the 50-80 millimeter aperture range. Mirror and compound telescopes do not work well as separate guidescopes because their mirrors can move separately from the imaging scope. If a separate guidescope is used, it must be rigidly mounted to prevent flexure between the guidescope and imaging scope. A piggyback arrangement with the guidescope on top of the main imaging scope usually works best. Very small scopes can be shot side-by-side on a tandem bar, but these setups are very prone to flexure with larger scopes.
Unguided Astrophotography With the widespread use of DSLR cameras for long-exposure deep-sky astrophotography, a school of philosophy has developed that says you might be able to get by without guiding at all. This can be very attractive because guiding adds additional expense and complexity to an astrophotography outing. If you can do this successfully, you can save the expense of either an off-axis guider, or separate guidescope, rings, diagonal, guiding eyepiece, autoguider and computer. Basically, you just shoot a bunch of exposures, and then throw out the ones with poor tracking. This will be discussed in depth in the section on Guiding vs Tracking. Camera Mounts Use these to mount your camera on top of your telescope for piggyback photography with short camera lenses. Dew caps, Anti-Dewers Unless you live in the desert, you will probably encounter problems with dew, especially with SCTs. The first line of defense is a dew cap, but auxiliary heaters are also usually required. "Dew Removal" is a mis-misnomer. If correctly used, these systems will prevent dew from ever forming, which is really what you want.
Crayford Focuser If properly constructed and manufactured,a Crayford focuser, by design, is excellent for both visual and astrophotographic work. It features two sets of bearings against which a focusing tube is help in place by the shaft for the focusing knobs. This gives three planes of contact that prevents wobble, backlash and radial play. A good focuser is a critical component in obtaining excellent astrophotos. If there is slop in the focuser or it is not well constructed, the image will shift positions as the direction is changed making focusing a challenge. The focuser should also have a solid lock down so once focus is obtained it will not move or shift during long exposures. A 2 inch focuser is a requirement for almost all types of astrophotography. Motorized Focuser Like a computerized Go To mount, a motorized focuser is not a requirement for astrophotography, but it can make life easier. Some designs have a position indicator that can be used to repeat a position accurately for use in trial and error software assisted focusing. In this procedure, a star is selected in the frame, and then a numerical readout is given of the star's size or brightness. The focus is then moved a small amount and the numbers are recorded. This process is repeated until the position of best focus is obtained, and the focuser is moved back to that position based on the readout of the focuser position indicator.
Polar Alignment Scope Some mounts come with a polar alignment scope as standard equipment. Some mounts don't have a hollow polar axis to accommodate one. Some mounts can accept one, but must be obtained as an additional purchase. A good polar alignment scope can get you close enough so that you can shoot long exposures with camera lenses and not do any drift alignment. For long exposures at long focal lengths, a polar alignment scope can save quite a bit of time in the drift alignment process. Each mount that takes a polar alignment scope will require the specific one that it is compatible with, so no recommendations are made here, it just depends on which mount you have. Filters Different types of filters can be used for various purposes both for astrophotography and for visual observing. Christian Buil has a good web page that shows transmission data for various filters.
*Prices and availability of all items are subject to change without notice by the vendors and manufacturers. |
||||||||||||||
|
Back | Up | Next |