DSLR cameras are remarkably versatile. We can use them for normal daytime photography of our families, and for nature and sports photography. We can also use them for long-exposure deep-sky astrophotography. They can even be used to create time-lapse movies made up of many still images. And we have always been able to use them to shoot single frames of the Sun, Moon and planets. The latest models of most DSLR cameras are even capable of recording high-definition video. This begs us to ask if we can use these video recording modes for high-resolution lucky imaging, the way that planetary photographers have been using webcams and high-end video cameras. The answer is an emphatic yes!
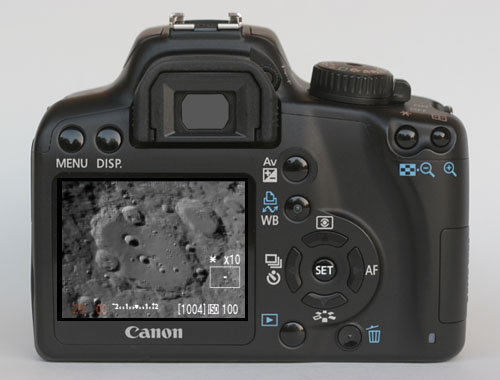
Lucky imaging has revolutionized planetary photography over the last decade, allowing amateur astrophotographers to take images with moderate sized telescopes that rival those taken with large telescopes at professional observatories. Many DSLR cameras with Live View and high-definition video can be used for high-resolution planetary photography with lucky imaging. There is even a way to record video with older cameras that don't shoot movies, if they have Live View. Sensor Resolution The sensor in a DSLR is an array of pixels. "Pixel" is short for Picture Element. Each pixel is a tiny little square and the array of pixels is like the array of squares on a chess board. Each pixel is sensitive to light and records a signal in direct relation to the number of photons that hit it. The array in a modern camera sensor has millions of pixels. The Canon T2i, for example, has an array of 5,184 x 3,456 pixels for a total of 17,915,904, or nearly 18 million pixels. This is what's referred to as the original native physical resolution of the sensor. When we record a still image with our DSLR camera, this is the number of pixels we get in a full-resolution image. 1:1 Pixel Resolution Using the native resolution of the sensor allows us to record images with 1:1 pixel resolution. This means there is a 1:1 relationship between the detail recorded by the sensor and the detail in the final image. One pixel recorded by the sensor is output to one pixel in the final image. This is important for high-resolution planetary imaging where we hope to capture fine detail on the planets. Some cameras, however, will not allow us to get exactly 1:1 pixel resolution in a video, but will allow us to get very close to it. Close enough, in fact, that we can still do some excellent high-resolution planetary photography with them. So we don't have to write "1:1 pixel resolution or as close to it as possible" every time we mention this in the rest of the book, we are just going to call it "1:1 pixel resolution", even though for some cameras it's not exactly 1:1, but close to it. 1:1 pixel resolution is needed to record the finest details in a planetary image. 1:1 pixel resolution gives us the highest resolution possible in the final image of the planet being recorded. Video Resolutions Some DSLR Cameras can record video with different resolutions. It may seem counterintuitive because it is called "high-definition" video, but we generally don't want to use our DSLR's "high-definition" 1080p or 720p video modes for high-resolution planetary photography.
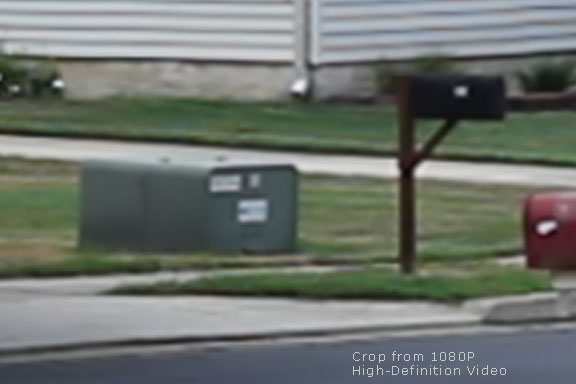
We don't want to use 640 x 480 standard definition video either for high-resolution planetary imaging. 1080p video is only "high definition" in relation to the old "standard definition" video, which was only 640 x 480 pixels. 1080p "high-definition" video at 1920 x 1080 pixels is not high definition at all in comparison to the 5184 x 3456 pixels in the original full-frame image that the sensor is capable of producing. There are, of course, some exceptions, but for the highest-resolution work, we want to record the pixel data off the sensor as close as possible to 1:1 as it is recorded on the pixel array. The problem is, high-definition 1080p or 720p video, and 640p standard definition video don't do this. High-definition 1080p and 720p, and standard definition 480p video use all of the pixels in the full frame of the sensor to record the video, but then downsample the image and throw away data to arrive at their final output size. This is bad for high-resolution planetary imaging. The Problem With High-Definition Video With high-definition 1080p and 720p video modes the camera must somehow transform the original native resolution of a camera like the Canon 60D's sensor's 5,184 x 3,456 pixels down to 1,920 x 1,080 pixels for 1080p (Figure 2), or 1,280 x 720 pixels for 720p, and 640 x 480 pixels for 480p standard definition video.
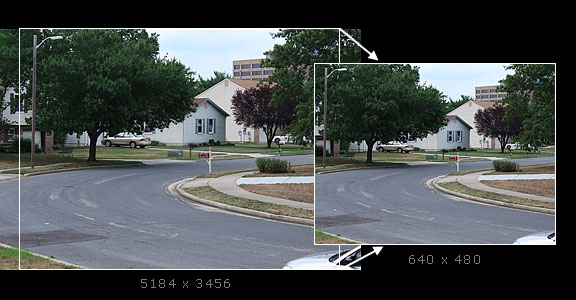
In this process of reducing the size, a lot of the original resolution must be thrown away (Figure 2). This is usually accomplished by averaging pixels together, or discarding every other horizontal row or vertical column of pixels, or a combination of the two. Either way, the finest planetary details are lost (Figure 3).
In the above mouse-over comparison in Figure 3, we can see the tremendous amount of resolution that has been lost when converting from the sensor's original 5184 x 3456 pixel resolution down to 1920 x 1080 pixels in 1080p High Definition video mode. This is not good for high-resolution planetary imaging. Video for High-Resolution Planetary Imaging We definitely want to use video for high-resolution planetary imaging because it allows us to record a lot of frames in a short period of time and use lucky imaging to pick out those frames with the best seeing. The secret to high-resolution planetary imaging with a DSLR is to find a way to record video at 1:1 pixel resolution off the sensor. We can use 1080p and 720p high-definition video modes in certain circumstances, such as for wider-field shots of craters on the Moon. But these high-definition and standard video modes are not the best way to shoot high-resolution planetary images. For that, we need 1:1 pixel resolution. Two Different Methods to Record 1:1 Pixel Data There are two basic ways to record pixel data at 1:1 off the sensor. Note that the entire sensor is not used in these case. Only a small portion of the total area of the sensor is used. For example, with a Canon 60D, only the central 1024 x 680 pixels are used at 5x zoom in Live View. In 640 x 480 Movie Crop Mode, only the central 640 x 480 pixels are used. This gives a much smaller field of view, but it's not a problem for most of the planets like Jupiter, Saturn, and Mars, which are not that large even at their closest approach to the Earth. Note also that some cameras have a video mode that records standard definition 640 x 480 pixels. This is not the same thing as 640 x 480 Movie Crop Mode! Standard definition 640 x 480 video mode takes the full frame from all 5184 x 3456 pixels in the sensor of our example camera and turns it into a full-frame image that is only 640 x 480 pixels (Figure 4). It has to resample and throw away a lot of data, even more than the 1080p and 720p movie modes.
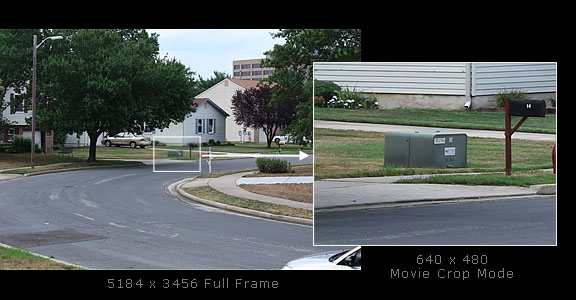
The special 640 x 480 Movie Crop Mode records just the 640 x 480 pixels in the center of the 5184 x 3456 pixel sensor, and crops the rest of the pixels off from the sides of the center of the frame (Figure 5).
The reason we can use these small crops out of the center of the much larger original frame is that the planets are very small. Even at high magnifications they will usually fit nicely inside of just a 640 x 480 pixel frame.
In the image comparison above in Figure 6, we can see that no resolution is lost from the original image when using 640 x 480 Movie Crop Mode. This is what we need for high-resolution planetary imaging. Compare this to Figure 3 above. Almost 1:1 Pixel Data Not all DSLR cameras allow you to access pixel resolution that is exactly 1:1, but we can usually figure out a way to get as close to it as possible. If you have a camera that doesn't allow exactly 1:1 pixel resolution, don't worry about it. Use what you have! Recording Live View will get you very close. Most of the time you will be limited by the seeing anyway. Some of the high-resolution images in this book, including the picture of Jupiter on the cover, were taken with a Canon T2i (550D) by recording Live View, which does not give exactly 1:1 pixel resolution in that mode. The point, or goal, is to get as close to 1:1 as possible for high-resolution work. Whether you can get exactly 1:1 pixel resolution is determined strictly by the camera you own. Using 5x zoom while capturing Live View will get you as close as possible to 1:1 pixel resolution, and using 640 x 480 Movie Crop Mode will get you exactly 1:1. If you are looking to purchase a DSLR and high-resolution planetary imaging is important to you, look for a camera that will give exactly 1:1 resolution. If you have a camera that doesn't give exactly 1:1 pixel resolution, just don't worry about it. Get as close as you can to 1:1 and have fun shooting the planets with your DSLR! If you really get bitten by the high-resolution planetary imaging bug, and decide you want to do seek the absolute maximum resolution that your optical system and seeing can allow, you can always get a specialized monochrome planetary camera later after you have learned the basics with your DSLR. Color from a Bayer Array
The sensors in our DSLR cameras really only see in black and white and shades of gray. But they produce color images with a neat trick. Each pixel has either a red, green or blue filter over it. These are arranged in a "Bayer" pattern, named after Bryce E. Bayer, the Kodak engineer who invented it. A block of 4 pixels will have two green pixels and one red and one blue pixel. Each pixel only records a brightness level for its color filter, but by comparing neighboring pixels, full color information can be created for each pixel. The Bayer array does a remarkable job of producing color. Just take a normal daytime image and look at it - the colors are amazingly accurate. The resolution of the color data, however, is compromised somewhat by the Bayer array. Luckily, the luminance data, where we get most of our fine-detail resolution from, is reduced only a little bit. DSLR Advantages for High-Resolution Planetary Photography DSLR Disadvantages for High-Resolution Planetary Photography Cameras With Live View and HD Video Camera Brands For Planetary Photography In this book most of the examples were shot with Canon DSLR cameras because that is what I have been using for the last 8 years. Many other people also use Canon DSLRs for long-exposure deep-sky astrophotography, so there is a large pre-existing base of photographers for whom specialized astronomical software for Canon cameras has been written. This is not to say that you can't use other brands besides Canon for planetary photography. You most certainly can use Nikon, Pentax, Olympus, Sony and other manufacturer's DSLR cameras for wide-angle scenic and prime focus planetary photography. You can even use them for single frame high-magnification shots. The problem is in trying to use them for lucky video imaging at 1:1 pixel resolution. As we have seen, normal high-definition video doesn't give us 1:1 pixel resolution. Only some very special modes do. If your camera has one of these, you are ready to go. Recording Live View at 5x magnification is a trick to get 1:1 pixel resolution with Canon DSLRs, but it requires special software that is specifically written to do this. Images Plus is the only software that I know of that supports some Nikon DSLR cameras in recording Live View video. Some Nikon cameras that have Live View that can be recorded also have additional problems. Unlike Canon, some Nikon models won't let you adjust the ISO and shutter speed to control the brightness of the Live View display, which can be a major problem for a small bright planet on a large dark background. The latest Nikons, like the D7000, seem to have changed this behavior, so they may be usable for high-magnification using lucky video recording. Hopefully, future Nikon models will also give control over the brightness of the Live View image. Unfortunately, at the time of publication of this book, I don't know of any software that supports recording of Live View video with Pentax, Olympus, Sony or other manufacturer's cameras. If there are programs out there that will do this, let me know about it so I can include them in future updates of the book. If you have a camera that has a video mode that allows you to get 1:1 pixel resolution, or close to 1:1, you can use the video with the planetary image processing programs covered in this book. Testing Your Camera for 1:1 Pixel Resolution To test a camera to see if it produces 1:1 pixel resolution, shoot a single still frame and a very short movie with the video mode you want to test. Use a tripod so the camera does not move. Extract a single frame from the video and overlay it on the single still frame. Compare the two images. If the camera did not move, they should line up fairly closely. You may have to move the top image a little bit to get it to line up. If they line up exactly, you have 1:1 pixel resolution. If they don't line up exactly, but are pretty close, you should be able to use that mode for high-resolution planetary work. If they are off by a lot, then that mode is not going to work very well for high-resolution planetary photography. Here's the procedure step-by-step.
|
|||||||||||||||||
|
Back | Up | Next |