|
The Astrophotographer's Guide to the Deep Sky is intended to show you some of the beautiful objects that are up there in the night sky to help you decide which ones to image.
This book is not intended to be a "how-to" book on long-exposure deep-sky astrophotography or image processing. Please see my previous books for detailed information on those subjects:
How The Images Were Shot
For the images in this book, my main imaging scopes were a 130 mm f/8 triplet apochromatic refractor with a focal length of 1,025 mm, an 11-inch Aplanatic Schmidt Cassegrain Telescope (SCT) with a focal length of 2,800 mm, and a 70 mm f/6 ED doublet refractor with a focal length of 420 mm. A wide variety of camera lenses with focal lengths from 16 mm to 300 mm were also used.
 |
|
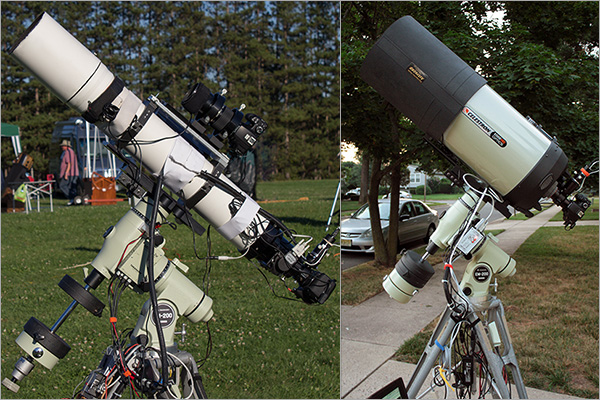
The 130 mm refractor (left) and the 11-inch Schmidt Cassegrain (right) are shown on the Takahashi mount. Robofocus, an off-axis guider, the Lodestar autoguider, and a DSLR camera are also attached to each scope. A telephoto lens with a focal length of 180 mm lens is piggybacked on top of the refractor.
|
All scopes and lenses were used on either a Losmandy GM100EQ or a Takahashi EM200 Temma 2M German equatorial mount on top of an old, but incredibly stable, CECO cinema tripod.
With the 11-inch SCT, a Starlight-Xpress Lodestar autoguider was always used through an off-axis guider for long exposures at 2,800 mm of focal length to prevent star trailing from flexure and primary mirror movement. The Lodestar provided the luxury of not having to rotate the off-axis guider to acquire a guide star because one would always be available in the field of view because of the Lodestar's excellent sensitivity.
With the 130 mm refractor, many of the images were guided with a venerable SBIG ST-4 autoguider through a Celestron 80 mm f/11.4 doublet achromatic refractor that was piggybacked on top. The 130 mm refractor was also sometimes guided with the off-axis guider and at other times guided with the 70mm refractor piggybacked on top of the main scope. The 130mm refractor was used as the guidescope when imaging through the 70 mm refractor.
Both the 130 mm and the 70 mm refractors were sometimes used with focal reducers to produce a focal length of 784 mm at f/6 for the 130 mm refractor and 336 mm of focal length at f/4.8 for the 70 mm refractor.
Long telephoto lenses, such as the Nikkor 180 mm f/2.8 ED AIS seen here, were mounted piggyback on top of the main imaging scope in a set of ADM rings. On the end of the counterweight shaft a Monfrotto ball-socket tripod head was used to mount a camera with a wide-angle lens for constellation and Milky Way shots that were taken at the same time as images in the main imaging scope.
Robofocus was used to focus the primary imaging scope. Other lenses were focused manually using Live View at 10x magnification.
I used a variety of Canon EOS DSLR cameras including a 20Da, 60Da, T2i (550D), T3i (600D), and XS (1000D). They were usually "modified" by Gary Honis. The camera's built-in long-wavelength filter was replaced with a special UV-IR filter that passed almost all of the red hydrogen-alpha light from emission nebulae. Normally, these long red wavelengths would have been mostly filtered out with the standard filter in a stock camera. Some images of reflection nebulae, galaxies, and star clusters were made with stock cameras. Canon's 20Da and 60Da did not need to be modified because they are specifically made for astrophotography.
A few of the older images were even shot on gas-hypersensitized film using a Nikon F3 camera body. Gas hypersensitization involved baking the film in a special chamber filled with forming gas (a mixture of 8% hydrogen and 92% nitrogen) at 122°F (50C) for a number of hours or days. This reduced the film's low-intensity reciprocity failure which caused unhypered film's sensitivity to decrease during exposures at low light levels.
A cooler box was sometimes used in hot weather to reduce thermal signal and its associated noise inside the camera. The box was designed by Gary Honis.
Cercis Astro 12-volt to 7.4-volt DC adapters were used to power the DSRL cameras.
The planetarium program Cartes du Ciel provided mount control and computerized go-to pointing with the Takahashi mount. Manual pointing was required with the Losmandy mount. Backyard EOS was used for focusing metrics and camera control. AstroTortilla interfaced with the Takahashi mount and camera-control software for plate solving. Craig Stark's Push Here Dummy (PHD) was used for autoguiding. All of these programs ran on a Dell laptop that was connected to the telescope and cameras.
Electric anti-dewers from Kendrick and Dew-Not were used on all of the lenses and on the main scope.
 |
|
A rat's nest of wires provide power for the equipment. At top, two Cercis 12-volt to 7.4 volt adapters power two DSLR cameras. The RoboFocus controller is at center. At bottom is the RIGrunner power center.
|
The entire setup was powered by two large-capacity 75-amp-hour 12-volt deep-cycle batteries connected in parallel and kept in coolers under the tripod. Connecting batteries in parallel, with plus to plus and minus to minus, gives the same 12-volts as an individual battery, but twice the energy capacity. The price, of course is double, both in terms of cost as well as weight.
A RIGrunner 4008 and Anderson PowerPole connectors were used to provide 12-volt power to the two DSLR cameras, mount, computer, anti-dewers, hair-dryer, cooler box and RoboFocus.
Image Processing
Once the photons were recorded, only half of my work was done. The other half, which was just as important, was processing the data that had been recorded.
Images had to be "calibrated" to remove unwanted signals and then "stacked" or combined together to improve the signal-to-noise ratio in the image and equal the exposure of a longer image. I used Images Plus for dark, bias and flat-field calibration, sub-frame alignment, and stacking.
Photoshop was used for subsequent contrast and color corrections as well as special techniques such as high-dynamic-range composites. Images were processed on a Dell 2209WA IPS monitor that was color calibrated with a Pantone Eye-One Display 2 hardware calibrator.
Sometimes it took as long, or longer, to process an image in the computer as it took to shoot it out under a dark sky. There is a lot of work involved in every image in this book, and I am quite proud of the results.
Image Quality
To briefly summarize, the quality of your images will depend on the following factors:
Object Brightness - It is easier to take good images of bright objects like Messier 42, the Orion Nebula. Good pictures of M42 can be taken in just a single image with a relatively short exposure of only a minute or two. Faint objects like M63, the Sunflower Galaxy, can require hours of exposure. Sky Darkness - Observing and photographing a deep-sky object is easier under a dark sky because there is more contrast between the object and the sky background. As the sky gets brighter from light pollution, this contrast goes down, and it is more difficult to get a good image.
The extreme example of this is the daytime sky. Those same deep-sky objects are up there during the daytime, but it is practically, if not theoretically, impossible to take an image of them.
Simply driving to a darker observing location will improve your images. Using light-pollution filters will also help, even at dark-sky locations because they also filter out airglow - a brightening of the sky that is always present at night. You can take a better image with a given exposure time at a dark-sky observing site compared to a light-polluted observing site.
The World Atlas of Artificial Night Sky Brightness Google Maps overlay and the Dark Sky Finder are good resources for finding observing sites with dark skies.
Total Exposure Time - The quality of an image is directly related to its signal-to-noise ratio. The signal comes from the photons from the deep-sky object. The rest of the image is degraded by noise. The only way to improve the signal part of the signal-to-noise ratio is by adding more exposure time to the image. Usually this is done by combining, or "stacking," a series of shorter exposures. More total exposure time makes for better images.
For example, you might be able to record some of galaxy Messier 101 in a single 5-minute exposure at a reasonably dark-sky site. But it will not be very good. If you take an hour's worth of exposure on M101, it will be much better. And two hours will be even better.
With digital cameras, unlike with film, you don't need to take a single 60 minute exposure that could easily be ruined by something like a plane flying through it. You can take a dozen 5-minute "sub-exposures" to equal 60 minutes.
There is, of course, a limit on how short of an exposure you can take for a stack. An individual exposure has to be long enough to get the signal up out of the readout noise of the camera. So you can't stack 3,600 one-second exposures and have it equal a single one-hour exposure. Those short exposures will be dominated by noise and you will end up only with noise in the stack. Likewise, there is, of course, no free lunch in that you can't take a single 5-minute exposure and stack it on top of itself a number of times to equal a longer exposure. I discuss how to easily and quickly determine the correct exposure for your equipment and particular sky conditions in my books on astrophotography. Expertise - Your expertise at the art of polar aligning, focusing, framing, guiding, calibrating and other astrophotographic skills will affect the quality of your images. Image Processing - Except for very bright objects, your images will usually require processing to improve their appearance. With image processing we can remove the ugly red sky-background color from light pollution, and improve the color and contrast of the deep-sky object.
If this sounds complicated, don't let that discourage you. It is very easy to get started with simple equipment. All you really need to shoot wide-angle shots of constellations is a camera, lens and tripod. And you can even get away without having a tripod by using something like a beanbag. I have detailed information on things like camera settings, and more information on getting started in my Beginner's Guide to DSLR Astrophotography.
You can then progress to longer exposures on a simple, inexpensive, home-made, barn-door tracker, and then to tracked shots with longer focal length lenses riding on top of an equatorially mounted telescope. Finally you can shoot longer focal length images through your telescope with longer exposures as I explain in my book for more advanced astrophotographers A Guide to Astrophotography with Digital SLR Cameras. The great thing about astrophotography as a hobby is that it can be as simple, or as challenging, as you want it to be.
General Notes on Exposure Times
You will notice that for each image I have included the exposure and Sky Quality Meter (SQM) reading for the observing site in the Exposure Data box on each individual image page.
The Sky Quality Meter reads the brightness of the sky in magnitudes per square arcsecond. Dark skies have higher numbers. The darkest observing sites on Earth are about magnitude 22.0 per square arcsecond. Light polluted locations in large cities can be as bright as magnitude 17.0 per square arc second.
Magnitudes, however, are not a linear progression. In other words, a magnitude 18 observing site is not simply twice as bright as a magnitude 19 observing site. Each magnitude is about 2.51 times different.
What this means in practice is that to achieve the same image quality with a 1-hour exposure at a magnitude 19 observing site, you would need about 2.5 hours of total exposure at a magnitude 18 observing site.
To achieve the same quality as a one-hour exposure taken from a reasonably dark observing site in the country with a magnitude 21 reading, 39.7 hours of exposure would be required at an observing site from downtown in a big city with a magnitude 17 reading!
We can calculate this from the 4 magnitude difference in sky brightness from the dark-sky site at magnitude 21 compared to the light-polluted site at magnitude 17. Remember, each magnitude is 2.51 times difference, and we have 4 magnitudes, so:
- 2.51 x 2.51 x 2.51 x 2.51 = 39.69
That is why it is a good idea to take the time to drive to a dark-sky observing site if you want the best quality images.
Here are average numbers from some of the sites from which I have observed and imaged. Location, elevation, Sky Quality Meter reading, and World Atlas of Artificial Night Sky Brightness color codes are given.
An * indicates an estimated value. Other values are actual SQM measurements that I have made.
I have also included elevation data for these observing sites in the list above. This is the elevation above sea level. As you get higher in elevation, you have less of the Earth's atmosphere to look through. It is easier to take better images at higher elevations because the Earth's atmosphere absorbs and scatters light. The difference between a couple of hundred feet is trivial. A couple of thousand feet can start to make a difference. 5,000 feet elevation and above can make a substantial difference.
This is also why you can take better images of an object when it is higher in the sky as opposed to closer to the horizon - you are shooting through less of the Earth's atmosphere and less of any junk that may be in it such as air pollution, aerosols and haze.
The World Atlas of Artificial Night Sky Brightness color codes represent sky brightness, and roughly corresponds to these Sky Quality Meter readings:
| Map Color |
SQM Reading |
| Black |
21.99 - 22.00 |
| Dark Gray |
21.93 - 21.99 |
| Gray |
21.89 - 21.93 |
| Dark Blue |
21.81 - 21.89 |
| Blue |
21.69 - 21.81 |
| Dark Green |
21.51 - 21.69 |
| Green |
21.25 - 21.51 |
| Dark Yellow |
20.91 - 21.25 |
| Yellow |
20.49 - 20.91 |
| Dark Orange |
20.02 - 20.49 |
| Orange |
19.50 - 20.02 |
| Dark Red |
18.95 - 19.50 |
| Red |
18.38 - 18.95 |
| Gray |
17.80 - 18.38 |
| White |
brighter than 17.80 |
Blue, Gray and Black colors on the map indicate outstanding observing locations.
Numerical values in the table above are in magnitudes per square arcsecond. Values are from the Light Pollution Atlas 2006 by David Lorenz who recalculated the The World Atlas of the Artificial Night Sky Brightness with newer data.
Lorenz also has a Google Maps atlas overlay that is very useful in scouting potential observing locations and evaluating the quality of your current ones.
Miscellaneous Image Notes
Focal Length
If you have more than one telescope or camera lens, pick the focal length that best frames the object you are shooting. If you only have one focal length, use what you have!
A good lens to start with is a wide-angle lens such as an 18-55 mm zoom lens that comes with many DSLR cameras. These are great for constellation shots and, in fact, most of the constellation images in this book were shot with Canon's inexpensive 18-55 mm f/3.5 to f/5.6 IS EF-S zoom lens.
Add a 50 mm f/1.8 lens next. It is a great, inexpensive, addition that will give you a faster focal ratio than the zoom used at 50 mm, so you will be able to take better pictures in a shorter amount of time at that focal length.
A 180 mm or 200 mm can be great for shooting large objects like the North America Nebula.
Refractors and some other telescope can also be easily used with telecompressors or focal reducers that will give a wider field-of-view to work with.
You will generally need about 1,000 mm of focal length to start shooting galaxies because they are usually relatively small, but nebulae come is all shapes and sizes and can be shot with many different focal lengths. Long refractors, large reflectors and Schmidt Cassegrains are good for small bright objects like planetary nebulae and globular clusters.
In the Master Objects List, the last column gives a suggested focal length for each object, however, objects can always be shot with a variety of focal lengths. Shorter focal lengths give a wider field that can set an object in the context of its surroundings while longer focal lengths reveal more details in small objects. Sometimes a small object might be framed better with a longer focal length, but you may might not have a telescope that big. Don't let this stop you from shooting it with whatever you have!
Focal length suggestions for stars are arbitrarily given at 2,000 mm. Stars are so far away they are effectively point sources, so you can't really enlarge them, but as you increase the focal length, and therefore the magnification, you should be able to start splitting double stars, if the seeing permits.
Fields of View for Common Focal Lengths for APS-C Sensors
| Focal Length |
Long Side of the Frame |
Short Side of the Frame |
| 2,800 mm |
27.6' |
18.4' |
| 2,000 mm |
38.4' |
25.6' |
| 1,000 mm |
76.8' |
51.2' |
| 750 mm |
102' |
68.4' |
| 500 mm |
2.55° |
1.71° |
| 400 mm |
3.19° |
2.13° |
| 300 mm |
4.26° |
2.85° |
| 200 mm |
6.38° |
4.27° |
| 100 mm |
12.72° |
8.52° |
| 85 mm |
15° |
10° |
| 50 mm |
25.14° |
16.95° |
| 35 mm |
35.34° |
24.03° |
| 24 mm |
49.84° |
34.49° |
| 18 mm |
63.55° |
44.97° |
Field of View Calculator
Stacking - Most of the images in this book are combinations, or stacks, where several shorter exposures are averaged together with special software to create the signal-to-noise quality of a longer exposure. In the exposure data box on each image page the number of frames, the exposure for each frame, and the total exposure are given. For example, the image of galaxy NGC 891 shows "6 x 600 seconds (60 minutes total)." This means that six individual sub-frames were shot. Each sub-frame was 600 seconds, or 10 minutes, long. These sub-frames were then stacked in software to equal a single 60 minute exposure.
High Dynamic Range Images (HDR) - Some deep-sky objects have a brightness range that is too large to be captured in a single exposure. A long exposure of M42, the Orion Nebula, for example, will overexpose the core of the nebula and not record any detail because the core is very bright. A shorter exposure will capture detail in the core of the nebula, but won't be long enough to capture detail in the faint outer portions of the nebula. An HDR image will use two or more images at different exposures and combine them so that detail is contained in the object throughout its entire brightness range.
Diffraction Spikes - Some images, such as open cluster Messier 44, have diffraction spikes around bright stars. These images were shot with refractors or Schmidt-Cassegrain telescopes that did not have secondary spider supports which usually produce these spikes. Therefore, they should not have had diffraction effects like this. These spikes were added with software in post processing for aesthetic reasons. Some images shot with camera lenses have spikes around stars that are diffraction effects from the aperture blades in the diaphragm of the lens when it was stopped down to improve the optical performance of the lens.
|