For planetary imaging, aperture and focal length are important. Aperture determines resolution of fine details, and focal length determines the magnification. You generally need at least 6 inches of aperture to do any kind of serious planetary imaging. But even if you only have a small telescope, if you have a camera with Live View, you can have fun doing some planetary imaging. In the past, the best planetary imaging was usually done by inexpensive web cams. These cameras essentially shoot a series of still photos continuously and turn them into a video. This is actually how all video and motion pictures work. If the framing rate is high enough, because of the human visual system's persistence of vision, still photos will trick the eye into thinking it is continuous motion. For planetary photography, the most important thing is to catch a moment of good seeing where the atmosphere allows high-resolution fine detail to be recorded. These moments can be fleeting except on the very best nights. Web cams shoot continuously, and then software is used to examine each frame, keep the sharp ones, and throw out the others. This has been called "lucky" imaging where it's just a matter of luck as to which frames are sharp. Today, the best planetary imaging is being done with high-end, fairly expensive video cameras. With modern DSLR cameras with Live View, we can do something similar to what the inexpensive web cams were doing. We can capture and record the Live View video signal with a computer. The video runs continuously and then software is used to pick out the best frames.
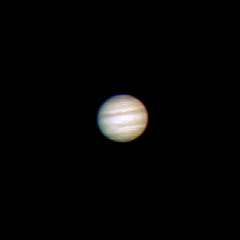
In the example above of Jupiter, shot with eyepiece projection and a 70mm refractor, we can see that when the video was recorded, the seeing was average to mediocre. Yet there were still some moments of good seeing in there. The video recorded everything, good and bad frames alike. The individual frames in the video were examined by Registax, a planetary image-processing program, and just the good ones were extracted and stacked together to produce a decent image. You can see the belts of Jupiter as well as the Great Red Spot at lower left. For this video capture, the telescope was first focused on a star overhead where the seeing was better. It is hard to focus on a planet when the seeing is bad. Then the focus was locked and the scope was moved back to Jupiter. Normally for Live View focusing, the camera is set to ISO 1600 and the Bulb shutter speed setting is used to produce the brightest image. But Jupiter was so bright, there was no detail at all on the planet at these settings. So the ISO was reduced to 100, and the shutter speed increased to 1/2 of a second. The shutter speed is not actually used since this is video, but it is used by the camera to adjust the brightness of the video image to simulate the exposure as if you were going to take a still frame. For shooting video of other planets or the Moon, adjust the ISO and shutter speed until the video image displayed on the monitor looks like the correct exposure and the most detail is visible. Live View vs. Video Mode Live View mode was first introduced into Canon DSLR cameras only for the purpose of composing and focusing shots on the LCD on the back of the camera. Live View does not record video in the camera. However, we can capture the Live View video signal to a separate computer and use it to extract high-resolution planetary photos. Some of the latest DSLR cameras also now have the ability to shoot high-definition video in a special video mode, and store it directly on the memory card, just like a traditional video camera. These newer cameras can also be used to shoot planetary images with this function. But we are really talking about two different things here. Live View is not the same thing as recording high-definition video in the camera on the memory card, although Live View is used to preview the image when high-definition video is recorded. For cameras that record HD video directly to the memory card, you will need a program that can break this video file down into its separate frames and put them into a file format that Registax can work with. For cameras that have Live View but do not record in high-definition video mode, you will have to output the analog Live View video signal from the camera into a computer. The resolution of images shot with cameras that record high-definition video in the camera can be 1920 x 1080 pixels or 1280 x 720 pixels. The resolution of images taken off the analog Live View video signal is much less, usually around 320 x 200 pixels for cameras such as the Canon 1000D (Digital Rebel XS) with 2.5 inch LCD screens with 230,000 dots. For higher-end cameras such as the Canon 50D with larger LCD screens with 920,000 dots, the Live View video signal is 640 x 480 pixels. It takes three dots on the LCD screen to make a pixel. The lower resolution of Live View is not that important for doing high-resolution planetary work because the planets are so small that you will never enlarge them this much anyway.
If you have a camera with Live View, you can output the video signal and record it with a computer. There are two ways to do this:
When you use Live View on the back of the camera, the initial display shows the full frame at 1x magnification from the lens or scope that you are using. You can also magnify this view 5x and 10x, and crop into the image. At 1x magnification the screen shows a crop box that you can move around and enlarge whatever part of the image you want. You can then increase the magnification to 10x. However, Canon's software, and other independent programs like Images Plus that use Canon's software development kit, only allow you to view the video on your computer with a maximum of 5x magnification. If you view the video on the LCD on the back of the camera, you can view it at 10x magnification. There is a work-around to allow you to record 10x magnification in a video. It does require an additional piece of hardware though, like the Dazzle DVD Recorder analog video to USB adapter. Instead of the normal USB2 cable, this device takes the analog video signal out of the video port on the side of the camera and imports it into a USB plug on your computer. Then you can record the video with VirtualDub.
The freeware program VirtualDub can be used to record the video on a laptop as an AVI video file. The AVI file is then opened in RegiStax for processing.
Registax is the premier freeware program for planetary imaging that examines a sequence of video frames, picks out the best ones, aligns and stacks them, and then sharpens and enhances them. For cameras that do not record HD video, but have Live View, you have to record the Live View video signal with a separate computer that is hooked up to the camera. The Live View signal can be recorded as a video with VirtualDub, or as a series of still images with Images Plus.
|
|||||||
|
Back | Up | Next |
|||||||