Channel substitution takes a separate higher contrast image, or a different wave band, usually taken with a filter, and blends it into a color image, or substitutes it for one of the channels in a color image, to produce a hybrid that has the best features of both. In the example above, a black and white image from the red channel of a hydrogen-alpha filtered image has been substituted into the red channel of a normal RGB color image. This greatly enhances the visibility of the red hydrogen-alpha nebulosity in the image. In the days of film, a high contrast black and white technical pan film image would be combined with a lower resolution color image. When CCDs came along, this method was called LRGB (the L stood for Luminance). An unfiltered high-resolution luminance image is combined with lower resolution red, green and blue color images to save time in producing a color image. Today many CCD imagers are using narrow-band filters to accentuate different wavelengths in objects, such as hydrogen-alpha, SII, and OIII. These wavelengths are recorded in the color image, but when shot with a filter in a separate image, and then combined with the color data, they are much more prominent. The same process can be done with DSLR cameras, but with some caveats. Narrow-band filtered images produced with CCD cameras take advantage of the high-sensitivity of the CCD chip to these wavelengths, and utilize the complete resolution of the chip. DSLR cameras, on the other hand, have the Bayer filters over each pixel. In a Bayer array, one half of the pixels have green filters, and only one quarter are red, and one quarter blue. This means that for a hydrogen-alpha filtered image, only one quarter of the total pixels in the chip will record the data of interest. There are many different ways to blend filtered images into color images. For example, a high-contrast black and white image from the red channel of a hydrogen-alpha filtered image can be substituted for the red channel in an RGB color image, as seen in the example above. Or, it can be pasted as a layer and combined using different blending modes in Photoshop.
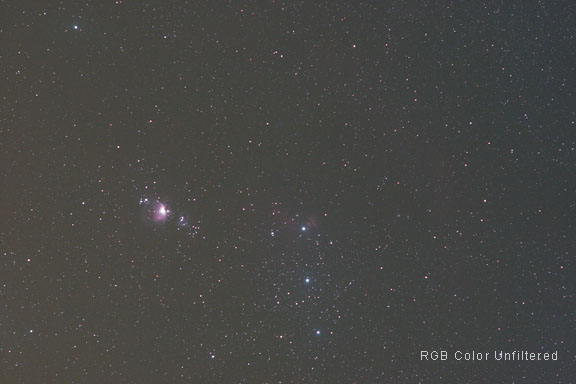
Hold your mouse cursor over the descriptions below the image to see contribution of each channel to the final image. Hold the mouse cursor over the image itself to see the combined RGB color image. This is a single unfiltered 60 second exposure at ISO 1600 at f/4.5 with a Canon 20Da DSLR Camera.
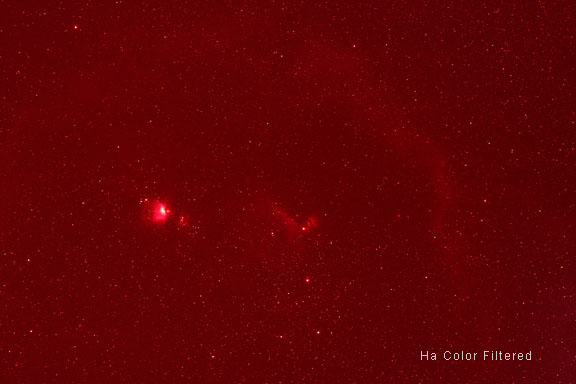
Hold your mouse cursor over the descriptions below the image to see contribution of each channel to the final image. Hold the mouse cursor over the image itself to see the combined RGB color image. This is a single hydrogen-alpha filtered 300 second exposure at ISO 1600 taken with a Canon 20Da DSLR camera. We can see that almost all of the detail in the image is in the red channel because the hydrogen-alpha filter cuts out all of the wavelengths shorter than hydrogen-alpha, which is in the red portion of the spectrum.
The remarkable difference in the amount of hydrogen-alpha emission nebulosity recorded in the image taken with the filter can be seen compared to the unfiltered image in the images above. This is because the filter removes all of the light of the spectrum below red. That filters out all of the light pollution, of which there was some at this moderately dark-sky observing site, and allows longer exposures to record more nebulosity. Because the sky is darker, there is also more contrast between the nebulosity and the sky background. Naturally, this filter will not do a very good job of recording broad-band objects such as galaxies or reflection nebulae which contain light across the entire spectrum. This particular hydrogen-alpha filter was a cut-off filter made by Lumicon for use with film, but nevertheless, it works with CCDs and DSLRs also. A cut-off filter means that it cuts off all of the spectrum below a particular wavelength. Other narrow-band filters cut off more of the spectrum, on both sides of the wavelength of interest. For example, a narrow-band hydrogen-alpha filter may only pass a window of 15nm worth of wavelengths centered on 656.3nm, the wavelength of hydrogen alpha. Even more narrow filters are made, but are really more suitable for CCD work because they require really long exposures. Red Channel Substitution Copy the red channel from the hydrogen-alpha filtered image and paste it into the red channel of the unfiltered image.
Lighten Layer Copy the entire RGB color hydrogen-alpha filtered image and paste it directly on top of the unfiltered RGB color image as a layer. Change the layer blending mode to Lighten.
|
||||||||
|
Back | Up | Next |