|
3.3 Neutralize the Sky Background
|
Back |
Up |
Next
|
Video
After the linear 16-bit image has had a non-linear stretch applied to it, we need to neutralize the sky background. This removes any light pollution that may have been recorded, as well as the natural red/brown color of the sky from airglow.
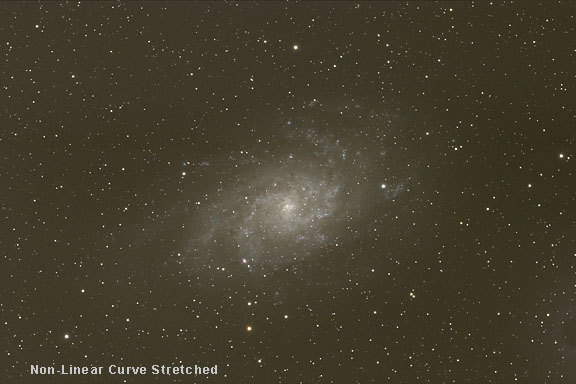
Here we will continue to work with the image of M33 that has had a non-linear curve stretch applied, and that has been white balanced in Photoshop from the previous sections.
We will now neutralize the sky background in Levels in Photoshop.
 |
 |
|
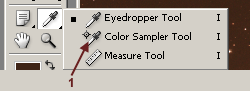
1. The Color Sample Tool
|
2. Color Sample Tool Options
|
1. Click on the Eyedropper tool and hold the mouse down for a moment, and select the Color Sample Tool from the fly-out menu.
2. Select a 5 x 5 pixel box as the sample size from the Tool Options.
|
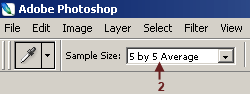
|
Color Sample Point set in a blank area of sky background.
|
3. Set a color sample point in an empty section of the sky background of the image that does not contain any stars or nebulosity. Notice that the R,G,B readouts for this point in the image are 64,57,43. This indicates that the sky background is higher in the red and green compared to blue. Red and green yield the ugly color of the sky background in this image.
If you have a lot of noise in the image, it can be difficult to pick a good location for the color sample point because of variations in pixel color and brightness due to the noise.
As you work on this example, you probably won't be able to put a color sample point in exactly the same place that I did, so the numbers for the pixel values may be slightly different.
4. Open the Levels dialog: Image > Adjust > Levels.

|
|
The Levels Dialog
|
5. Click on the Gray-Point Eyedropper Tool.

|
|
The Image with the sky background neutralized by clicking on a blank area of sky background with the gray-point eyedropper tool in Levels.
|
6. Now click the eyedropper in an empty section of sky background in the image somewhere near the color sample point.
Notice that the R,G,B pixel values for the sample point that we have established now read 53,54,54. This indicates that the sky background is now a neutral gray color.
Color and brightness variations in individual pixels will influence the overall color balance of the sky background in a way that can sometimes be misleading when it comes to setting the color of the sky background in an image. Info palette readouts of pixel values can indicate a neutral color balance when, in fact, the overall visual color balance is quite different. Try clicking the gray-point eyedropper in a number of different locations until the sky background seems neutral, and check the numbers in the info palette.
Mouse Over
|
|
Hold you mouse cursor over the image to see a comparison between the original uncorrected image and the image with the sky background neutralized.
|
Using the gray-point eyedropper tool in the Levels dialog is a very easy way to neutralize the sky background color.
Neutralizing the sky background means making the average overall pixel values of the sky a neutral gray.
Subtracting the Sky Background
A more technically accurate way to correct the sky background color is to subtract the color of the foreground near-earth sky from the image.
Subtracting the sky background can be done with the following method.
Measure a blank area of darkest sky background with the eyedropper.
Duplicate the image and fill the entire image with this color.
Use the Apply Image dialog to subtract the color background image from the real sky image. Add an offset of about 50 in the dialog.
While subtracting the sky background is more accurate, using the gray-point eyedropper to neutralize the sky background is really easy and will get you very close.
|