Video Most astronomical image processing programs offer a way to automatically align the stars in the sub-exposures. Usually a reference image is selected and two stars are picked to align with. Sometimes these two stars must also be hand selected in the other frames if there has been a lot of drift between exposures. Some programs, like RegiStar, will do everything automatically. Later versions of Images Plus will also perform image alignment automatically. It is also possible to do alignment and registration manually by hand for each individual frame in a general image processing program like Photoshop, but it is difficult, tedious, extremely time consuming and not recommended. Astronomical image processing programs will do it automatically, and much better. Alignment in Images Plus v2.8 If you have been using Automatic Image Set Processing in Images Plus v2.8, you can leave that dialog box open and do your image alignment and registration directly from there. If you are using Images Plus v3.75, you can do all of this automatically by checking the Align box under the Process Tab in the section at the bottom called Perform After Calibration and Color Conversion.
If you have closed the Automatic Image Set Processing dialog box, go to File > Image File Operations > Align Files > Translate, Scale and Rotate. The same Translate, Scale, Rotation Alignment dialog box will open as seen in Image 2. If you have opened it directly from the Automatic Image Set Processing dialog, the files to be aligned will already be selected. If you have gone there from the file menu, you have to select the files to be aligned. For images shot with the same focal length so that they have the same image scale, use "Translate and Rotate" as the alignment type. For images shot at different focal lengths, use "Translate, Scale and Rotate" as the alignment type.
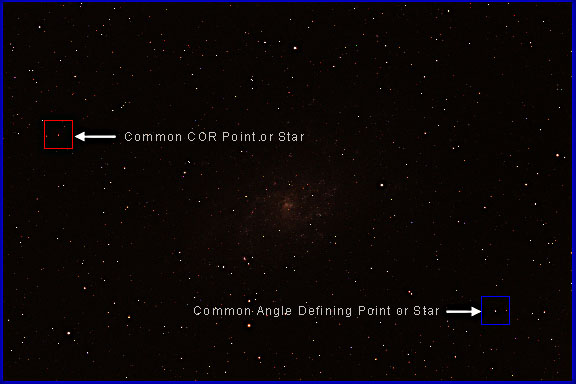
1. Click Centroid for the Alignment Method. 2. Click Translate + Rotate for the Alignment type. 3. Click Common COR (Center of Rotation) Point or Star for the Alignment Selection. Reference Image and Auto Advance after Select should already be checked by default. 4. Click on the first image to be aligned. This will be the reference image. Two stars now need to be picked in this image as reference points. The first star, the Common COR star will be the anchor point in the reference image. The other images will be shifted in the x and y axes to align with this star. The second alignment star, the Common Angle Defining Star, will be used to rotate the image around the first COR star so that all of the rest of the stars in the image align. In Images Plus, these stars are selected in the images in two steps. First the Common COR Star is selected in the reference image, and then in the other images. Then the Common Angle Defining Star is selected in the reference image, and then in the other images.
5. Shift and Left Click on a fairly bright star in the first image to define the COR. It will be marked with a red box. Use the arrow keys to fine tune the position of the box around the star. Shift and Enter can also be used to set the red COR box.
6. Click the blue, right-pointing double arrow in the Translate, Scale, Rotate Align dialog box. This will automatically bring up the next image. Select the same star in this image with the red COR box. Do the same for all of the rest of the images. 7. Uncheck the box for Common COR point or Star in the Translate, Scale, Rotate Align dialog box. 8. Check the box for Common Angle Defining Point or Star in the Alignment Selection of the Translate, Scale, Rotate Align dialog box. 9. Shift and Left Click on a fairly bright star in the opposite corner for the COR box in the first image to define the Common Angle Defining Point or Star. It will be marked with a blue box. Use the arrow keys to fine tune the position of the box around the star. Shift and Enter can also be used to set the blue box. 10. Click the blue, right-pointing double arrow in the Translate, Scale, Rotate Align dialog box. This will automatically bring up the next image. Select the same star in this image with the blue box. Do the same for all of the rest of the images. 11. After all of the alignment points have been selected in all of the images, click the Align button in the Translate, Scale, Rotate Align dialog box to start the alignment of the set of images. The aligned and registered images will be saved into the directory with the original light frames, unless you have specified another directory. They will have at TnRt_ prefix added to all of the aligned files to indicate that they have been Translated and Rotated.
At this point, the image file names should look something like this: TnRt_BINT_C_CVT_LIGHTS05.FIT The original raw file name was: LIGHTS05.CR2. The naming convention is fairly self-explanatory:
The prefixes that have been added by Images Plus are these:
As you can see, these files are starting to take up quite a bit of room. At this point, we don't really need the intermediate-step files. They can be deleted. The originals should have already been archived, but if they haven't be sure you don't delete them. Only the TnRt prefix files really need to be saved at this point. So save the following files:
|
||||||||||||
|
Back | Up | Next |