Video
The following steps are described for Images Plus v2.8. They will be very similar for more recent versions of the program. I believe it is better to use a slightly earlier version of the program for examples because many people may not have upgraded to the latest version. The principles are exactly the same no matter which version of the program you are using. Some menu items and dialog boxes may be slightly different, but not enough that you won't be able to figure out what you are supposed to do.
In Images Plus v2.8, go to File > Automatic Image Set Processing.
All images should be the original camera's raw file format without conversion or any adjustments or manipulations.
|
|
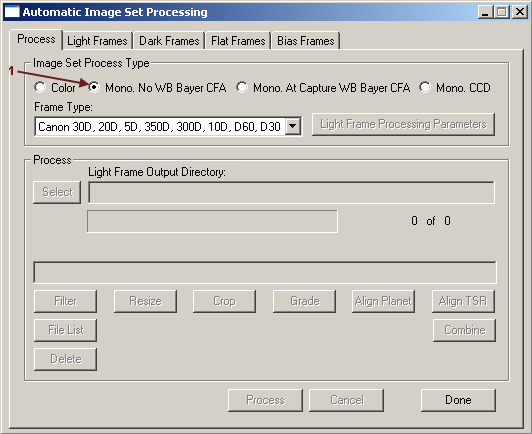
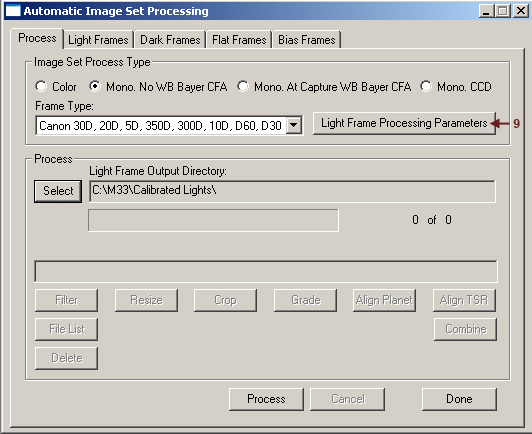
1. Under Automatic Image Set Processing > Process Tab under Image Set Process Type Select Mono, No WB Bayer CFA.
In the latest version of Images Plus v3.75, under Image Set Process Type, you would select DSLR > Bayer No WB.
The idea is the same. You want to calibrate the images with the raw files before the color has been interpolated.
Under Frame Type select your particular type of DSLR camera.
|
|
|
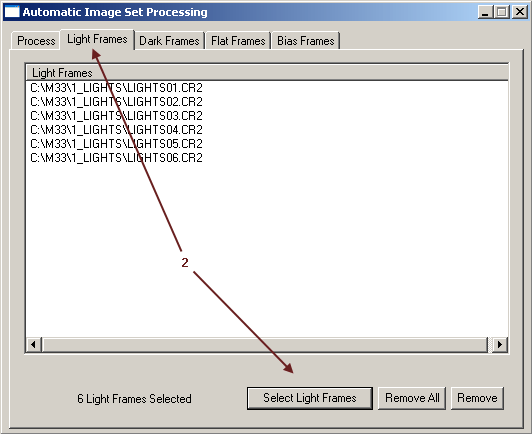
2. Click on the Light Frames tab.
Click the Select Light Frames button at lower right.
Navigate to the directory on your computer that you have saved your light frames in.
Highlight all of the light frames to be used and click to Open button in the Select Light Frames Dialog box. They should then be listed under the Light Frames tab.
|
|
|
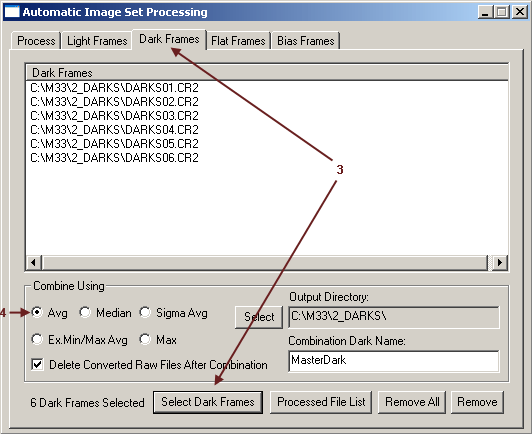
3. Click on the Dark Frames Tab.
Navigate to the directory on your computer that you have saved your dark frames in.
Highlight all of the dark frames to be used and click to Open button in the Select Dark Frames Dialog box. They should then be listed under the Dark Frames tab.
4. Leave the defaults checked.
|
|
|
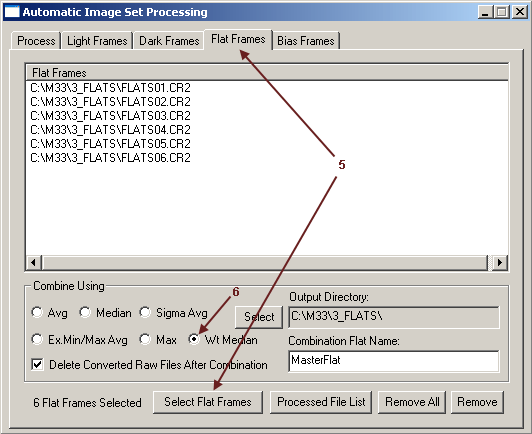
5. Click on the Flat Frames Tab.
Navigate to the directory on your computer that you have saved your flat-field frames in.
Highlight all of the flat-field frames to be used and click to Open button in the Select Flat-Field Frames Dialog box. They should then be listed under the Flat-Field Frames tab.
6. Under Combine Using, select Wt Median (weighted median) as the method.
|
|
|
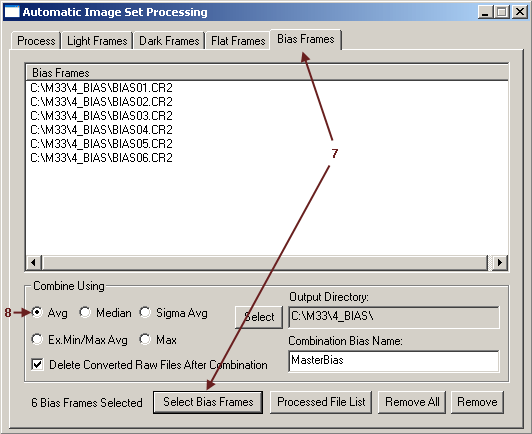
5. Click on the Bias Frames Tab.
Navigate to the directory on your computer that you have saved your bias frames in.
Highlight all of the bias frames to be used and click to Open button in the Select Bias Frames Dialog box. They should then be listed under the Bias Frames tab.
8. Leave the defaults checked.
|
|
|
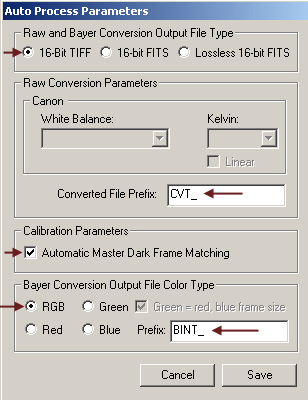
9. Under the Process Tab click the Light Frame Processing Parameters button. A new dialog box for Auto Process Parameters will appear.
|
|
Set the Raw and Bayer Conversion Output File Type to 16-bit TIFF
The Converted File Prefix is set to CVT_ as the default
Check On the Automated Master Dark Frame Matching
Select RGB as the Bayer Conversion Output File Color Type
BINT_ will be the default prefix for the Bayer Interpolated RGB files
Click the Save button.
Later versions of Images Plus will have additional options in this dialog box. Images Plus v3.75 will have options to perform Star Shape and Size Grading to remove defective images from the final stack. V3.75 will also have an option to do automatic star alignment and apply additional noise-reduction filters, all in this one dialog box.
|
|
|
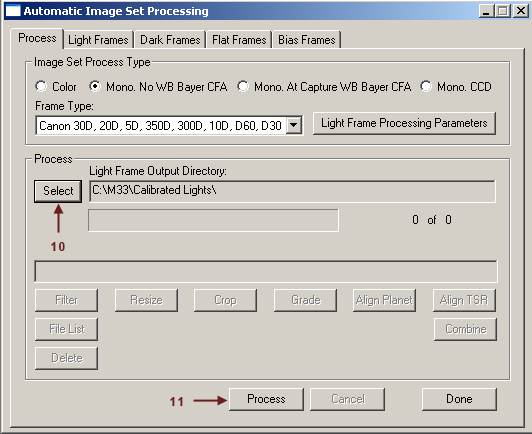
10. On the Process Tab, click on the Select Button to select the directory to save the final combined image in.
Images Plus v3.75 will have additional choices at the bottom of the Process Tab that will allow you to choose to Normalize, Grade, Align, and Combine the images automatically after they are calibrated. In earlier versions of the program, you had to perform these steps manually as described in the next sections.
11. Click the process button to automatically calibrate the light frames.
|
Images plus will then convert the raw files for each type, and create master files, and then calibrate each individual light frame. Finally the calibrated light frames will be converted to color images.
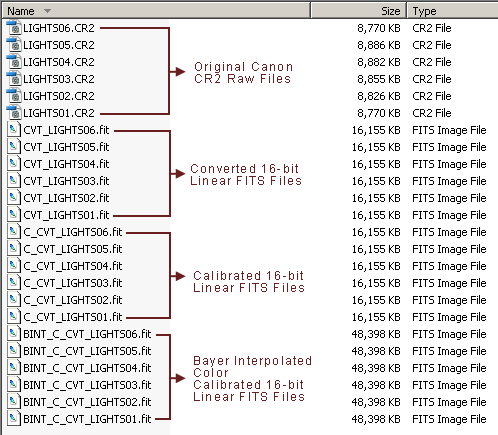
Images Plus' Automatic Image Set Processing will produce the following files:
|
|
Calibrated, Converted and Bayer Interpolated Files.
|
The prefixes that have been added by Images Plus are these:
- CVT = Converted from raw to 16-bit linear
- C = Calibrated
- BINT = Bayer interpolated (turned into color)
If delete raw files after conversion is checked in all of the Automatic Image Set Processing tabs, then only the master calibration frames, in FITS file format, will be saved. The converted, calibrated and Bayer-interpolated light frames will be saved also.
After Automatic Image Set Processing, only the individual light frames with the BINT prefix will need to be registered and aligned, and then stacked, as described in the next section.
|