Filters are used to modify the spectrum of light that reaches the sensors in our digital cameras. They may be used to reduce the intensity of the light, isolate a particular wavelength of interest, or block out wavelengths that are not particularly interesting, such as those dominated by light pollution. Narrowband filters are centered on a particular wavelength, and with a bandpass that passes a window of wavelengths on either side of the central wavelength. Long-pass filters let wavelengths pass that are longer than the cutoff wavelength. Short-pass filters pass wavelengths that are shorter than the cutoff wavelength. Other filters can be used, not to affect the wavelengths of the light they pass, but rather for artistic effect, such as fog, soft-focus, or cross-star filters. Although they are not used in DSLR cameras because each individual pixel has its own colored filter over it, Red, Green and Blue filters are also used with black and white astronomical CCD cameras to create color images. RGB Tri-Color All CCD and CMOS sensors are monochromatic. That means they are black and white, and grayscale devices. Color is usually created by photographing light through filters of three colors - red, green and blue. Dedicated astronomical CCD cameras shoot three separate exposures, one each through a red, green and blue filter, and then these individual black and white images are combined into a full-color image. Most DSLR sensors, whether CCD or CMOS, also create color by using red, green and blue filters, but do it in one shot. Each individual pixel has either a red, green or blue filter over it in a Bayer array. A computer algorithm examines the color of each pixel in a 4-pixel group and creates full color for each of them, even though they technically only see the primary color from whatever color filter is over them. These "one-shot" color cameras do a very good job of reproducing accurate color. It will do you no good to try to shoot a color image through individual red, green and blue filters with a DSLR. These filters are already built into the sensor. DSLR Long-Wavelength, Low-Pass Filters Almost every consumer DSLR camera has a special filter built in to the camera in front of the CCD or CMOS sensor. This filter serves two functions. The low-pass function of the filter to apply a slight blur to the image to reduce the effects of aliasing and moire. The other function is to filter out long wavelengths of light which can cause undesirable color reproduction, particularly in skin tones of certain individuals. Unfortunately, these long-wavelength filters also filter out most of the light at the hydrogen-alpha wavelength of 656.3 nm. This is the wavelength that gives emission nebulae their beautiful red color. Consequently, since most of this light is filtered out, stock DSLR cameras don't take very good pictures of emission nebulae. The only exceptions to this in stock cameras are the Canon 20Da and 60Da, which have a specially modified filter that passes 2.5 to 3 times as much of the red hydrogen-alpha light as a normal unmodified camera.
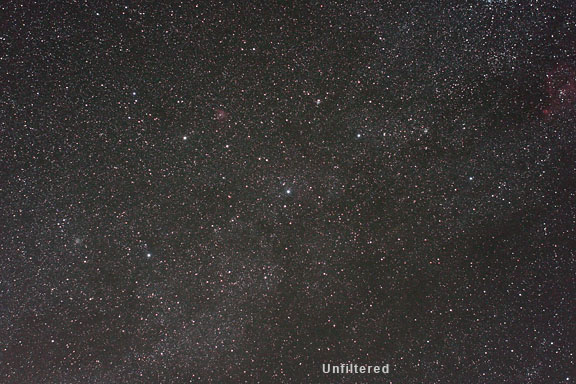
In the image comparison above, we can see the difference that a filter that passes more hydrogen-alpha light makes. The images were shot at different f/stops which accounts for the difference is sharpness and size of the stars. The image taken with the Canon 1D Mark II camera was a 5 minute exposure at ISO 800 at f/2.8. The image taken with the Canon 20Da camera was a 5 minute exposure at ISO 800 at f/4. Even though the 1D Mark II exposure was shot at twice the aperture, giving twice as much exposure, the 20Da image has clearly recorded much more hydrogen-alpha red emission nebulosity because this camera does not filter out most of the hydrogen-alpha light. Some photographers remove this long-wavelength filter completely to make the camera sensitive not only to hydrogen-alpha wavelengths, but also to longer wavelengths, making true infra-red photography possible. Others have replaced the filter with one that passes hydrogen-alpha light for astrophotography of emission nebulae, but blocks the longer infra-red wavelengths. When the manufacturer's stock filter is removed, the camera's warranty is voided and additional filtration must be used to achieve correct color balance for normal daytime photography. Note that modifying the camera and totally removing the low-pass filter in front of the CMOS sensor may render lenses unable to focus at infinity. Some that focus past infinity, usually auto-focus lenses, may have enough focus travel range to reach infinity, but some may not. Lenses that stop directly at infinity will not be able to focus at infinity if the filter is completely removed. To overcome this problem, clear glass of the same thickness and refractive index needs to be substituted for the filter that is removed. This allows these lenses to reach focus at infinity and the camera to autofocus correctly. The color balance and exposure however, will not be correct. It is also possible to replace the filter with glass that filters different wavelengths, such as Ultra Violet and Infrared. A variety of different filters for light-pollution suppression, nebula enhancement, hydrogen-alpha, UV/IR and daylight-balance can be purchased for most Canon DSLR APS-C sensor cameras that fit in the camera body's mirror box, behind the lens mount, and in front of the mirror. Daylight Balancing Filters If the manufacturer's low-pass, long-wavelength filter is removed from a DSLR camera, or replaced with a different filter, the camera's daylight color recording capabilities will be affected. These camera's de-Bayerizing color-creating algorithms are finely tuned to work with the particular sensor, individual red, green and blue filters over the pixels, and the low-pass, long-wavelength filter. To restore normal correct color balance for daytime shots with a modified camera, a replacement filter must be used that mimics the original manufacturer's long-wavelength filter's pass bands. This filter can either be placed in front of the camera lens, or inside the camera's mirror box in front of the mirror. A custom white balance must also be used set on a gray card under the main source of illumination for the scene you are photographing. The degree of color accuracy you need for normal daytime work will determine whether the solution of a replacement filter and custom white balance is sufficient for your needs. For example, if you are a professional catalog photographer where reproducing colors is extremely important, you probably won't want to be using a modified camera, even with a replacement filter and custom white balance. If you are a snapshot photographer who just wants to use your modified camera for some daytime pictures of your kids, then you might even be able to get away with just using a custom white balance and no replacement filter. Replacement Filters
For examples, see Gary Honis' web page on correcting the white balance of a modified Canon 300D. Light Pollution Filters Light Pollution Reduction (LPR) or Light Pollution Suppression (LPS) filters, such as Hutech's IDAS LPS filter, Lumicon's Deep-Sky filter, and Astronomik's CLS filter, do a good job of filtering out wavelengths dominated by man-made light pollution, and passing wavelengths emitted by astronomical objects. This darkens the sky considerably and increases the contrast between the astronomical object and sky background at the same exposure. It also allows a longer exposure to record even more signal from the object. Light pollution reduction and suppression filters work very well under light-polluted skies, but also help even at dark-sky observing sites because they also reduce the natural brightness of the night sky caused by airglow. This also helps increase the contrast between the sky and object.
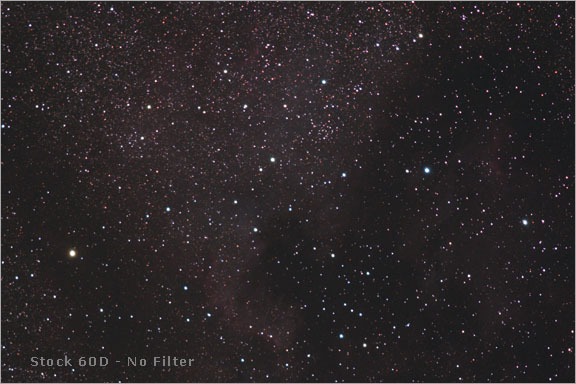
We can see from the above comparison of the North America nebula shot with the same stock, unmodified, Canon 60D camera that it is possible to shoot red hydrogen-alpha emission nebula with an unmodified camera. The IDAS Light Pollution Suppression filter allows a three-times longer exposure at the same site with the same ISO and f/stop. This allows fainter stars to be recorded as well as more nebulosity. The secrets to shooting red emission nebulae with an unmodified camera are:
Narrowband Filters Narrowband filters isolate a specific region of the spectrum such as the hydrogen-emission wavelength at 656.3 nm. The bandpass of the filter may be fairly wide and centered on a particular wavelength, or it may be very narrow. Extremely narrow band passes are usually only used for solar work.
Wide bandpass filters, usually more than 10 nanometers wide, filter out most of the rest of the spectrum and increase the contrast between the wavelength of interest and the sky. Because most of the rest of the spectrum is filtered out, the intensity of stars in the image, which produce light across the entire spectrum, is reduced. This results in smaller, less-prominent stars. Wider bandpass filters work better with fast optical systems where the bandpass may shift as the light moves off-axis because of the steep light cone. Very narrow bandpass filters, usually only a couple of nanometers wide, increase the contrast even more between the wavelength of interest and the sky, but require longer exposures. Extremely narrow hydrogen-alpha bandpass filters, usually less than one angstrom wide, are used for solar work. Narrowband imaging can allow photos of supernova remnants, planetary nebulae, and certain emission nebulae to be taken on nights when the moon is up since most of the spectrum which brightens the sky is filtered out. Narrowband filters for DSLRs can be purchased from Astronomik, Baader and Hutech. Representative Color Imaging True-color imaging is generally regarded as color astrophotography that seeks to present images as the eye would see colors if the object were bright enough to stimulate the color-sensing cone cells in the retina. This is a complicated question, especially with emission nebulae. If images are carefully calibrated, imaged correctly through the proper filters, accurately combined, calibrated and white balanced on a G2V spectral-class star, it is possible to produce reasonably accurate "true-color" images of deep-sky astronomical objects. It is also possible to shoot wavelengths that are invisible to the human eye, such as infrared and ultra-violet. If these images are presented in color, some color must be arbitrarily assigned to them. This creates the possibility of arbitrarily assigning any wavelength to any of the primary colors of red, green and blue in a normal color image. This type of color creation is done, for example, with the Hubble Space Telescope where SII, Ha, and OIII are assigned to R, G, and B, respectively. Black and white images taken through these and other narrowband filters can be combined into assigned-color, or representative-color images. Each wavelength, usually in order, is assigned to one of the channels of an RGB image. For example, Hydrogen-beta at 486.1 nm may be assigned to the blue channel, Oxygen III at 500.7 nm may be assigned to the green channel, and Sulphur II at 672.4 nm may be assigned to the red channel. Hydrogen-Alpha (H-alpha) Filters H-alpha filters are probably the best known because the hydrogen-alpha wavelength is responsible the red color of emission nebulae. Long-pass filters cut off all of the wavelengths of light that are shorter than 656.3 nm and pass everything longer, such as near infrared and long infrared. Narrowband hydrogen-alpha filters are usually used with CCD cameras and pass only a narrow range of wavelengths centered around the hydrogen-alpha emission wavelength of 656.3 nm. The human eye is only slightly sensitive to hydrogen-alpha light. Therefore focusing a lens or telescope through a hydrogen-alpha filter is extremely difficult to accomplish visually. It is best to focus by test exposures and trial and error, or by using a clear filter of the same thickness and refractive index and then substituting the h-alpha filter. Some people think that it is not productive to use h-alpha filters with DSLR cameras because of the Bayer matrix of color filters over the individual pixels. Because the ratio is 2 green filtered pixels to 1 red and 1 blue, only 1/4 of the pixels in a sensor are sensitive to red light. Although this reduces spatial resolution somewhat, all of the pixels are used when the color is created when the image is de-Bayerized. The image of the Horsehead Nebula at the top of this page is an example of what can be done with a DSLR and long-pass cut-off hydrogen-alpha filter.
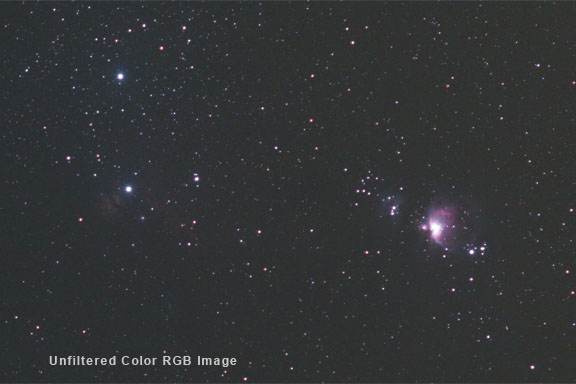
As seen in the image above, it is also possible to use a high-contrast h-alpha filtered image to enhance the red by using the technique of channel substitution. With this method, the red channel of the hydrogen-alpha image is swapped for the red channel in a separate full color RGB image, or for the L channel in an LRGB color image, or in other combinations. These methods will be discussed further in the section on channel substitution in the chapter on image processing. This type of long-pass cut-off hydrogen-alpha filter can be found at Hutech, and Lumicon.
LRGB Images LRGB stands for Luminance, Red, Green, and Blue images. These images, typically taken with a dedicated monochrome astronomical CCD camera, take a lower-resolution RGB color image and combine it with a higher-resolution Luminance image to save exposure time when the red, green and blue filtered images are taken. The LRGB technique is not useful for normal DSLR cameras because the sensor already has red, green and blue filters over the pixels. Infrared Infrared wavelengths begin just past the deepest red portion of the spectrum, just past the hydrogen-alpha and Sulphur II wavelengths around 700nm. Infrared that can be photographed is in the range of 700 to 1,000 nm, but infrared radiated energy extends to even longer wavelengths. The human eye cannot see infrared radiation, although humans can sense some far infrared radiation non-visually in the form of heat in the 3,000 nm and longer wavelengths. Infrared wavelengths are broken into near, mid and far infrared. Near-infrared starts at about 700 nm and extends to 1,300 nm. Mid-infrared extends from 1,300 nm to 3,000 nm. Far-infrared extends from 3,000 nm to 1 mm. DSLR CCD and CMOS sensors are sensitive to infrared wavelengths. They make excellent infrared cameras for daytime photography if the low-pass, long-wavelength filter is completely removed or replaced with a clear filter. For this type of use, it is best to use an infrared filter that filters out all of the visible wavelengths below infrared. Unfortunately, this filter is opaque, so it is impossible to focus or compose a shot visually through the viewfinder. It is possible however, to focus using Live View. Camera meters are also sensitive to different wavelengths than infrared, so metering is usually not accurate. Test exposures can be made and the exposure adjusted by examination of the visual image and histogram on the LCD on the back of the camera. B+W makes infrared filters for daytime photography. They are the 092, 093, or 099 filters. For regular visible-wavelength deep-sky astrophotography with a modified DSLR camera where the low-pass, long-wavelength filter has been removed, attention must be paid to the infrared wavelengths that are reaching the sensor if imaging is done with a lens, or refractor. Lenses and refractors focus light by bending it. The amount of bending depends on the wavelength of the light and the refractive index of the glass. Lens optical systems are corrected so that all (or most) of the visual wavelengths come to the same focus point. Infrared and Ultraviolet wavelengths, which are not visible, are not corrected in these types of optical systems. Therefore, these wavelengths come to a different point of focus. While we can't see it visually, our cameras will record this out-of-focus light and it will degrade the sharpness of the image. Only all reflective optical systems are immune to this problem because mirrors focus all wavelengths to the same point. To correct for this problem in a camera that has been modified, a UV/IR filter must be used with a lens or refractor for astronomical photos. Hutech's type 1 UV/IR Blocking filter automatically corrects for this problem. White-Light Solar Filters
The trouble to which we go to shoot the stars at night is slightly ironic considering that the brightest star in the sky is very nearby compared to the rest. It is so bright that it banishes the dark of night and turns it into daylight! We are talking about the Sun of course. With the proper filtration a great amount of fascinating detail can be seen and photographed on the Sun with very modest equipment. The Sun can be safely viewed and photographed through the proper type of solar filter. They can be obtained from the following sources:
Unsafe solar filters include exposed or unexposed photographic film, neutral density filters, polarizing filters, smoked glass, floppy disks, CD-ROMS, DVDs and anything else that is not specifically made to be safe for solar viewing. Especially dangerous are screw-in solar filters that fit the eyepiece of some telescopes. Because concentrated light is gathered and focused at the eyepiece, these filters can easily crack due to heat, letting the full force of the Sun reach the eye with no notice. These type of filters should not be used as they are not safe! Good references about safe solar filters:
Hydrogen-Alpha Filters for Solar Work
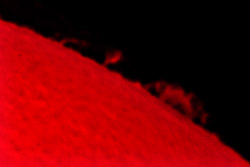
Very narrow-width bandpass hydrogen-alpha filters (less than one angstrom) can be used for Solar work which reveals high-contrast detail on the face and limb of the sun in hydrogen-alpha light. The photo at right shows several limb prominences. It was taken with a 7" f/9 Triplet Apochromatic Refractor and Barlow projection at approximately f/27 on a Nikon D2H DSLR camera at 1/30th of a second exposure at ISO 800. The 0.2 angstrom Hydrogen-alpha filter was manufactured by Solar Spectrum and was working at 140mm of aperture with Red #25 glass energy rejection filter.
Minus Violet Filters Minus Violet filters such as Lumicon's minus violet, and Baader's fringe killer filter, filter out excessive blue wavelengths for refractors and camera lenses that are not apochromatic. Because these non-apo lenses do not focus the blue light at the same focus as the rest of the spectrum, they appear as out-of-focus blue halos around stars. The minus violet filter can remove most of this blue fringing and yield smaller stars. Artistic Effects Filters
"Fog" filters, diffusion filters, and "star" filters are used for artistic effects. A fog filter is a diffuser that is used in front of the lens that puts a halo or glow around bright stars. This can make the bright stars of the constellation stand out, making its shape easier to recognize in a photograph that may contain thousands of other stars. Tiffen's 52mm Pro-Mist 3 is a good one, as well as Hoya's Fog A filter. Make sure to get the one with the correct size filter threads for your lens. A star filter simulates diffraction spikes around stars that are typical in a Newtonian reflector from the spider vanes that hold the secondary mirror. Miscellaneous Notes
Resources for Filters:
|
|||||||||||||||||||
|
Back | Up | Next |