Because clear nights seem so rare, not to mention clear nights when the moon is not up and you don't have to work the next day, I usually plan on staying out all night doing astrophotography. When I go out for an entire night of astrophotography, I note the time of sunset and sunrise and the beginning and end of astronomical twilight. I try to arrive at the observing site for just about when the sun sets. This allows about an hour to setup all of my equipment and get polar aligned while darkness falls. If you are going to shoot twilight flat-field frames, shoot them before it gets completely dark. Scope Setup When I set up the tripod for the scope, I try to pick ground that is relatively level and solid. After I have all of the equipment on the scope, I stand on the ends of the tripod legs to push them into the ground as much as possible so that they will not sink after the scope is polar aligned. For ground that is questionable you can also put down paving stones or blocks of wood for the tripod legs. It helps to bury these into the ground a little bit first. If the tripod shifts, or sinks into the ground any amount during the night, it will throw off your polar alignment, and you may end up with trailed stars in long-exposure photographs. After you have set up the scope, collimate it if necessary. Align the finder with the main scope. When I set up my mount with the scope on it, I am careful to balance it in all three planes with the camera and ST-4 autoguider in the guidescope, in the exact configuration in which it will be used, even down to the exact extension of the focusing tube when the camera is at focus at infinity. It's important to get the balance as perfect as possible before polar aligning. Any kind of wrestling with the mount to move the scope up or down in the dovetail plate after polar aligning can cause the mount to move and polar alignment to become inaccurate. Because I use a German equatorial mount, I adjust the counterweights on the dec shaft so that the scope is just a small amount heavy on the eastern side. This ensures that the right ascension worm and gear are always engaged by making the scope lift just a little weight and removes any slop in the mesh of the gears and leads to better tracking. If I do a meridian flip, I adjust the counterweights so that the east side of the setup is always heavy. If you have a mount with a worm and gear on the declination axis, it is common for there to be a small amount of play in the mesh of these gears. Once the scope is completely set up, polar aligned, and the object acquired, you can add a tiny amount of weight to the declination balance so that the gears are always engaged. If it's winter time, or if it's going to be windy, I usually try to set up the scope on the lee side of a wall in a gravel pit, or next to a stand of trees to block the wind. If this is not possible, I'll even try to use my truck as a wind-blind. Polar Alignment After I'm setup, it's usually just dark enough to find Polaris and use my polar-alignment scope to align the mount so that the polar axis is pointing at the north celestial pole. The first time you use your mount and its polar alignment scope, you may want to spend the time to drift align the scope to check the accuracy of the polar alignment scope. Drift aligning is covered in detail in the next section. Periodic Error Training Most telescope mounts offer a feature for periodic error correction or training. Periodic error is introduced into the right ascension tracking because it is impossible to manufacture a gear perfectly. It shows up as a gradual movement or oscillation back and forth in right ascension as the scope tracks a star. Their period of this oscillation is the same as the period of revolution of the worm gear and may be anywhere from 4 to 12 minutes or more, depending on the gearing of the particular mount. The periodic error correction feature allows the user to "guide out" this error manually for one worm revolution, and have the mount's electronics memorize the corrections, and then play them automatically every subsequent worm revolution. This can be accomplished either manually or with an autoguider. Backlash Settings In addition to periodic error correction, the mount may have the ability to correct for any backlash in the right ascension and declination gears due to imperfect mesh between the work and gear. This setting usually needs to be determined by trial and error, but once determined, can make the mounts tracking more accurate by providing a better response when a correction needs to be made in the tracking. Anti-Dewers Virtually every location that I have ever shot from has suffered from dew. Dew forms on any surface exposed to the sky when the temperature of the surface drops below the dew point. Dew will form on your objective quickly since it is pointing towards the sky. This is not because the dew "falls" from the sky like rain, but rather because any object exposed to the open clear sky will radiate its heat away to open space, where it is very cold. By open space I'm talking about outer space, up there where the stars and planets are. It's cold in space and objects will radiate their heat away. This is why a lens shade will help prevent dew from forming for a little while - it shades the lens a bit from the open sky. But if you are shooting something in the night sky, the lens will ultimately be pointed to the sky and it will radiate its heat away. A lens shade or dew cap will slow, but not prevent this from happening, and dew will eventually form. If you have used a large Dobsonian telescope, you may have never had a problem with dew. This is because the mirror is usually down in a long tube, which acts as a dew shield (again, up to a point), but is more because of the large amount of thermal inertia in a large piece of glass. Dew doesn't form on a Newtonian or Dobsonian mirror because it has so much mass that it never manages to completely radiate all of its heat away so that the temperature of the mirror can reach the temperature of the ambient air. This is also the reason that most large mirrored telescopes never give perfect views - because the mirror is radiating heat, a layer is formed at the glass-air boundary which disturbs the seeing inside the telescope tube. It is also easy to see that the temperature of the mirror never reaches the ambient temperature of the air if an inexpensive indoor-outdoor thermometer is used with the outdoor probe attached to the back of the mirror, and the indoor readout left outside the tube. This fact can actually work to your advantage if you are shooting with a Newtonian telescope. If the mirror is large enough, and has enough thermal mass, you may not have to worry about dew forming on the imaging surface. It's easy to keep dew off of optical surfaces by slightly warming the lens or eyepiece that you want to use. This is accomplished by using an electric-powered anti-dewer, usually some type of covered wire with the correct resistance for the voltage applied to supply a small amount of heat. Wrapping these wires around the telescope objective or camera lens, and then applying just enough heat to keep the surface a degree or two warmer than the ambient night air will keep the dew off all night long. You can also keep the temperature of the surface high enough by periodically blowing warm air onto it from a portable 12 volt hair dryer. This is a less than optimum method to use though because, depending on the ambient temperature, it must be performed repeatedly throughout the night, and the tendency is to really hit the objective with a lot of hot air to warm it up considerably, which causes a deterioration in the seeing, and can even cause a change in focus. It is recommended to use something like the Dew-Not anti-dew removal system where the amount of heat applied to the optics can be controlled. For controlling dew on wide-angle lenses, always tape down the focus on the lenses at infinity, it's just too easy to accidentally move it. For the wide angle lenses I use a clear glass filter (like a UV or skylight) and a metal screw-in lens shade that is wide enough not to vignette the widest lens that I have. You only need one of these widest lens shades, and then you can use it on longer focal length lenses. The point is not to use it so much as a lens shade, but to use it so that the Kendrick anti-dewer won't slip off the end of the lens or end up partially obscuring the field. Since I tape down the focus, I can also have part of the anti-dewer on the focusing ring. Part of the anti-dewer touches the filter and metal lens shade and the heat is transferred to the glass in the filter and dew is never a problem. With DSLR camera bodies, the electronics inside of the camera usually generate enough heat so that dew does not form on the camera body. Likewise with computers in the field. They will usually generate enough heat so that dew will not form on them. However, dew may form on a laptop screen with a piece of red plexiglass over it. In this case I use a "Hoodman" or "Lapdome", to shield the screen from the sky, and it acts as a dew shield. It also prevents light from the screen from bothering other dark-adapted observers who may be near you. Power Requirements To do astrophotography in the field, it may take quite a bit of power, especially if you are planning an all-night imaging session. Here is a list of equipment that will need power:
Learn the power draw in amps for each piece of equipment under load, and add it up to be sure your battery has enough power to last all night long.
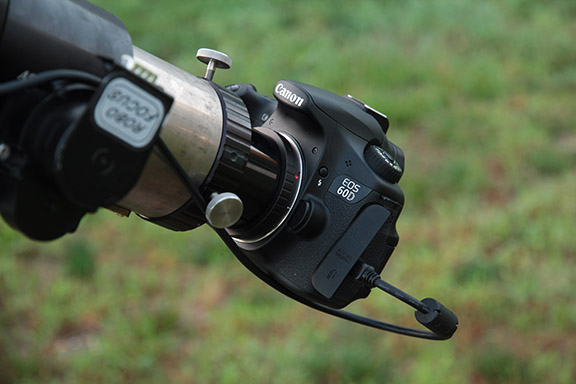
Hook up the Camera to a Computer Hook up the camera to the computer via the USB cable and be sure that the camera establishes communication with the computer.
For newer generation cameras only one USB2 cable is required to control all of the camera's functions including long exposures through the bulb setting. For older generation cameras, two cables are required for long-exposure astrophotography. One USB cable controls the camera's functions, and another serial cable controls the bulb port on the camera making exposures longer than 30 seconds possible. You can get a serial to bulb port cable from Hap Griffin. Computers in the Cold Computers are usually rated for operation with a specific range of ambient temperatures. If you use them in colder temperatures than recommended (usually about 40F), you run a real risk of damaging the hard drive. The hard drive head operates extremely close to the spinning platter which stores the data. Because metal contracts in the cold, this can cause the head to touch the spinning platter and cause damage. It is especially important not to boot up a cold computer before it has warmed up as this can destroy the hard drive. A simple solution to this problem is to use a Solid-State Drive (SSD) in place of a traditional hard drive. Prices have dropped on these SSD drives to make them affordable, and they also use less power than a traditional hard drive. LCD screens can also display aberrant behavior at temperature extremes, blacking out at very high temperatures and losing contrast at low temperatures. Neither temperature extreme usually causes damage to the display. This generally isn't a problem if you keep the laptop inside of a Lapdome tent as waste heat from the computer will heat the tent. The other consideration for using a computer in cold temperatures is condensation inside the computer when it is brought inside to a warm environment. This moisture that condenses inside the computer can damage electronics. If the computer is allowed to chill during the night, it is advisable to put the laptop computer into a large ziploc bag with some silica desiccant while out in the cold, and seal the bag before it is brought inside. The same procedure is recommended for you camera and lenses if they are used in the cold and brought into the warm. Computers will usually generate enough heat on their own from the hard drive and processor to keep the internal electronics warm enough so that cold won't affect them, within reasonable temperature ranges. If a computer is relatively warm when it is turned on, and if it is left running during the imaging session, its internal heat generation will normally be enough so that no additional measures are needed. In extreme temperatures, additional heat may need to be applied with something like a Kendrick's laptop heater. If the laptop is only used initially for focusing and then put into an energy-conservation mode, the hard drive may spin down and the computer may go to "sleep". Although this can save power, it will also allow the computer to dissipate heat and become cold. It is probably a good idea to disable power saving features and just let the computer run so that it stays warm. This, of course, requires more power than a laptop battery can provide for an extended imaging session, so provision must be made for an alternate power supply working off of either 12 volts DC or 120 volts AC. In extremely cold weather, it may also be a good idea to put the laptop inside of something like a Styrofoam cooler placed on its side to further insulate the computer from the cold. The cooler's cover can be closed when the computer is not in use.
|
|||||||
|
Back | Up | Next |