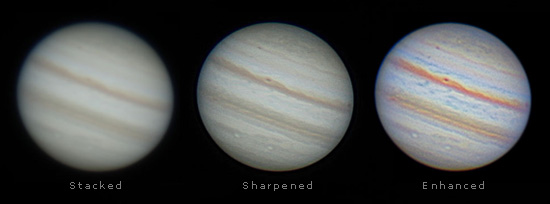
Most of the time for high-resolution planetary imaging, we are going to be shooting video and using lucky imaging. Videos are really a series of still frames. We will shoot many frames in a video over the time period of a couple of minutes and hope to get lucky on some of them and get some moments of good seeing where fine detail is recorded. We will then use planetary image processing software like RegiStax, AviStack or AutoStakkert! to pick out the best frames and stack them to improve the signal-to-noise ratio in the image. The many frames in the original video end up as a single still frame in the stack. Stacking may also be done by multi-point alignment, where only the sharpest parts or sections of an individual frame are used in the final stack. The stack is then sharpened with special techniques such as wavelets or deconvolution, and further enhancements, touch-ups and color correction are applied. Videos shot and recorded in-camera in a DSLR camera are usually recorded in a compressed MOV file format. This format needs to be converted to an uncompressed AVI file format that planetary image processing software can work with. Videos recorded from DSLR camera's Live View with programs like Backyard EOS or EOS Camera Movie Record on a computer are usually record directly in an AVI file format that does not need to be converted. Each image is unique and requires its own unique processing. This is where the art of planetary photography comes in. Some programs work better with some images, for example, AviStack works particularly well with lunar craters. When you are first starting out, don't feel like you have to master each of these programs. Start with one that is easy to use like AutoStakkert!. For lunar images, AviStack will do everything automatically. RegiStax and Images Plus are very powerful, but also the most complex. Once you get familiar with the basics of a program, you can start adjusting the settings to try to produce even better images. Two General Rules for Image Processing
Even if you only shoot single frames, the same rules apply. You need a high-quality image with good signal-to-noise in the original to pull out details in processing. Archiving Originals Original files should be archived. The JPEG and Raw files for single frames, and the MOV and AVI files for video movies, that are recorded when you shoot, should be treated as precious. They have the most original data in them. One day there may be a new way to handle and process this data that may produce better results, so save the originals! Even though the original MOV files may be hundreds of megabytes, they are going to be much smaller than the uncompressed AVI files to which we will convert them. I archive all of my original files right out of the camera to a DVD with the subject and date as the title of the DVD. Notes I always make notes when I shoot and process images. When I shoot videos in the camera, it is simple to make verbal notes that get recorded with the video. I usually record the following: If I'm shooting single still frames, I write all of this down in a notebook. I then transcribe all of this information into a text file that I include with the digital files when I burn the DVD with the originals. After I'm done processing an image, I usually burn another CD with the original best video that I used for the stack, and the raw stack and each step of the processing along with the final image. Again, I include notes such as how many good frames were used out of the total number of frames in the video. In the end, this gives me two DVDs with the original data on them, in case one is lost or damaged. After I have archived the original files on DVD, I re-format the memory card in the camera to erase everything. Monitor Calibration How do you know that other people see on their monitors what you are seeing on yours? If you lined up 5 or 10 examples of the exact same monitor, and examine the same image on each of them, you will almost certainly find that there is some variation. From manufacturer to manufacturer there may be a great amount of variation. Even the same single monitor will change over time as it ages. Indeed, how do you know that even a single monitor that is sitting in front of you is adjusted correctly? You can change the brightness, contrast and color. What should these be set to so that an image is correctly displayed? The factory defaults are usually not the best settings for viewing images. The best way to deal with these questions is to use a hardware calibration device. This will objectively adjust your monitor by characterizing its display abilities and then calibrating it to a known objective standard. Monitor calibration hardware is made by Datacolor, X-Rite, Pantone and other manufacturers. They range in price from about one hundred to several hundred dollars. This may seem like a lot in comparison to the price of an inexpensive LCD monitor these days. If you can't afford one, at a minimum you should adjust the brightness of your monitor with a grayscale step wedge like the one below.
Adjust the brightness so that the black step on the far left is as dark as you can make it and still distinguish it from the step next to it on the right. Most people have their monitors adjusted way too bright as this is the default setting as they come from the factory. You should be able to distinguish each of the 18 steps. The two on each end, black and white, should have a tonal difference between them and the step next to them. Each of the steps should appear to be a neutral gray color. Although it is difficult to be sure if the gray color is exactly neutral because our eyes are so adaptive, you should be able to see if there are any color casts between steps in the gray scale. If there are any obvious color casts, you can try adjusting the color balance of your monitor. Most of the time you won't be able to correct the color if, say, the whites look red but the dark gray patches look neutral. In this case, you will either have to get a hardware calibrator, a better monitor, or just live with it. Color Spaces Color spaces are a way of defining what colors the numbers in a digital file mean. If you use the same color space when you shoot in the camera, and then throughout your processing, your colors should stay consistent. If you embed a special color space tag into your final image when you save it, other people who open it can use this color space information to hopefully see the image as you intended. sRGB is the most common color space. It is best to use sRGB unless you are extremely knowledgeable about color spaces and color management. You should set your camera to record images in the sRGB color space. This is really only applied to the data in a JPEG file. Raw file data can be assigned any color space you like, but in the end, after you have your final image, and you want to save it as a JPEG that is displayed on the web, sRGB is the color space you should use. The entire subject of color management, color spaces, and which is the best to use is complicated and beyond the scope of this book. It is made even worse because some web browsers support color space tags in images and some don't. sRGB, also known by its more formal name "sRGB IEC61966-2.1" is a kind of minimum standard with which you will have the most chance of other people seeing the same colors in your images that you do. File Formats Computer files usually contain data or a program that works with data. They usually have a name and a three-letter file extension. Program files usually have an .exe extension. the "exe" means executable, which is computer speak for a program that will do something and execute commands that are written into its code. Photoshop.exe would be an example of a program. Data files are usually designated with a name and a three-letter file extension that indicate the file format type and the program that should work with it. For example, a Microsoft Word text document may be called something like Schedule.doc. The last three letters after the period are the file extension that tells what kind of file format the data is written in. An image out of a DSLR camera usually has a number for a name, so each file can be uniquely identified since dozens or hundreds of images may be shot on a single memory card in the camera. An image file usually looks something like img_1023.jpg. The file extension here specifies that this is an image in a JPEG file format. Depending on your operating system, the file extension may be hidden. On Windows, you can display the file extensions for your files by going into Windows Explorer or clicking on the computer icon on your desktop and from the pull-down menus selecting Tools > Folder Options, clicking on the View tab and unchecking the box next to Hide extensions for known file types. On a Mac, go to Finder > Preferences> Advanced, and check the box next to Show all file extensions. On most computers, the operating system automatically associates specific file types with the specific program that they work with. Some file types, like JPEG and TIFF image files, may work with many different programs. Still images can be recorded in the camera Raw file format with all of the original data unmanipulated. Raw files must then be converted into a common file format like TIFF which can be read by most image processing programs like Photoshop. Still images can also be recorded in the camera in a compressed file format like JPEG. Compressed file formats save space and allow you to record more images on a memory card. The problem with compression is that it is usually achieved by throwing some of the image data away. The compression scheme usually works very well, and this data loss is usually not noticeable. Most DSLR cameras these days allow you to shoot both JPEG and Raw file formats at the same time. You end up with two image files written to the memory card in your camera. In the camera, if you can't shoot both JPEG and Raw, or don't want to for some reason, you should shoot RAW file format. This gives you the best data to work with for single frames. You should always archive your final processed image in uncompressed TIFF file format. This can be easily converted to JPEG for use on the web. |
|||||
|
Back | Up | Next |