This book started as a set of notes for myself when I learned that high-quality planetary imaging could be done with a DSLR. These notes expanded over time. When I felt that I had sufficiently mastered the concepts and ideas necessary, I thought I would share them with others. There is a lot of material out on the internet on this subject, but I felt there was a real value in putting them in one place with an organized and coherent structure. In addition to normal daytime imaging, and long-exposure deep-sky photography, high-resolution planetary imaging with DSLRs was now possible with Live View and video recording. These diverse capabilities make DSLRs extremely versatile. If used properly, a DSLR can give the 1:1 pixel resolution critical for high-resolution work with low noise and the high framing rate that makes "lucky imaging" possible. Lucky imaging uses hundreds of frames shot in a video and special software to pick out the sharpest frames that were "lucky" to have a moment of good seeing when the atmospheric turbulence allowed fine details to be recorded. Organization and Content Chapter 1 discusses the basics of planetary photography including the DSLR cameras, telescopes, and mounts that work best. Atmospheric effects, resolution, sampling and detail smearing due to planetary rotation are discussed in depth. Chapter 2 gives an overview of the different ways there are to do planetary photography including wide-angle scenic shots, prime focus, and high-magnification, high-resolution imaging. Single frame photography where one image is shot at a time, and multiple-frame lucky imaging, where hundreds or thousands of images are shot in a video are also discussed. Chapter 3 covers the specifics of actually taking images with your camera and telescope. Topics such as the importance of scope cool-down, focus, exposure and collimation are covered. Step-by-step directions are given for all of the popular planetary image capture software that records lucky images with a DSLR camera. Chapter 4 looks at the Sun and Moon and each of the planets in the solar system as well as satellites, meteors, comets and asteroids. Chapter 5 covers image processing with special lucky imaging software that will examine each frame in a video, pick out the best and stack them for the best results. We cover using each program in detail as well as post processing in Photoshop. Chapter 6 contains more than 100 minutes of video tutorials on image processing of high-resolution planetary images. The book also includes: Background I've been a professional photographer since 1976. To me, the last millennium seems like only yesterday! I actually first bought a camera to take pictures through my home-made 10 inch reflector, and fell in love with photography. I've been taking astrophotos for more than 35 years; I've had pictures and articles I've written published in books and magazines all over the world; and written 5 books on astrophotography: This book, A Guide to DSLR Planetary Imaging, is my fifth book. You can see examples of my daytime and nighttime photography on my web site at www.lodriguss.com. My First Attempts at Video Planetary Photography I've taken planetary photographs since the days of film, and even with DSLRs when I switched over to them for my daytime job of sports photography. Back then, they were all single frames, and were limited by the quality of the seeing (steadiness of the atmosphere) during the single, usually fairly long, exposure. Then web cams came along and revolutionized planetary photography. The digital sensors in them were sensitive enough so you that could use a relatively short exposure, and you could shoot many frames per second and record them in a video. This opened up the world of lucky imaging. These exact same principles could be applied when recording video with a DSLR camera when Live View was first introduced with the Canon 20Da in 2005.
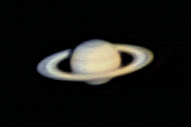
I tried recording the video from the Live View with my Canon 20Da almost as soon as I got it. I shot Saturn with my 130EDT refractor and eyepiece projection. The analog video out of the camera had to be sent through a USB converter and recorded in my computer with VirtualDub. It did work, but I knew I would be limited by only 130mm of aperture. Because I was more interested in deep-sky photography at the time, I didn't really do any more planetary photography for a couple of years. Then I bought an 11-inch Schmidt Cassegrain to shoot the small deep-sky objects on which I couldn't get enough image scale with the 130EDT. I realized that I could do much more serious planetary photography with this scope because of its aperture and focal length. At the same time I purchased a Canon T2i (550D), which had an intriguing feature - "640 x 480 Movie Crop Mode". This particular movie mode was a bit of a puzzle. The camera would record high-definition video at 1920 x 1080 pixels. 640 x 480 Movie Crop Mode used only the 640 x 480 pixels in the center of the sensor, and cropped all of the rest of the pixels out of the image around the edges. For normal daytime photography, this crop would give the apparent effect of a much longer focal length, but it would also greatly magnify any problems with focus, or movement if the camera was hand held. And the 640 x 480 image it produced in the video would really be low resolution compared to the camera's high-definition mode. The 640 x 480 Movie Crop Mode had three attributes, however, that were perfect for high-resolution planetary photography. It gave true 1:1 pixel resolution to capture the finest details in a planetary image; it was extremely low noise, and it recorded video at 60 frames per second. The latter was something that only high-end specialized planetary video cameras were achieving at the time. Now, in addition to the tremendous versatility of a DSLR in its ability to shoot normal daytime still images, as well as long-exposure deep-sky images at night, it could also shoot high-definition daytime video, and the 640 x 480 Movie Crop Mode was perfect for planetary photography. During this same time period, several different programs were released with the ability to record the Live View image directly out of the camera. This isn't something that the camera manufacturer really intended, but it was easily achieved. Recording Live View would get you 1:1 pixel resolution, or very close to it, on cameras that didn't have the 640 x 480 Movie Crop Mode. Programs already existed for lucky planetary imaging processing with videos from web cams and video cameras, and these programs will also work with videos from DSLR cameras. The Book's Format This book on CD-ROM is presented in web page format that can be viewed in any web browser such as Internet Explorer, Firefox, Chrome, or Safari. It is formatted so that pages can be printed out directly from your browser. A unique feature and advantage of this book compared to a traditional paper book is its "mouse-over" image comparisons. When a technique has a comparison between before-and-after images to illustrate it, instead of the images being presented side by side with smaller images due to the limited page width, the comparison images are presented at full-page width combined with the mouse-over feature. All the reader has to do is hold the mouse cursor over the image to see the before and after images. In this way the images can be instantly compared more conveniently and at a larger size than would have been possible in a traditional paper book. Note that you must have Javascript enabled in your browser to be able to use the mouse-over image comparisons. Links One of the features you will find in this book is live links to web pages on the internet. For example, if I mention a particular camera or accessory, I may link to a location on the internet where you can buy it or get more information about it. I think this is a very useful feature that is much easier to use than typing in a full URL from a traditional printed book. However, things change fast on the internet and frequently links will be broken for reasons such as the original authors changing their location, or re-organizing their web sites. It can be irritating when you click on a link and it doesn't work. So that presented a dilemma. Do I use live links in the book with their ease and convenience, but at the risk of broken links that will occur over time? Or do I leave them out altogether so the book doesn't appear outdated? I decided to leave the live links in, even at the risk of some of them going bad, which some undoubtedly will, because they are so relevant and convenient. Even if a link is broken, you will usually be taken to the web site's home page where you can do a simple search for the item and usually find its new location. And many of the links will remain good for long periods of time. Note that you must be connected to the internet when you click on an external link in the book for it to work. Internal links in the book, from one of the books pages to another, do not require an internet connection. A Note about Internet Explorer and Active Content When trying to view the pages of this book in some versions of Microsoft's Internet Explorer browser, You may get a warning message about active content in the information bar. A warning may also be displayed that looks like this:
Or like this:
You can click on this information bar and select "Allow blocked content" if you want to see the mouse-over illustrations and video tutorials and use the calculators, or, you can use a browser like Firefox that does not have these kinds of security problems. The "active content" that Internet Explorer is blocking are tiny snippets of Javascript that allow the images to change on mouse-overs, and other Javascript that allows the videos to play and calculators to run. This CD-ROM has been thoroughly scanned for viruses and nothing on it presents any threat to your computer. If you trust the author and publisher, please allow this blocked content in Internet Explorer, or switch to another browser. If not, please return the CD for a full refund. Acknowledgements I had a lot of help in writing this book. Everyone who helped was most kind in sharing their own knowledge and time, and I am deeply appreciative of their help. I would like to personally thank the following friends for their help: I would also like to thank my wife, Kathy, for her limitless support and love, and my two sons, Brandon and Michael, for their technical help and expertise. |
||||
|
Back | Up | Next |