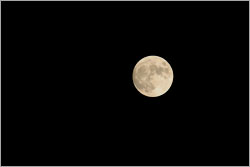
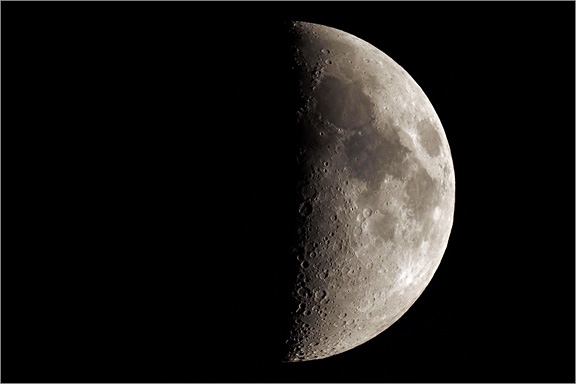
The full Moon is a bright easy target for the beginning astrophotographer. You will need a little bit longer focal length to get a reasonably large image size of the Moon so you can see some detail on it. The full Moon is so bright, you don't even need a tracking mount to stop its apparent motion across the sky due to the Earth's rotation. Normally, as you increase the focal length, objects will trail and become blurry in a longer exposure. But the exposure for the full Moon is so short this is not a problem. The photo at right was shot with a 1/1000 second exposure at ISO 400 at f/6 with a telescope on a fixed tripod. The full Moon is so bright because it is illuminated by direct sunlight. At full Moon on the side of the Moon facing the Earth, it is just like noon on the Earth. And the exposure is almost exactly the same. We can use the old rule of thumb for a sunlit exposure on the Earth, 1/ISO at f/16. This is called the "Sunny 16 Rule". It means to set the shutter speed to the same number as the ISO you are using, and shoot with the aperture of your lens set to f/16. For example, if you are shooting at ISO 400, you would set your camera to 1/400th of a second exposure at f/16. These days, no one calculates exposures like this anymore because they just use autoexposure on their camera. But autoexposure won't work for most astronomical subjects. It usually won't work for the Moon unless you have so much focal length, the Moon completely fills the frame. When the Moon is smaller than full frame, its brightness in a black sky fools the camera's meter. You will usually have to use manual exposure when shooting the Moon. The good thing about DSLR cameras is that you can shoot a test exposure and look at the results on the LCD on the back of the camera. Reality vs. Perception Although the full Moon appears brilliant when it is high in the sky, in reality, it is made of very dark material. The Sunny 16 rule will give the correct technical exposure for the full Moon, but it will usually appear too dark. Our subjective impression of the Moon is not that it is dark though, it seems very bright. This is because we usually see it in a black sky, which makes it seem much brighter, like a spotlight in the dark. If we want to adjust the exposure for our subjective impression of the Moon, we need to expose longer and make it brighter. So we can modify the "Sunny 16" rule for the Moon and call it the "Looney 11 Rule". "Looney", in this case, being a play-on-words for "Lunar", referring to the Moon. Opening up the aperture from f/16 to f/11 makes the image one stop, or twice, as bright. So if you shoot at ISO 400, with the "Looney 11" rule, you would use an exposure of 1/400th second at f/11. Hopefully, your telescope doesn't have a focal ratio of f/11. I say hopefully, because f/11 is very slow for long-exposure deep-sky astrophotography. Whatever the focal ratio of your telescope is, you won't be able to change it like you can change the f/stop on a camera lens. If it is f/6 or f/8, you won't be able to change it to f/11. To compensate for whatever your scope's focal ratio is, you can just change the shutter speed. If your scope is f/6 like mine, that is about 2 stops faster than f/11. So just change the shutter speed by two stops faster to compensate. In our example of 1/400th second at f/11 at ISO 400, you would change the shutter speed to 1/1600 second at f/6. You can shoot at any combination of shutter speed, and f/stop that will give you an equivalent exposure. Shutter speed, and f/stops are directly related in terms of exposure. If you make the shutter speed longer by one stop, and you close the f/stop by one stop, you will get the same exposure. As you let more light in with a longer exposure, you compensate for that with a smaller aperture which lets less light in. Likewise, you can use a faster shutter speed with a wider aperture. The Quarter Moon The first quarter Moon is another very easy target for astrophotographers. Like the full Moon, it is bright enough to be shot with just a telescope on a fixed tripod.
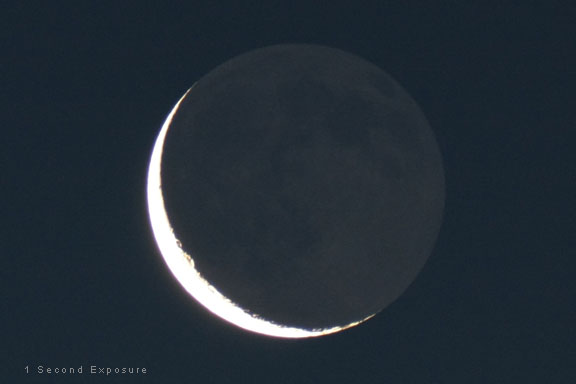
The first-quarter Moon looks like a half Moon. Yes, that is confusing! In this case, the quarter represents the Moon one quarter of the way through its phases and its orbit around the Earth. Also, although it appears that we are seeing half of the Moon, we are really seeing only one quarter of it, because there is another half of the Moon on the far side that we never see because the Moon is tidally locked with the Earth. Although the Moon does rotate on its own axis, because it is tidally locked, it makes one rotation at the same time it makes one revolution around the Earth, always presenting the same face to us. For a full Moon, we are seeing only half of the Moon, the near side. For a first-quarter or third-quarter Moon, we are seeing only half of the front side in sunlight, which is one quarter of the entire Moon. As the Moon orbits around the Earth, its position in relation to the Sun changes. When it appears nearest to the Sun in the sky, the back side of the Moon that always faces away from us is illuminated, but we can't see it, so the Moon is essentially invisible to us. This is called a "new" Moon, and the phase cycle begins. The Moon then goes through a waxing crescent phase where the crescent gradually gets bigger until it reaches it's first-quarter phase. At first quarter, the Moon is directly illuminated by the Sun, but the Sun is at about a 90-degree angle between the Moon and our viewing position. The first-quarter Moon rises around noon, and is overhead in the sky at sunset, and sets at about midnight. The Moon then goes through its waxing gibbous phases until it reaches full Moon, about two weeks after the start of the cycle. At full Moon, the Moon is directly illuminated by the Sun face on, which is 180-degrees opposite it in the sky. Full Moon rises when the Sun sets in the evening, and sets when the Sun rises in the morning. Full Moon is halfway through its cycle of phases. After its full phase, the Moon wanes gibbous until it reaches third quarter. At third quarter, the Moon is again illuminated by the Sun at a 90 degree angle, but this time the opposite half of the Moon is illuminated from first quarter. The third-quarter Moon rises at midnight and is highest in the sky at dawn, and sets at noon. Finally, after third quarter, the Moon is a waning crescent, and about 29 and a half days after the beginning of the cycle, new Moon occurs, and the cycle starts over as the Moon is born new again. Because the first-quarter and third-quarter Moons are lit from the side, they require more exposure than full Moon when the Moon is fully illuminated directly from the front. In general, you will need about two stops more exposure, so the Looney 11 rule can be modified to the Looney f/5.6 rule for first and third quarter. The brightness of the Moon can, of course, be affected by atmospheric conditions, as well as the Moon's elevation above the horizon. When the Moon is low on the horizon, its light passes through more of the Earth's atmosphere and more light is absorbed, dimming the brightness. You will have to increase the exposure under these circumstances. Again, shoot test exposures to figure out the best exposure for the conditions you encounter. Although exposures for a quarter Moon are a little longer than those needed for a full Moon, they are still short enough so that a tracking mount does not need to be used to prevent blurring from the Earth's rotation. Crescents and Earthshine When the Moon reaches a thin crescent phase, you will have to increase the exposure even more to correctly record detail on the sunlit crescent portion of the Moon. For a thin crescent Moon, try about a 1/60th of a second exposure at ISO 400 at f/6. Compare this to the 1/1600th second exposure needed for a full Moon at the same f/stop and ISO. That is about four stops more exposure for the crescent.
When the Moon reaches a thin crescent phase, a beautiful phenomenon of Earthshine can be observed and photographed. To record Earthshine, you will need a much longer exposure than the one you used for the sunlit crescent. Earthshine is much fainter because it is reflected, and not direct sunlight. A general rule of thumb for Earthshine is that you will need about a 1 second exposure at f/2.8 to f/4 at ISO 400 to record it. This is six stops more than the correct exposure for the sunlit crescent. This causes the crescent to be overexposed if you want to record the Earthshine. The exposure for Earthshine is 11 stops, or 1600 times, fainter than the exposure for a full Moon in direct sunlight. At a long focal length, a one-second exposure is about as long as we can go before we will start to get blurred images from the Earth's rotation. Anything much longer than this will need a tracking mount. The Sun The other large brilliant thing up there in the sky that is easy to photograph is the Sun! The Sun is, of course, the nearest star. It is 93 million miles (147 million kilometers) away, and it takes the light about eight minutes to reach us. Compare this to the next nearest star, Proxima Centauri, which is so far away it takes the light more than four years to reach us. The Sun is so bright, it is, in fact, dangerous. To take pictures of the Sun, you must use a proper, safe, solar filter. There is no fooling around here. And you must make sure that your solar filter is permanently attached to your telescope so that it won't accidentally fall off, or get blown off by the wind, while you are looking through your scope taking pictures.
A very good, and perfectly safe solar filter that is great for photography of the Sun is the Baader solar filter. This image of the Sun was made at the solar minimum part of the 11-year solar cycle. In 2009, the Sun was in the middle of a longer-than-normal solar minimum when there had been no sunspots for very long periods of time. Sunspots are areas of the Sun's photosphere that are cooler than the surrounding regions. Cooler being relative in this case, with the sunspot having a temperature of about 3,700 degrees Kelvin, about 2,000 degrees cooler than the rest of the solar surface. Sunspots only appear dark in contrast to the rest of the brilliant surface.
|
||||||||||||
|
Back | Up | Next |