Digital cameras count photons of light and turn them into numbers. Because they can accumulate photons over time in long exposures, they can record very faint details, such as those found in deep-sky astronomical objects like nebulas and galaxies. This is what makes DSLR astrophotography so magical - we can take pictures of the wonders of the universe that, in some cases, are too faint to be seen vidually even with a telescope. In this book, I will explain the basic equipment and easy methods that work to produce successful astrophotos. You will learn exactly what to do to begin in astrophotography and how to advance up the learning curve.
Basic Equipment for Astrophotography
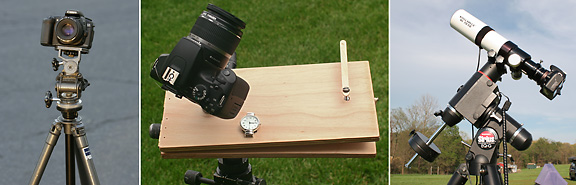
Almost all of the photos in the book were taken with the very modest equipment seen in the images above.
All you need to get started is a camera, lens and tripod. If your budget is restricted, you can even get into longer exposures that track the stars to compensate for the Earth's rotation by building a homemade barn-door tracker for almost nothing. I present the images in this book as realistic examples of what you can produce as a beginner. Many of them are single exposures straight out of the camera with no special processing. Later in the book I will show you what can be done with more sophisticated techniques that you can learn. This will show you what is possible, and give you something to aim for. Recommended Equipment If you already have cameras and telescope equipment, start with what you have. If you don't have anything, I will recommend equipment that is proven to work. It won't be the cheapest stuff out there. A minimum investment is required to be successful without frustration and waste of money. If you buy inferior equipment to start with just because it is the cheapest, you'll end up having to replace it later anyway, so this is false economy. Don't go out and spend a lot of money on the latest and greatest gee-wiz high-end equipment like a computerized GPS-enabled Go To telescope on an altazimuth mount that will automatically align and calibrate itself. Don't go out and buy a Dobsonian for astrophotography. Even though you can get these types of scopes that are good for visual work, they are not very good choices for astrophotography. I will tell you exactly why in this book. You can also save money by buying good used equipment on the classified ad sections of the web sites of AstroMart or Cloudy Nights. If you can't afford decent equipment to start with, don't buy anything. Save your money. Study and learn more about astrophotography while you use your camera on a tripod or a barn-door tracker. If you ask around for opinions on what is the best hardware to use for astrophotography, you will probably get many different answers. People tend to recommend what they have themselves because it is what they are familiar with, but that doesn't make it the easiest equipment to get started with, or the right equipment for you. If I recommend a small refractor as the best scope for a beginner in astrophotography, you will undoubtedly be able to find someone who started out with a big Schmidt-Cassegrain. This was probably a scope they originally bought for visual work and then started shooting with when they got bit by the astrophotography bug. They may have ultimately had some success with it for astrophotography, but you can bet it didn't come easy. And people like this are the rare exceptions that prove the rule. I'm recommending a small refractor because I want to make it easy for you! Zen and the Art of Astrophotography Astrophotography is a holistic endeavor in that you must first master all of the parts of the craft to be successful. If any one thing, such as focus or tracking, goes wrong, the image can be ruined. To become an advanced astrophotographer, you must master the basics first. Things like focusing and determining the correct exposure are fundamental, but can seem surprisingly hard when you are first starting out. I will show you easy ways to do these tasks. More advanced astrophotography can be a challenging undertaking. Deep-sky astrophotos attempt to image very faint objects such as nebulas and galaxies that move across the sky continuously because of the Earth's rotation. To get good results with these faint subjects, long exposures are required, and the objects must be tracked to compensate for the Earth's rotation. I will explain how to do this in the easiest way possible. I'm going to suggest equipment and procedures that will put you in a position to be successful and take great astrophotos. When it comes to astrophotography, you can learn a tremendous amount from reading, but the best way to truly learn is by getting out there and actually doing it yourself. That, however, doesn't mean that you have to re-invent the wheel and repeat every common mistake ever made. I will tell you how to avoid most of them. Anyone with a DSLR can get started in astrophotography with very modest equipment. After reading this book, you will be able to take remarkably beautiful images of celestial objects, even if you don't know a lot about astronomy or photography when you start!
|
|||||
|
Back | Up | Next |