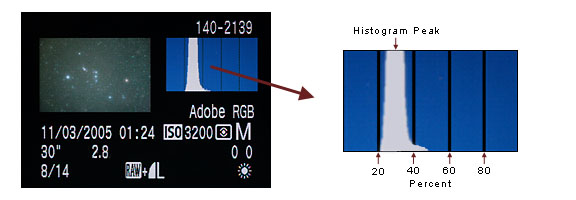
If you have an equatorial telescope mounting, you can attach your DSLR camera and lens to it and take longer exposures. Usually the camera is mounted on "piggy-back" on top of the telescope. A ball and socket head can be used so that the camera can be aimed in a different direction from where the telescope is pointing. The mount should be polar aligned, although the accuracy of the alignment is not extremely critical depending on the focal length of the lens and length of exposure of the image. If the resulting pictures show stars that are trailed in what seems to be arcs at the edges of the frame, this is called field rotation and more accurate polar alignment is needed for that particular focal-length and exposure. Most lenses don't work very well on stars when used wide open at their fastest aperture. The standard 50mm lens that came with most film cameras may be as fast as f/1.4 or f/1.8. These can be stopped down two stops to f/2.8 and will produce decent stars and are still fast enough to use exposures of 30 seconds to a couple of minutes. Many digital cameras come with zoom lenses in the 18mm-55mm range, but they have smaller apertures, usually around f/4 to f/5.6. You can try using them wide open, but they will probably have to be stopped down a bit for best performance. Unfortunately, when stopped down, these slower f/stops will require much longer exposures. You can determine the correct exposure for your observing site by making a series of test exposures and examining the results on the LCD on the back of the camera. Look at the image, and also at the image's histogram on the LCD. Most DSLR cameras have a setting that allows the histogram to be viewed. A histogram is a bar graph that displays the number of pixels at each brightness level in an image. Black is on the left-hand side of the graph, and white on the right-hand side. Shades of gray run in between. Most of the pixels in an image are from the sky background and look like a kind of "mountain" on the histogram. If your image is underexposed, this mountain will bump up against the left-hand side of the histogram. If it is overexposed, the mountain will bump up against the right-hand side of the histogram.
Expose long enough so that the sky is not black, and the peak of the mountain of the histogram is about 20 to 40 percent of the way from the left to the right. This particular image display seen above was for a shot of the constellation of Orion. It shows the image and the image's histogram, along with pertinent data. From the top, the data displayed is:
Barn-Door Mounts If you don't have an equatorially mounted telescope, the easiest way to take longer exposures with wide angle lenses is with a simple "Scotch", or "barn-door", mount. This consists of two pieces of wood that are hinged together. The hinge acts as the polar axis of the mount and must point at the north celestial pole. This can be accomplished crudely by simply sighting along the edge of the hinge and pointing it at Polaris. A more sophisticated method involves use of a small finder telescope that is aligned with the hinge axis. A screw, located at a precise distance from the hinge, is used to raise one of the boards that tracks the stars in right ascension. The number of threads per inch on the screw, determines the distance from the hinge, as well as the number of turns required per minute to track the stars. A simple barn-door mount can enable exposures of several minutes with short focal length lenses. More complicated designs can extend the exposure time even more. A simple hand-driven barn-door mount can be constructed out of readily available materials that are very inexpensive, and does not require sophisticated tools or machinery to construct. You can also find plans and parts list for a more accurate motorized curved-bold barn-door mount by Gary Seronik. |
||||||
|
Back | Up | Next |