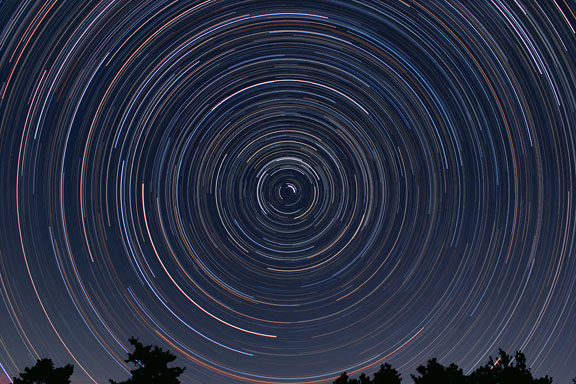
Star trails are the easiest kind of night astrophotography to get started with. In addition to demonstrating the Earth's rotation, they can be amazing and beautiful! In the days of film, one long exposure, sometimes up to several hours in length, was made. Today with digital cameras, we need to make a series of short exposures, each several minutes in length, and composite them together to get nice long star trails. The length of the star trails depends on how long the shutter is open, or how many individual short exposures you composite together. In 24 hours (23 hours 56 min 04.0905 seconds to be exact)the stars make one revolution around the celestial pole. If the daylight didn't interfere and you exposed for 24 hours, the each star would make a complete circle of 360 degrees around the celestial pole. In 12 hours, each would make a half circle of 180 degrees, and in 6 hours, a 1/4 circle of 90 degrees. With traditional film cameras, taking star trail photos could not have been simpler. You just put the camera on a tripod, focused the lens on infinity, locked open the shutter and exposed the film for a couple of hours, depending on the darkness of the sky at your observing location. With digital cameras, it is a little more complicated because of the thermal noise that is generated inside of the camera during long exposures. The problem is that this thermal noise builds up to unacceptable levels in digital cameras when the exposures go too long. How long depends on the inherent noise in the individual camera and the ambient temperature. Even the best digital cameras can't go for the multiple-hour exposures that can be taken with film cameras. This thermal noise will usually limit exposures to about 5 to 10 minutes. Tricks of the Trail If you want really long star trails, there is a trick to get around being unable to shoot long exposures. You simply shoot a lot of short exposures and then easily combine them in Photoshop, or use freeware programs like StarTrails or StarMax to combine the images. StarTrails will composite all of the short exposures together automatically. In Photoshop you will have to combine all of the short exposures manually. Place them one on top of another as a layer, with each layer set to "lighten" as the blending mode. In the photo above, with the camera on a fixed tripod, six 8-minute exposures were made with a Canon 1D Mark II digital SLR camera with a 16 -35mm zoom lens working at 16mm at f/2.8 at ISO 400. Because the camera is pointed north, and because the Earth rotates on it's own axis, during the exposure the stars seem to revolve around a point in the sky very near to Polaris. This point is called the North Celestial Pole, and it is coincident with the Earth's axis of rotation. Of course, you don't have to point the camera north, you can point it anywhere in the sky you like. If you point it east in the winter, you might record something like Orion rising on the horizon. Also, if you put something in the foreground, such as an observer or telescope, the photo will be that much more interesting. Camera - You only need a camera which has a shutter that can be locked open for several minutes. This usually means you won't be able to use a point and shoot digital camera, whose exposures are normally limited to 15 to 30 seconds at most. Check your camera's instruction manual, to find out what is the longest exposure it is capable of. You will probably need a camera with a "bulb" setting which holds the shutter open for as long as the shutter release is pressed. However, even if you can only shoot 30 second exposures, you may still be able to shoot star trails if you can find a way to automate the exposure series and take a lot of exposures. Batteries -Cold kills batteries. Your camera's shutter only stays open by battery power, so make sure you have fresh batteries in your camera before getting started. Remote Release - You will need a cable release to lock the shutter open during the time exposure. These days this is usually a proprietary device made by your camera manufacturer, although with some cameras, such as the Canon Digital Rebel, you can easily make your own with a simple switch and mini-phono plug. Other cameras, such as the Nikon D70, will only work with an infra-red remote release. Again, check your camera manual to see what you need. Canon also makes a more sophisticated remote release called the TC-80N3 that has digital intervalometer capabilities built into it. You can also get a cheap Chinese clone from Aputure on Ebay for about $50 (Search for "Aputure timer remote" on Ebay). This means that you can set one of these to take any number of exposures, at any length exposure time, at any interval, automatically. This kind of automatic programming ability comes in very handy when attempting to take multiple-hour exposures with a series of 5-minute sub-exposures. It is also possible to automate the exposure sequence with software that controls the camera such as Images Plus, and DSLR Focus, but you will need a computer for to do this. For the latest generation of cameras, the manufacturer's software should also allow you to do this with a computer. Tripod - You don't absolutely need a tripod. You can use a bean bag placed on a sturdy surface, like the ground, or a picnic table, or the roof of your car. Don't lean on the car or get in it, or open or close the doors during the exposure though because if the camera moves during the exposure, the stars will move too, and will record as squiggly lines and not as nice, aesthetically pleasing, straight lines. It will be more difficult to successfully accomplish a large series of exposures by hand if you're not using a remote release. If you do have a tripod, use it. Lens - What kind of lens should you use? Well, the one you have, of course! Any lens will work for star trail photos. Wide angle lenses can work especially well. Aperture and Exposure and ISO - The exposure length will be determined by the darkness of your site, and the ISO you are using, and the f/stop of the camera lens. For film, if you wanted to shoot really long exposures, you needed a really dark site and a night when the moon will not be up during the exposure. The cool thing about star trails with a digital camera is that the sky can be relatively bright, but you will still be able to create an image with long trails. Each sub-exposure should be exposed long enough to put some color in the sky, but not long enough to overexpose it. This sky brightness will then stay the same when the individual sub-exposures are combined. To determine the correct exposure for a given combination of aperture and ISO settings, take a test exposure and look at the histogram on the back of the camera. A good exposure to aim for will be when the peak of the "mountain" of the histogram is about 1/3 to 1/2 of the way from the left hand side of the histogram to the right. The first time you go out, try shooting a series of different exposures at about ISO 400: 30 seconds, 1 minute, 5 minutes, and 10 minutes. Note the temperature at which you made the photos. Then examine them later on your computer at high magnification, and see which one's noise you can live with. When ambient temperatures are very cold, you can get away with longer exposures. Also, try shooting these test exposures at different apertures, starting with the lens' widest and fastest setting, usually f/2 or f/2.8. Then shoot some more test exposures stopping the lens down one stop, and some more stopping the lens down two stops. The lens' optical performance will get better as you stop it down, but it will also not be able to record as faint stars. If you have a decent lens, you will probably be able to use it around f/2.8. Remember that every time you stop the lens down one stop, you have to double the exposure. Experiment with different ISOs in the camera. When you get back home and are examining these test exposures, you will find a compromise between the amount of noise, the best lens performance, and the faintest star trails that are recorded. Information such as exposure length, aperture and ISO will be recorded in each file's EXIF data that is saved with the file. This information can be read in Photoshop under File > Info, or in a great little program called EXIF Reader which you can download for free. These parameters will be what you use the next time you go out to shoot some star trails to get the best results. If you are shooting from a site with light pollution, the length of your exposure will be limited by how bright the sky is. You can only find out by doing some test exposures. Stopping down the lens does not really solve this problem, because as you stop the lens down you will record less faint stars, no matter how long you expose for. Luckily, once you have determined your optimum exposure so that the sky fog from light pollution is not so bad, you can get the equivalent of much longer exposures by stacking many shorter ones. This is one tremendous advantage that digital has over film star trails. When shooting a lot of short exposures, it is important to minimize, as much as possible, the time between exposures when the shutter is closed. These times when the shutter is closed will result in small gaps in the star trails once you composite them together. The shorter the time that the shutter is not open, the smaller the gaps will be. In most cases, unless the gaps are large, they will not be that visible unless the image in enlarged considerably. Minimizing these gaps is made much easier if you use something like Canon's TC-80N3 remote release. It can be programmed to take pictures one after the other, with the shutter closed for only a minimum amount of time. Exposure Suggestions - Try these combinations of exposure, aperture and ISO as starting points: For a bright sky location with a lot of light pollution, such as downtown in a city, you may only be able to record the brightest stars with exposures of about 30 seconds at ISO 200 at f/2.8. For a suburban location with a little darker sky, try exposures of one to two minutes at ISO 200 at f/2.8. For a dark sky location, far from city light pollution where you can see Milky Way, try two to five minute exposures at ISO 400 and 800 at f/2.8. Experiment! The great thing about digital cameras is that you can get immediate feedback. You can try a lot of different things because it doesn't cost anything to shoot a lot of test frames that will allow you to learn by trail and error. In-Camera Noise Reduction - Some cameras have built in noise reduction for long exposures. This usually works by the camera taking a "dark frame" - an exposure at the same length as the regular picture, and then subtracting it. Since the thermal signal stays constant from frame to frame at the same temperature, this procedure can reduce the thermal signal in a long exposure. The problem for star trail pictures is that if you shoot a 5-minute light exposure, and then the camera closes the shutter and takes a 5-minute dark exposure, you will have very large gaps in your star trails. It's best to turn off the camera's built-in long exposure noise reduction if you are talking star trail pictures, and just live with the noise. Or, you can take your own dark frame by using an exposure of the same length, making sure the lens and viewfinder eyepiece are completely covered so no light can get in. Then you can subtract this dark frame yourself from each individual light frame later in Photoshop or another image processing program such as Images Plus. Focus - Make sure you focus the lens at the infinity setting. But beware, many of the new autofocus lenses focus past infinity and this is not as easy as it sounds. Auto-focus usually won't work with any kind of short focal-length lens for star trail pictures, although if you are lucky, the autofocus may automatically stop at the infinity position if the camera cannot determine focus. But, don't count on it. The auto-focus sensor needs a subject of sufficient brightness and contrast to focus. A night sky full of tiny points of light usually doesn't work very well. Auto-focus might work with a short focal-length lens if you have an object like the moon, or a really bright planet. You can try it, and check the focus by enlarging the image on the LCD on the back of the camera. Another method of focusing with a wide-angle lens is to auto-focus during the daytime on an object that is really far away. Then, carefully tape down the focus ring, and turn autofocus off on the camera or lens. You can also focus by shooting some test exposures to see what setting gives the smallest width star trail if your lens focuses past infinity. Start out with the lens on the infinity setting and shoot a test exposure there. Then nudge the lens' focus just the smallest amount you can towards closer focus. You can tape a small index scale onto your lens to help note the position of focus. Repeat this a couple of times, making notes as to where the lens was set for each frame. Then move the focus back to the infinity mark, and move it in small increments for each test exposure in the direction past infinity. It helps to always approach your final focus position by turning the focus ring in the same direction. Then examine your text exposures and enlarge them on the LCD on the back of the camera and find the one with the sharpest stars, and use that focus position. If you have one of the latest generations of DSLRs, you can use the real-time Live View video mode at high magnification to focus on a bright star. Whichever method you use, when you have achieved correct focus, tape the lens focus ring down, and disable the camera or lens' autofocus setting. Miscellaneous Stuff
|
||||
|
Back | Up | Next |