Do not use any solar filters that come with "department" store refractors that fit in the eyepiece, these are extremely dangerous. Stacking several neutral-density filters in front of your lens is NOT SAFE for observing or photographing the Sun. You MUST use proper, safe, special solar filters. Safe Solar Filters Proper, full-aperture solar filters that fit in front of the main objective of the telescope or camera lens, that are of excellent optical quality, are made by several different manufacturers. They are available in glass, coated mylar and a new, high-strength polymer. The best and least expensive of these is the new high-strength polymer filter that is made by Baader in Germany. These Baader solar filters can be obtained from a variety of sources both in the United States and around the world.
When using these filters it is extremely important to secure them to the telescope so that they can not accidentally come off while you are looking through the telescope. Wind gusts can easily blow a filter off, not to mention Murphy's law. Be sure to lock down the filter, or tape it down so that it absolutely can not come off while you are observing or photographing the Sun. Shooting the Sun The Sun is the closest star to the Earth. Because it is so bright, it is easy to photograph with the correct filtration. It is also the same apparent size as the Moon. You can use the same rules of thumb for image size in the frame. The Sun will be about 1mm in size at the focal plane for every 100mm of focal length you use. With a full-sized, 35mm film-equivalent sensor that is 24mm x 36mm, you would need about 2,400mm to fill the frame on the short side with the solar disk. For a digital camera with a smaller 15mm x 22.5mm sensor, you would need about 1,500mm of focal length to fill the frame. To photograph the Sun, you don't absolutely need an altazimuth or equatorial telescope mounting that compensates for the Earth's rotation. But using one will make solar photography easier by keeping the Sun inside of the field of view of your camera, especially at long focal lengths. Getting the exposure correct for the Sun is pretty much the same as for the Moon, especially if you have a lot of focal length. Try an exposure at the camera's meter reading with spot metering if your camera has this. With a digital camera it is easy to examine the result and adjust the exposure accordingly through a process of trial and error. You may think that you can shoot the Sun without any filtration when it is high in the sky by just using a low ISO, stopping down the lens and using the highest shutter speed. You can't. The Sun is too bright when it is high in the sky to achieve the correct exposure without a special, safe, solar filter. DON'T EVEN TRY IT. You certainly can not look through the camera to try to focus it because camera's lens leaves the aperture wide open for focusing and the aperture of the lens will gather even more light than your eye normally does, concentrating the Sunlight and making it extremely dangerous to both your eyes and your camera. If you focus the camera on infinity while not pointed at the Sun, say on a distant object in the landscape, and then point the camera at the Sun, you run the risk of the concentrated sunlight burning a hole in shutter and damaging the digital sensor if the mirror is locked up. If you are going to be shooting at long focal lengths, you will have a lot of magnification and any movement of the camera and scope will be exaggerated. Be sure to shoot on a very sturdy tripod if you are using a lot of magnification. If you have a camera that allows the mirror to be locked up before the shutter opens, this can also help to reduce vibrations that can hurt sharpness in the final image. Solar Color Balance Over the course of millions of years of evolution, human eyes developed under the illumination of the Sun's light. They have therefore evolved to see the light from the Sun as white or neutral. Our mental concept of the Sun may be that is a giant red or yellow ball that we see at sunset or sunrise. This is how we have seen the Sun portrayed in countless photographs. It is very pretty this way, and it is what we have come to expect. But we see the Sun as red or yellow only when it is low on the horizon and filtered by the Earth's atmosphere. Because we are actually looking through much more of the Earth's atmosphere when an object is near the horizon than compared to when it is overhead, more of its light is filtered out. The atmosphere filters out the Sun's blue light and air molecules scatter this light. This is why the clear sky is blue in the daytime. When the blue light is filtered out, it leaves mostly the red and yellow light to pass through the atmosphere. This is why we see the Sun are red or yellow when it is rising or setting near the horizon. When the Sun is high in the sky, it is not passing through as much atmosphere as when it is on the horizon, and it shines at full brilliance. It is so bright that we can't even look at it without damaging our eyes. But if we could somehow cut its intensity with a truly neutral filter, we would see that it is white. Since our eyes evolved to see this light as our primary light source, by definition it is white light, a combination of all of the colors of the visible spectrum from the Sun.
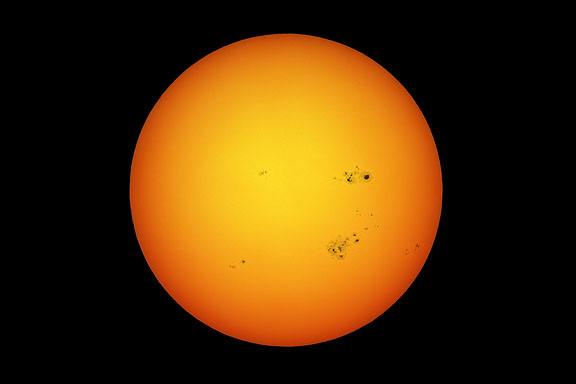
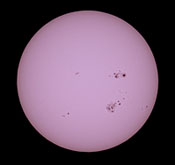
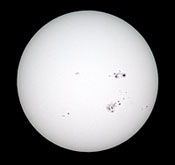
The problem in photographing the Sun with a safe solar filter is that these filters usually change the neutral white color of the Sun somewhat. Different type of filters made by different manufacturers will change the color slightly differently. When a digital camera is used with these filters and it is set to daylight color balance, the Sun will not come out white. This can be easily corrected by doing a custom white balance in the camera, or by adjusting the color balance later in Photoshop. In these examples, the first image is what the Sun looks like when shot through a Baader Solar Filter with the DSLR camera's color balance set to daylight when the Sun is high in the sky. Technically this setting in the camera should record the Sun's color correctly, but the filter changes the color balance. The second image is color corrected in Photoshop with a simple auto-levels adjustment. It shows the Sun as white, which is its true color. The third image is "colorized" in Photoshop. It presents a technically inaccurate color image of the Sun, but one that is perhaps more aesthetically pleasing because the color adds excitement and it is more what we expect.
Recommended Exposures for a Total Solar Eclipse shooting at ISO 100
I suggest starting at 1/2000th of a second exposure at f/8 at ISO 100 (or the equivalent for whatever f/stop you are shooting at) for the Diamond Ring and Bailey's Beads at second contact. Then methodically increasing your exposure by one stop increments until you reach your longest exposures at mid-totality. Then start increasing your exposures, again by one stop increments, until you reach 1/2000th of a second at f/8 for ISO 100 for the Bailey's Beads and Diamond Ring at third contact at the end of totality. This exposure series can then be digitally composited together to reveal the full majesty of the corona during totality. You can go longer at mid-totality to record maximum corona if you have a wide enough field of view, and possibly even record some Earthshine on the face of the moon if you are extremely lucky. For other ISO's simply multiply the exposures, for example, if you need 1/500th second at f/8 at ISO 100 for prominences, but you want to shoot at ISO 200, just use 1/100th second at f/8. Remember that with DSLR Cameras, the dynamic range goes down as ISO goes up, so shoot at ISO 100 if possible. Shoot Raw file format if possible. Make sure you have a fast memory card for your camera, and also one with a large enough amount of memory to hold all of the frames that you will shoot during totality. You do not want to be changing cards during totality. Consider automating the entire image capture sequence with a program like Images Plus during totality so that you can observe the eclipse visually. If you shoot with a safe solar filter during the partial phases, be sure to remember to remove it just before totality, and to replace it just after the end of totality. Don't forget to focus on the Moon's limb just before the start of totality. Do this through your safe solar filter. Since the filter is in front of the main objective, the focus should not change when it is removed for totality.
|
|||||||||||||||||||||||||||||||||||||||||||||||||
|
Back | Up | Next |