Signals
Signal Modifications
Noise
Improve the Signal-to-Noise Ratio With More Exposure
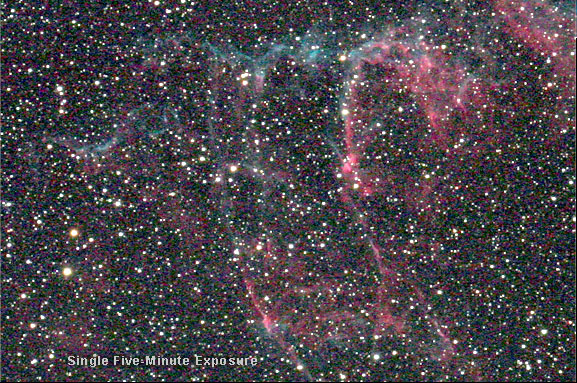
Here two images can be compared to see the effects of additional exposure time. One is a single five-minute exposure. The other is an average of 25 exposures for a total of 175 minutes of exposure time. Both were shot at ISO 1600 at f/6. The single five-minute exposure has had its brightness and contrast increased to make it match the 175-minute stacked image. It is easy to see the incredible difference that more exposure makes. More exposure gathers more photons, increasing the signal-to-noise ratio, revealing more stars and fainter nebulosity. Remove Thermal Current Signal by Subtracting a Master Dark Frame
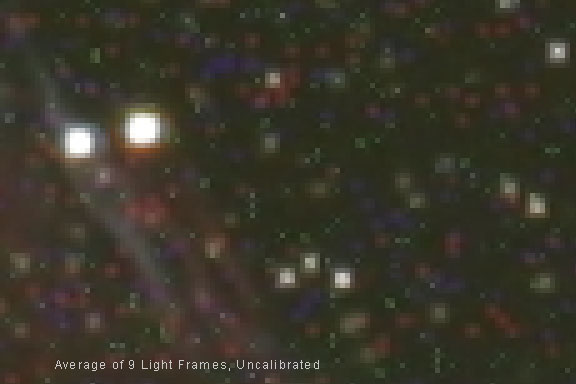
The image above is a composite of 9 five-minute exposures at ISO 1600 and it shows a significant amount of thermal current signal generated by heat in the sensor's silicon substrate, as well as bias signal. Both were removed by subtracting a master dark frame composed of 9 five-minute individual dark frames. Sky Background Signal Subtracted Out, Vignetting Corrected
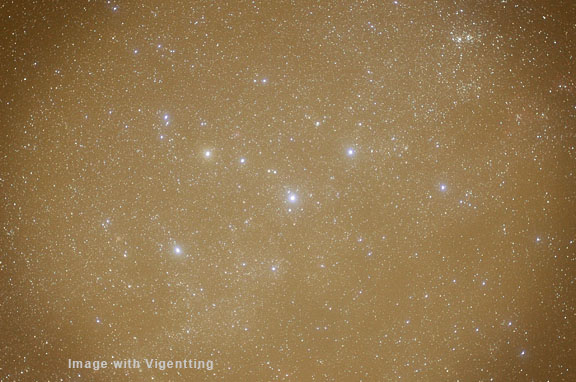
This example shows how the skyfog can be subtracted out, and vignetting and light-pollution gradients corrected with the proper image-processing software filtering techniques. The sky background was subtracted by adjusting the black point in Photoshop's Levels, and vignetting and light-pollution gradients were removed with an application of the GradientXTerminator filter. The uneven dark areas remaining in the image are actual dark nebulae in space. Dealing with Noise The number one rule to beat noise is to gather more signal. Noise is always present in the images that we take. Photon noise, dark noise and readout noise can never be removed from an image. However by increasing the number of photons gathered, we can increase the signal-to-noise ratio and improve the image. This is done by shooting the longest exposures as possible for a given set of conditions and then combining as many of these long exposures as possible. With short exposures of dim subjects, not many photons are collected, and dark current noise and readout noise dominate the image. If a number of short exposures are added or averaged together, the dark noise and readout noise will add together. This is why it is critical to increase the exposure to where photon noise dominates. Photon noise can be dealt with by increasing the signal-to-noise ratio by gathering more photons. Dealing with Unwanted Signals with Calibration Frames
For most non-scientific, pretty-picture astrophotography, all we need to vastly improve our pictures are dark frames. Because a dark frame contains a bias frame, we don't really need to shoot separate bias frames. We only need to shoot bias frames if we want to create a scalable master dark frame that can be used for different exposure times. Scalable master dark frames will be discussed in a later section. Vignetting and uneven illumination in the optical system can be corrected by generating a master flat-field frame. If we shoot where light-pollution gradients are a problem, we will probably have to use something like GradientXTerminator, or ABE, to remove the gradients, and in this case, we can skip a flat field frame as vignetting will be corrected at the same time. If we create a master library of dark frames taken at different temperature ranges, we don't even have to shoot dark frames each time out. It is highly recommended to use clear dark sky time shooting deep-sky objects and gathering object signal. Use cloudy nights to shoot dark frames to make a good master dark frame. Data and support frames:
In-Camera Dark Frame Subtraction Some cameras, such as Nikon and Canon, offer in-camera noise reduction as a custom function that basically works the same way as manually subtracting a dark frame. After the light frame exposure is made, the camera closes the shutter and takes another exposure of the same length, and then subtracts it from the light frame during processing in the camera before the file is written. In-camera noise reduction can work well, but at the cost of doubling the exposure time of each individual light frame. This wastes precious clear-sky time that can be used for gathering photons. Also, a larger amount of dark noise is added to the light frame with this single dark-frame method than with use of a master dark frame made up of an average of a number of individual dark frames. Another variation offered by some cameras is to take a single dark frame and store it in the camera's memory, and then to use it for all subsequent light frames shot at the same exposure. The problem with this method is that the exact same dark noise is added to each light frame when the dark frame is subtracted. Then when multiple light frames are composited together, this dark noise adds, making it a less than attractive method of thermal current removal than shooting multiple dark frames separately to create a master dark frame that is subtracted from each individual light frame. This in-camera, single frame method of dark frame subtraction will also be applied to a raw frame, making it not really "raw" anymore. If calibration with a master dark frame is planned, then in-camera, long-exposure noise reduction should be turned off. Controlling Sources of Heat Thermal current signal and its associated noise increase as the internal temperature of the camera goes up during operation. Astronomical CCD cameras use active cooling to reduce this effect. Astrophotographers who use DSLR cameras can also attempt active cooling by placing ice packs around the camera body during exposure, although this method can lead to moisture condensation inside of the camera body in humid climates and is not recommended. Other active cooling methods, such as blowing air onto the camera body with a fan have been found to be remarkably effective and are recommended. Shooting in cooler ambient temperatures can also reduce thermal current signal. Images made during the winter will naturally suffer from less thermal signal than those made in the summer. Passive methods of controlling heat buildup can also be employed, such as pausing for a time between exposures to let the camera cool down. This method, however, wastes precious clear-sky time that is best spent gathering photons to improve the signal in the signal-to-noise ratio. Noise Reduction Software The best way to reduce noise is to increase the signal. After that should come proper calibration with a good master dark frame and a good master bias frame to remove dark current. Even after this, noise may be noticeable or objectionable in a low signal-to-noise ratio image that has been stretched to bring out faint detail. As a last resort, application of a noise-reduction filter can be applied to the image. Software such as Noise Ninja, Grain Surgery and Noiseware do a remarkable job of analyzing the noise in an image and then blurring it to reduce it without losing much of the detail in an image. In-Camera Processing Modern DSLR cameras are marvels of engineering. There are some pretty smart people designing them and millions of dollars are being spent on their development. Every generation of new cameras shows improvements in noise reduction and image quality. CMOS sensors allow for transistors to be located on the pixel photosite itself. These electronic circuits are used for image processing and noise reduction in the collected data even before it is read out and written into the raw file. It's safe to assume that some sophisticated processing is also going after the sensor is read out, so what we are seeing as a "raw" file is probably not exactly the same thing as true "raw" data from an astronomical CCD camera. The data from an astronomical CCD camera has to be "pure" because it can be used for science. The data out of a consumer, or even professional DSLRs has more of a "black box" aspect to it, in that we can not be completely sure of what the camera engineers have done to it. Much of this "secret-sauce" information is considered proprietary and is closely guarded by the manufacturers. This is why complicated equations for calculating the total noise in an image are not presented here. This data processing for noise reduction takes place before the file is written and there is no way to turn it off or modify it. We are not even talking about the advertised "long-exposure noise reduction" that takes place after an image is taken by the camera making a post-exposure dark frame and automatically subtracting it in the camera before the file is written to the memory card. This is a custom function that can be turned on or off in many cameras. For astrophotography, making many separate dark frames and averaging them together creates a superior dark frame for calibration purposes and produces better results than using in-camera automatic long-exposure noise reduction. Even with these considerations, DSLR images can benefit from calibration frames, especially from master dark frame subtraction, and flat-fielding for optical systems that suffer from vignetting. |
|||||||||
|
Back | Up | Next |