In digital astrophotography, it's all about signals and noise. Signal Signal is current that is generated by electrons that get counted and converted into numbers by the A/D converter. Noise is sometimes defined as any unwanted signal that shows up in a particular image. Technically it is not. Noise is random and non-repeatable as it appears from frame to frame and can come from various different sources. Any image pattern that repeats from frame to frame but is not part of the celestial object or sky, is undesirable signal. Because these undesirable signals repeat consistently from frame to frame, they can be removed with correct calibration procedures. The object signal comes from the photons that have traveled incredible distances across the universe to hit the sensor in the camera and get recorded and counted. This signal is recorded in a light frame - the actual exposure of the sky object. In addition to the signal of interest from the sky object, there are also spurious signals that are not of much interest, except in how to get rid of them. They are generated by heat inside the camera and electronics, the foreground sky brightness, and other sources. Vignetting and shadows from dust on the sensor cover glass modify the signal in undesirable ways. Individual pixels have different sensitivities, and some may be dead, or hot, producing uneven response across the sensor. These unwanted signals, modifications to the signal, and optical and sensitivity distortions can be separated from the object signal and corrected by proper calibration and processing. Calibration involves taking support frames, such as darks, flats and bias, in addition to the light frames. We will discuss these in detail in a later section. Noise Noise is also present in every image that we take. It is due to the statistical uncertainty in the arrival of photons from the object, and in the readout and counting of the electrons generated in the sensor. Noise can never really be removed from an image. However the signal of interest can be increased in relation to the noise present, making the image better.
The next step is improving the visibility and enhancing the aesthetic presentation of the signal from the astronomical object by digital processing in a program like Images Plus or Photoshop. Detecting the Signal in the Noise Photons that arrive from the object are the signal we are interested in. Unfortunately they also arrive with photons from the sky background. If the object is dim, and the sky is bright, it may be difficult, if not impossible, to detect the object. That's why we can't see stars in the daytime (except of course for the Sun). The ability to detect an object is determined by the contrast between the object and the sky background. This goes for both visual observations and astrophotography. The brightness of stars is measured in magnitudes, with each magnitude being 2.5 times brighter than the next. The brightness of extended deep-sky objects is also measured in magnitudes, but per square arc second. We can think of this as if a star were spread out over an area instead of being a point. The brightness of the sky background is also measured in magnitudes per square arc second. The darkest skies in the world at the premier professional observatories have skies that are about magnitude 21.9. Light-polluted observing locations have a sky brightness of about 17th magnitude per square arc second. This is about 5 magnitudes difference, or almost a factor of 100 times difference. Although we can shoot more total exposures and add or average them together under light polluted skies to equal longer ones taken under dark skies, this is the factor that we need to work with: 100x for the difference between shooting downtown in a city and on top of a remote mountain in Arizona or Chile. Our total exposure at a light-polluted observing site, made up of numerous shorter exposures, would need to be more than 100 times longer to get the same signal-to-noise ratio as an exposure taken under the darkest skies possible. It seems counterintuitive at first, but we can see, and photograph, extended deep-sky objects that are fainter than the brightness of the sky background. For example, we can see M1, the Crab Nebula, with a surface brightness of 20.5 mag/square arc sec, in a rural sky with a brightness of 18 mag/square arc sec. Here, the Crab is fainter than the sky background. We can think of it like this - photons are arriving from both the sky and the object at a given rate. As an example, lets say photons from the sky are arriving at a rate of 1,000 photons per second. The deep-sky extended object may only be producing photons at 100 photons per second. That's a lot less than the sky is producing, but the object's photons are added on top of those from the sky, so there are a total of 1,100 photons where the object is, and 1,000 photons where the sky background is. Detection becomes a question of contrast. Here it is about 10 percent, so we should be able to see it. The faintest outlying portions of the nebula may only be producing only 20 photons per second. This would produce a total of 1,020 photons against a sky background of 1,000 photons, or 2 percent difference, probably not enough contrast to be detected by the eye. In the case of digital astrophotography, because our sensors are linear, we can subtract out the skyfog. The problem is that due to the quantum nature of light there is an uncertainty in exactly how many photons will arrive in a given time, in this case, in one second. The amount of error is called "photon noise", and is calculated by Poisson statistics as the square root of the signal. Here it would be 33 photons (the square root of 1,100) for the object signal plus sky background signal. The bright part of the nebula could be distinguished because its 100 photons is greater than the roughly 33 photons of noise, a signal-to-noise ratio of 3 to 1. However, the fainter part of the nebula, which contributes only 20 photons, would be lost in the 33 photons of noise. The way to reduce the photon noise from the object is to make longer exposures, either by taking a single longer exposure, or by averaging together a series of shorter exposures. If we increase the exposure by a factor of 10, we will have gathered 10,000 photons from the sky background. We would have an additional 1,000 photons from the object for a total of 11,000 photons. The total noise of 105 photons here would be more than in the shorter exposure, but the signal-to-noise ratio of the bright part of the nebula would now be 10 to 1. At the 10 times longer exposure the faint part of the nebula would now have 200 photons of signal. It would probably now be just barely detectable at a signal-to-noise ratio of about 2 to 1. The way to reduce the photon noise from the sky background is to shoot under darker skies. This can mean shooting from a location that does not have as much light pollution, or shooting on a night when the moon is not up making the sky brighter. Visual Examples of Noise in Digital Cameras
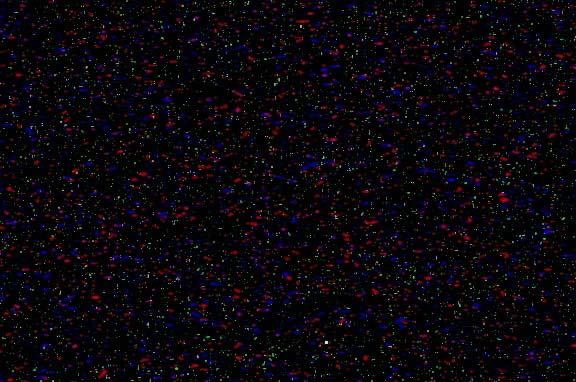
Fixed pattern noise includes hot pixels and color blotches that stay fixed in location. This type of noise gets worse with longer exposures and higher ISOs and higher ambient temperatures. Because it is fixed it can be calibrated out by subtracting a dark frame taken at the same temperature, exposure and ISO as the light frames.
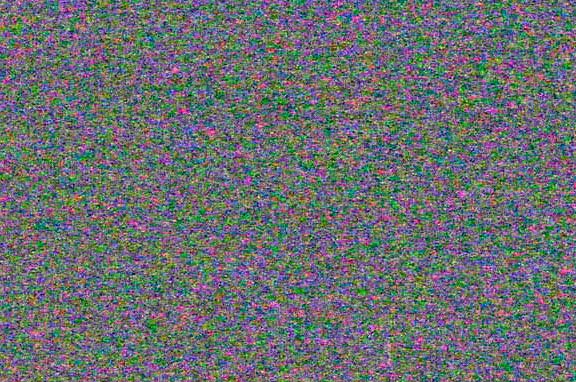
There will always be noise present in any image. Because noise is defined as random variations, it is different in every image, and cannot be removed by calibration.
In this example, both vertical and horizontal banding are present. It is most visible in shadow areas in images taken at high ISO speeds. It can be difficult to remove, but dithering the image - moving the scope slightly between exposures, can help. The best way to deal with these kinds of problems is by having more signal. |
|||||||||
|
Back | Up | Next |