Almost all consumer level DSLR cameras these days are being made with CCD or CMOS chips, or variations on these designs. The chief characteristics listed by manufacturer's marketing departments that define most DSLR cameras are the physical size of the chip and the number of individual pixels on it. The size of the chip is stated in millimeters and the number of pixels is usually given in "megapixels", or millions of pixels. For astrophotography purposes however, the characteristics we are most interested in are the pixel size, full-well capacity (how many photons can be recorded before a pixel saturates), the sensitivity of the chip, quantum efficiency, and the noise in the camera. These numbers are not usually released by camera manufacturers, but can usually be deduced from user tests. Roger N. Clark has a very informative Digital Camera Sensor Performance Summary with these numbers for various cameras. The most important thing for astrophotography is how the camera handles the signal in relation to how much noise is present in the camera. The most recent generation cameras from Canon and Nikon perform very well in these regards. Don't worry too much about the following technical terms now, they will be explained in detail later in Chapter 3. Important Camera Technical Characteristics
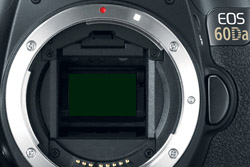
Camera manufacturers use clever technological tricks and sophisticated image data handling inside the camera to produce low-noise cameras. The noise characteristics of the latest generations of Canon and Nikon cameras produced since about 2004 - 2005 have been very good. Sensitivity, on the other hand, is directly related to quantum efficiency, pixel size and filter factors. The quantum efficiency of DSLR sensors seems to have been staying relatively fixed over the most recent generations of cameras. For normal daytime photography, where you have a lot of light and signal, smaller pixels are not a problem. Smaller pixels mean more resolution. More resolution means you can make larger prints. But in the real world, you are not going to see much difference in the results from an 8-megapixel camera compared to a 10-megapixel camera. As camera manufacturers shrink the size of pixels in their sensors, they have come up with some very effective techniques, such as using microlenses, to overcome the inherent problems that smaller pixels create. The total area of an individual pixel is usually not sensitive to light, only a certain percentage is. Some of the space is taken up by electronics on the pixel. One of the best methods is to use a small microlens over each pixel to gather photons from a larger area than the actual light-sensitive area on each pixel. This effectively increases the signal that is gathered for each pixel. What camera manufacturers seem to be improving in each new generation of DSLR cameras is noise. This is very important for low-light photography. Lowering the camera's readout noise, and sophisticated signal processing to reduce thermal signal really help produce low-noise cameras which are great for astrophotography. These improvements in camera technology work very well. Every new generation of camera seems to come out with more megapixels because this is a very attractive marketing feature. These smaller pixels have microlenses, and better electronics and better digital image processors, and the overall signal-to-noise ratio of these most recent cameras is very good. Physical Size of the Sensor This is the size of the area at the focal plane that the sensor occupies. It is normally about the size of a postage stamp in typical consumer DSLR cameras. "Full frame" sensors are 36mm x 24mm. This is the same size as traditional 35mm film and are usually found in the top-of-the-line professional model cameras. Canon sensors come in three basic sizes: approximately 36mm x 24mm, 29mm x 19mm, and 22.5mm x 15mm. Canon's entry level cameras all have 22.5mm x 15mm sensors. Nikon sensors come in two basic sizes: approximately 24mm x 16mm and 36mm x 24mm. Field of View and Crop Factor In the days of film, most photographers considered 35mm cameras as a kind of standard. Many photographers were used to thinking of lens coverage in terms of 35mm film, which was actually 36 mm x 24 mm in rectangular size. When digital cameras came along, their sensor sizes were initially smaller than 35 mm film. When the same lens was used on these digital cameras as on a 35mm film camera, they gave a smaller field of view because of the smaller sensor size. This became popularly referred to as a "multiplier" factor for lens coverage. A camera such as the Nikon D5000 was said to have a 1.5x multiplier factor. Photographers began to think that this was cool, that they were getting something for nothing. For example, a 200mm f/2.8 lens would somehow, magically, become a 300 mm f/2.8 lens! Camera manufacturers didn't exactly discourage this kind of perception. It is, however, incorrect. A smaller sensor does not multiply anything. What it does is crop the field of view. The image scale is exactly the same. A 200 mm lens still produces exactly the same size image as it did on a 35mm film camera, only the smaller sensor in the digital camera cannot take it all in, so it crops out the difference in size to give the same size field of view as a 300mm lens on 35mm film. If it was film, this would not be a good thing because you would have increased grain and a loss of sharpness because you would have to enlarge the image more. Luckily with the increased resolution and lower noise of digital sensors, this is not as much of a problem. Photographic sensors in DSLR cameras come in several different crop factors: 1.0x, 1.3x, 1.5x, and 1.6x. The crop factor considers a 35mm negative (36 x 24mm) to be standard, so a 36 x 24mm sensor would have a crop factor of 1.0x. A 23.7 x 15.6 (rounded to 24 x 16) would be a 1.5x crop factor (36/24 = 1.5) and so on. Canon entry-level and advanced-amateur DSLR cameras have a 1.6x crop factor. Equivalent Nikon models have a 1.5x crop factor. Full-frame 1.0x crop-factor sensors are only found in top-of-the-line professional models. Pixels and Megapixels Digital sensors have a certain number of individual pixels in them. Technically they are called photosites, but everyone calls them pixels. The total number of actual pixels determine the true optical resolution of the camera. The optical resolution is easily determined by counting the number of actual pixels in the sensor by multiplying the number in one dimension of the array by the number on the other side. A checker or chess board has 8 rows by 8 columns of squares, therefore it has 8x8 squares, for a total of 64 squares. Think of pixels the same way. For example, Canon's 60Da camera has a 22.3 mm x 14.9 mm rectangular sensor that has 5184 pixels on the long side and 3456 pixels on the short side. This makes up a mosaic, or grid of 5184 x 3456 pixels, for a total of 17,915,904 pixels. We round this number and call it 18 million pixels, or 18 megapixels, with mega meaning million. For most photography, the more pixels you have the better. More pixels mean higher resolution. More pixels also mean that you can make larger prints from the original file. Don't think that the number of megapixels in a camera sensor is the most important thing to consider in buying a camera. More pixels in the same space mean more resolution, but also require higher quality optics to deliver this resolution. In the real world many factors conspire to produce an image that does not take advantage of the full resolution of the sensor anyway. For example, for daytime photography, most shots are hand held, which reduces image resolution because of camera shake. For astrophotography, the seeing in long exposures usually reduces resolution. For very high megapixel cameras, you also need excellent optics and top-of-the-line camera lenses and telescopes to take advantage of their resolution. Spatial Resolution The number of pixels define the sensor's spatial resolution. For example, the Canon T2i (550D) has 18 million pixels in an array of 5184 x 3456 pixels in a 22.3 mm x 14.9 mm rectangular space. That means each pixel is 4.3 microns square in size. Smaller pixels can resolve more detail, such as in planetary photography, if the optics are capable of delivering it. Dynamic Range Dynamic range is the amount of difference between the brightest and darkest parts of a scene, or image, that a camera can record. Although human visual perception can encompass an enormous range of brightness, imaging devices cannot. They can only record detail in the highlights and shadows within a particular brightness range. In photographic terms, for today's high-end consumer DSLRs, this dynamic range is usually about 8 - 10 stops for a raw file. The dynamic range in a digital camera is defined as the full-well capacity divided by the noise. The full well capacity is the number of electrons that can be stored in a pixel. Dynamic range usually goes down as higher ISO speeds are used in a digital camera. Camera Noise Noise and unwanted signals are some of the biggest problems we have to face with digital cameras, especially for astrophotography. Some cameras are much better than others in controlling noise. This is accomplished by sophisticated chip designs and image-processing algorithms made possible by powerful computer chips inside the camera. Other strategies, such as in-camera dark-frame subtraction, are also employed by camera manufacturers to deal with long-exposure thermal current created by heat inside of the camera. In this process a "dark frame" (where no light hits the sensor) of equal exposure length to the "light" frame (the actual real exposure of the object of interest) is made immediately after a time exposure. Usually any exposure longer than 1 second can be affected by thermal noise. This dark frame takes a picture of just the thermal current and then it is subtracted from the light frame to remove the thermal signal and improve the image. In-camera long-exposure noise reduction works fairly well for normal photography, but astrophotographers have found it better to make their own separate dark frames and process them and the light frames later. This will be explained in detail in the chapter on how digital cameras work. ISO and Sensitivity The ISO rating of a DSLR digital camera usually specifies its sensitivity to light in relation to the level of its digital signal output. ISO can be measured different ways in digital cameras. ISO is an abbreviation for International Organization for Standardization that sets standards and definitions for how ISO sensitivity is measured. Digital cameras with CCD and CMOS digital sensors really only have one basic level of sensitivity to light. This sensitivity is defined by the sensors quantum efficiency, fill factor, microlens array, Bayer filter transmission characteristics, and other factors. These can't really be changed once a camera is manufactured. DSLR cameras have the ability to change ISO in the camera, but this is done by changing the gain and electronically amplifying the signal that the sensor produces. Most digital sensors have a native ISO of around 100 or 200, depending on how it is measured, but the ISO can be set to higher speeds. This, however, decreases the signal-to-noise ratio in the image when the exposure is reduced as the ISO is increased. For a given light level, shorter exposures mean less signal, at any ISO. Compared to film, when measured at the same signal-to-noise ratio, the CCD and CMOS sensors in DSLR cameras are much more sensitive than film. Quantum Efficiency A digital camera's quantum efficiency describes the percentage of photons that hit a CCD or CMOS sensor that are actually detected. If half of the photons are detected, then the quantum efficiency of the sensor is 50 percent. Quantum efficiency varies by the wavelength of light. A sensor's quantum efficiency is important because a camera with a higher quantum efficiency can produce a better quality image in a given time because it records more photons. Most one-shot color cameras, either DSLR or specialized astronomical cameras, have similar quantum efficiency. Monochrome astronomical CCD cameras usually have better quantum efficiency than one-shot color cameras. Red Sensitivity and Long-wavelength Filters Normally the CMOS and CCD sensors used in DSLR cameras are very sensitive to red light. Most DSLRs however, are designed with a built-in, low-pass, long-wavelength cutoff filter in front of the sensor. The low-pass characteristics of the filter are designed to prevent moire and aliasing. The long-wavelength filtration is designed to improve color reproduction and make it more like our human visual perception. The problem is that the long-wavelength filtration also filters out most of the light at 656.5nm, the wavelength of hydrogen-alpha. This is the wavelength of the red light that is emitted by hydrogen emission nebulae. Filtering out most of this light is a problem for astrophotography if you want to take pictures of these red nebulae, which are some of the largest and most beautiful objects in the night sky. Canon made the 20Da and 60Da, a DSLR camera body specifically made for astrophotography to address this problem. These two cameras have a special long-wavelength filter that passes more of the hydrogen-alpha wavelength. In the Canon 60Da, the filter passes 3 times more hydrogen-alpha than the normal stock 60D. It is possible to modify a DSLR camera for astrophotography of emission nebulae by removing or replacing the long-wavelength filter and substituting one that passes almost all of the hydrogen-alpha emission wavelength. A replacement filter of the same thickness maintains the camera's autofocus and manual visual focus capabilities. A replacement filter that filters out ultra-violet and infra-red wavelengths past the hydrogen-alpha wavelength can be very useful in refractive optical systems where color correction is important. Removing or replacing the long-wavelength filter, of course, invalidates the manufacturer's warranty and runs the risk of ruining the camera if not done correctly. However, astrophotographers have successfully removed the filters in both Nikon and Canon cameras and produced excellent images of objects with red hydrogen-alpha emission wavelengths. Third-party vendors such as Gary Honis, Hap Griffin, Lifepixel, MaxMax, and Andy Ellis in the UK can modify your camera by removing or replacing the long-wavelength filter for a fee.
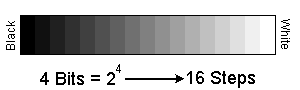
Bit Depth and Tonal Resolution In addition to their spatial resolution and dynamic range, each camera also has a tonal resolution. This means how many different tones, or steps of gray, can be differentiated from the darkest to the brightest tones that the camera can record. CCDs and CMOS sensors are actually analog sensors. But because we want to work on an image in a computer, we have to digitize it and break the continuous tones up into discrete steps so they can be represented by whole numbers that a computer needs to work with. This is called quantizing the information and it is done by the analog to digital converter in the sensor. Tonal resolution is described in bit-depth. A "Bit" is a Binary Digit. A bit can either be on or off, a one or a zero. Perhaps because we have 10 fingers, we normally work with 10 digits (0 through 9) in a numbering system called base 10. Computers work with only two digits, a base 2 numbering system, because they work with transistors instead of fingers. Transistors used in digital electronics are operated in an on-off mode, so when they represent a number it can only be a one (on) or a zero (off). Base two numbers are written in binary notation and are usually talked about in terms of "bits". The "bi" in binary meaning two, like the two wheels on a bicycle. Bit Depth is represented in exponential notation in the form 2x, or 2 to the Xth power, which means 2 times itself x number of times. We normally just ignore the exponential notation and say that a tonal depth of 28 is 8 bits. This represents 256 individual steps of tone. For example: 22 means 2 x 2 which equals 4. 23 means 2 x 2 x 2 which equals 8. 24 is 2 x 2 x 2 x 2 = 16. 28 is 2 x 2 x 2 x 2 x 2 x 2 x 2 x 2 = 256. Graphically:
8 bits of tonal depth, with 256 steps, is the minimum required to fool the eye into thinking there are continuous tones in an image. DSLR cameras usually work in 12 bits of tonal depth, or 4096 individual steps of gray. The latest models are now working in 14 bits or 16,384 steps. Dedicated astronomical CCD cameras usually have 16 bits of tonal depth or 65,563 steps. More bit depth is especially helpful in the shadow areas because detail can be differentiated from noise. Greater bit depth allows better tonal manipulations and improved shadow detail. Two colors or gray tones that may be very close can be distinguished at a higher bit depth. A lower bit depth may record those two different colors or tones as the same. The more bit depth we have, the closer the approximation to a continuous tone image we have. If major editing must be done to an image, working at a high bit depth is a great advantage. Having more steps between black and white helps when we start manipulating the data to enhance the parts of the image that we are interested in. When we stretch the data in a curves or levels operation, the limited number of steps we start with can become an even smaller number, and posterization can occur. Posterization is when a visually continuous tone breaks up into perceptible steps or banding of tone or color. Bit Depth and Color Color images are made up of three individual black and white channels, one each of red, green and blue. Each of these grayscale channels divides the color they represent into the number of steps defined by the bit depth. Because there are three channels, the total number must be multiplied by three to get the bit depth for the color image that these three channels represent. Therefore, 8-bits per 3 color channels equals 24 bits total. Each channel has 256 steps, so 256 x 256 x 256 produces 16,777,216 possible colors. Even though our cameras may record information in 12 or 14 bits, and our computers can easily work with them, our output devices are almost always limited to 8 bits per channel, or 24 bits total. Monitors and printers work in 24-bit color. Before outputting an original image file, we must convert it to 24 bits for color output. Still, this leaves us with more than 16 million colors to work with, which are usually more than enough. File sizes The file sizes that digital cameras create can be confusing for a number of different reasons.
Raw vs JPEG The raw file in a dedicated astronomical CCD camera is the unmanipulated data straight from the sensor. This is the most pristine data you can get out of the camera. In DSLR cameras, the true raw data is almost always massaged in some way before it is written to the raw file, so in truth, it is not what purists would consider raw. However a DSLR camera raw file is the most basic data we can get to work with that does not have tonal curves, sharpening or color correction applied to it. DSLR camera raw data can be better calibrated with dark, bias and flat-field frames than can JPEG data. Most of us just shoot JPEG files in the camera for normal daytime images. The JPEG file is processed in the camera according to the parameters we set in the menus for sharpening, contrast and color, to make it look pleasing. The camera will do a very good job of processing the image of a normal daytime scene if it is exposed correctly. It will also do as good a job as it can on an astronomical image, however there is usually much more that we can do to the original raw data to make it look better for astronomical subjects. This is why we should always shoot raw files for astrophotography. The additional bit depth, especially, will help tremendously when we stretch the image and increase its contrast to bring out faint details. JPEG Quality Settings DSLR cameras usually offer different JPEG quality settings which vary the amount of compression and the resulting quality of the image. They are usually labeled with such terms as "Fine", "Normal" and "Basic". Fine would be the highest quality setting, which would give the smallest compression ratio and yield the largest JPEG file size. Basic would give the highest compression ratio and yield the smallest JPEG file size, but would also be the worst quality. No matter what the JPEG quality setting is, the file, when opened will always open to the true optical resolution of the sensor if that is the resolution that was selected in the camera. For example, a Normal, medium-quality JPEG image file that was shot in the camera at full optical resolution may be stored on the memory card in the camera as a 3 MB JPEG file. A Fine, high-quality JPEG image file that was shot at the same full optical resolution may be stored on the memory card in the camera as a 5 MB file. They will both open to 23.4 MB files when opened in an image processing program. The Fine-quality JPEG will have much better quality in terms of color and detail and will have less JPEG compression artifacts than the Normal-quality JPEG file. In-Camera Adjustments When shooting JPEGs in the camera, the original raw data must be processed to make it look like a normal photograph that is suitable for human visual perception. Most of this processing is transparent to the user, but several different parameters can be adjusted in the camera by the user:
These in-camera settings are only applied to JPEG files, they are not applied to raw files. DSLR Camera Features In addition to camera attributes, manufacturers also offer dozens and dozens of camera features. We won't cover all of them here, but we will discuss those of interest to astrophotographers.
High-Definition Video Some features, like the ability to shoot high-definition video, are not useful for deep-sky astrophotography, but can be a lot of fun for normal daytime photography. Some astrophotographers ask if high-definition video can be used for high-resolution planetary work. The problem is that to produce the 1920 x 1080 pixels used in the high-definition video, the sensors original native resolution must be downsampled. This is not a good thing for imaging high-resolution planetary detail. However, Canon's 60D, 60Da and 550D (Digital Rebel T2i) have a special video recording mode called Movie Crop Mode that crops the central 640 x 480 pixel area of the sensor and record VGA video at 640x480 pixels at 60 frames per second. This can be very useful for planetary imaging. Canon's other cameras, that do not record high-definition video, but that do have Live View, can also be used in another manner for planetary imaging. The analog video signal from the Live View mode can be captured on a computer. When the 5x zoom function is used on the Live View, the resulting video is captured at 1:1, or close to 1:1, to the sensor's native resolution. This video can also be used for high-resolution planetary imaging. The captured video can then be used in a program like Registax where the software picks out only the best frames for sharpness, and stacks them to improve the signal-to-noise ratio.
|
|||||||||||||||||||||||
|
Back | Up | Next |